Ko/TF2/Team-Specific Doors: Difference between revisions
No edit summary |
m (obsolete language category) |
||
| (8 intermediate revisions by 6 users not shown) | |||
| Line 1: | Line 1: | ||
Team-Specific Doors | {{lang|TF2/Team-Specific Doors}} | ||
팀-전용 문들은 오로지 한 팀을 위해서만 열립니다, 그리고 종종 리스폰 앞이나 컨트롤 포인트 맵에서는 기지 근처에 놓기도 합니다. | |||
== | ==강좌 - 기본 팀-전용 문== | ||
이 예제에서는, 우리는 레드 스폰지점에 오로지 레드 팀만을 위한 문을 만들겁니다. | |||
=== | ===filter_activator_tfteam=== | ||
우선, {{L|filter_activator_tfteam}}엔티티를 놓아주세요. 이것은 어떤 팀이 문을 열수 있는지를 결정하는 필터 입니다. 당신은 이것의 Team, Filter mode, 그리고 Name을 적절하게 설정해야합니다. 이 예제에서는, Team 은 Red로 Filter mode는 "Allow entities that match criteria"로 설정하고 Name은 red_filter로 하겟습니다. | |||
당신은 맵마다 하나의 {{L|filter_activator_tfteam}}가 있어야 합니다. 당신의 모든 팀-전용 트리거들은 이 두개의 엔티티들중 하나를 참고할수 있습니다. 이것은 어떤 기억하기에 쉬운 장소에 놓는 것은 좋은 생각입니다. 이 예제에서는, 레드 팀의 스폰지점에다가 우리의 red_filter를 놓을것입니다. | |||
=== | ===prop_dynamic=== | ||
[[File:TeamSpecificDoor-prop_dynamic.jpg|thumb|right|200px| | [[File:TeamSpecificDoor-prop_dynamic.jpg|thumb|right|200px|prop_dynamic.]] | ||
다음은,{{L|prop_dynamic}}을 놓고 이것의 World Model을 멋진 문으로 설정해주세요. 이 예제에서 우리는 use models/props_gameplay/door_slide_large_door.mdl을 사용할겁니다. "parent"설정을 {{L|func_door}}의 이름과 같게 하는것을 잊지 마십시요, 그렇지 않으면 모델은 트리거가 작동 됬는데도 정지된 상태로 유지될 겁니다. {{clr}} | |||
=== | ===func_door=== | ||
[[File:TeamSpecificDoor-func_door.jpg|thumb|right|200px| | [[File:TeamSpecificDoor-func_door.jpg|thumb|right|200px|func_door.]] | ||
문의 두번째 부분은 문의 방향을 결정하는 {{L|func_door}} [[Entity creation#Brush-based_entity_creation|brush-based entity]]입니다. 이 엔티티는 모델의 방향을 계획하는 유일한 엔티티입니다, tools/toolsnodraw 텍스쳐를 사용하세요.func_door는 이제 어떤 플레이어가 뛰어들어도 보이지 않는 방어막처럼 활동합니다, 그래서 모양을 최대한 모델의 크기와 가깝게 하고 두겹으로 겹치는데에는 최고입니다. | |||
당신이 설정해야할 {{L|func_door}}의 숫자들: | |||
::{| class=standard-table | ::{| class=standard-table | ||
! | ! 설정 이름 || 설명 || 값 | ||
|- | |- | ||
| Name || | | Name || 이것은 적절한 것이여야 합니다, 예를 들자면 저희 예제에서는 door_red_spawn_01입니다. || door_red_spawn_01 | ||
|- | |- | ||
| Speed || | | Speed || 이것은 얼마나 문이 빠르게 열리고 닫히는지를 바꿉니다. 보통, 400아니면 500으로 설정하면 당신은 문이 열릴때까지 기다릴필요가 없습니다. || | ||
|- | |- | ||
| Move direction || | | Move direction || 이것은 문이 열릴때 어느 방향으로 열릴지 결정합니다. 이 예제에서는 위로 열립니다, 끌어 당기는 방식으로 설정하실수 있습니다. (이것은 업데이트 되었습니다, 이제는 끌어당기는 방식 대신에 xyz 숫자들이 있습니다). || Up (-90 0 0) | ||
|- | |- | ||
| Lip || | | Lip || 이것이 완전하게 열렷을때 Hammer에서 얼마나 크게 튀어나올지 결정합니다. 이 예제에서는, 3으로 설정합니다. || 3 | ||
|- | |- | ||
| Delay Before Reset || | | Delay Before Reset || -1로 설정하면 누군가가 출입구에 있는이상 문은 절대로 닫히지 않습니다. 그렇지 않으면, 트리거에서 모든 사람들이 사라질때까지 문이 닫히고 절대로 다시 열리지 않습니다. -1이 아닌 다른 숫자는 플레이어들을 비통하게 할수 있습니다. (즉 한 팀의 플레이어가 팀 전체의 스폰장소를 막고 있을수 있습니다). || -1 | ||
|} | |} | ||
다음으로, 우리는 {{L|func_door}}의 설정에 Flags 탭으로 가서, Touch Opens 가 체크해제 되어있는지 확인해야합니다. 만약 체크 되어있었다면, 다른 팀이 문에 닿음으로써 필터를 우회하고 문을 열게 할수 있습니다! 또한, Toggle을 체크해주세요. | |||
이제 우리가 우리의 {{L|func_door}}에 문 모델의 결정권을 주어야 합니다. [[prop_dynamic] 문 모델을 선택하시고, 이것의 Parent 설정을 우리의 {{L|func_door}} 이름으로 설정해주세요. 이번 경우에는, door_red_spawn_01입니다.{{clr}} | |||
=== | ===trigger_multiple=== | ||
[[ | [[File:TeamSpecificDoor-Trigger_Multiple.jpg|thumb|right|200px|trigger_multiple.]] | ||
문의 3번째 그리고 마지막 요소인 플레이어가 트리거에 닿았을때 문이 열릴건지 또는 닫힐 건지를 말해주는 {{L|trigger_multiple}} 엔티티 입니다. | |||
트리거는 다양한 각도들로부터 플레이어들이 다가와도 다룰수 있을 만큼의 크기가 되어야합니다 그리고 반드시 플레이어가 문에 닿기전에 문이 열려야 합니다. 당신은 보통 트리거의 크기를 쭉 늘려서 문의 양쪽 면에서도 작동할수 있게 하기를 원할겁니다, 두개를 만드는 것보단 낳겟죠. tools/toolstrigger 텍스쳐를 이용하셔야 합니다. | |||
"Delay Before Reset" 이 0으로 설정되었는지 확인하세요. 기본적으로는 -1로 설정되어 있습니다, 이것은 한번열리면 다시는 닫히지 않는 것을 뜻합니다. | |||
{{L|trigger_multiple}}의 설정 창에서 Outputs 탭으로 가주세요. 당신은 보시는 것과 같이 두개의 Outputs를 추가 해야 합니다. : | |||
::{| class=standard-table | ::{| class=standard-table | ||
! || My Output || Target Entity || Target Input || Parameter || Delay || Only Once | ! || My Output || Target Entity || Target Input || Parameter || Delay || Only Once | ||
|- | |- | ||
| [[ | | [[File:Io11.png]] || OnEndTouchAll || door_red_spawn_01 || Close || <none> || 0.00 || No | ||
|- | |- | ||
| [[ | | [[File:Io11.png]] || OnStartTouchAll || door_red_spawn_01 || Open || <none> || 0.00 || No | ||
|} | |} | ||
마지막으로, {{L|trigger_multiple}}의 Filter Name 설정이 당신의 {{L|filter_activator_tfteam}}의 이름으로 설정해야 팀-전용 문이 됩니다. 이번 경우에는, red_filter입니다. | |||
됫습니다, 우리는 오로지 레드팀에게만 열릴 문을 만들었습니다! | |||
[https://dl.dropbox.com/u/12664902/onlinesdk/hammer/team_specific_doors.zip | [https://dl.dropbox.com/u/12664902/onlinesdk/hammer/team_specific_doors.zip 데모 맵을 여기서 다운 받으세요.]{{clr}} | ||
== | == 디자인 개론 == | ||
===Placement=== | ===Placement=== | ||
공론으로, 팀-전용 문들은 어디에나 놓을수 있습니다, 하지만 매우 조심하세요 왜냐면 그들은 맵의 밸런스를 크게 붕괴시킬수 있습니다. | |||
=== | ===충돌=== | ||
공식 맵들의 문들은 그들의 {{L|prop_dynamic}}의 Collisions 설정이 Not Solid로 되어있다. 이것은 꼭 필요하지 않습니다, 그러나 이것은 매우 효율적입니다. 이 경우에는, 문의 {{L|func_door}}가 이것의 충돌을 결정합니다, 그리곤 대게 충분히 정확합니다. | |||
=== | ===건축=== | ||
{{L|func_nobuild}} [[Entity creation#Brush-based_entity_creation|brush-based entity]]를 출입구에 추가하는것 또한 필요합니다. 이것은 엔지니어들이 어떤 건물들을 예를 들자면 센트리 건들이나 디스펜서들을 출입구에 설치하는 것을 막아줍니다. 그렇지 않으면 다양한 문제들이 일어납니다 : 건물은 위로 문이 닫히고 열리고 하는것은 보기에 비현실적으로 보입니다, 그리고 당신이 설정에서 "Force-closed"를 설정에서 "yes"라고 하지않았는데도 문이 열리는 것을 방지합니다. (어쨋건 그 설정은 플레이어가 문 모델에 끼는것을 방지하기 위해서 항상 설정이 "No"로 되어있어야 합니다.) | |||
== | == 다른 볼것.. == | ||
* | * {{L|TF2/Team-Specific Barriers}} | ||
* | * {{L|TF2/Setup Gates}} | ||
* | * {{L|TF2/Respawn Areas|리스폰 지역}} | ||
* | * {{L|Team Fortress 2 Level Creation|카테고리 : 팀 포트리스2 레벨디자인}} | ||
{{ACategory|Level Design}} | |||
{{ACategory|Team Fortress 2}} | |||
Latest revision as of 02:37, 22 August 2024
팀-전용 문들은 오로지 한 팀을 위해서만 열립니다, 그리고 종종 리스폰 앞이나 컨트롤 포인트 맵에서는 기지 근처에 놓기도 합니다.
강좌 - 기본 팀-전용 문
이 예제에서는, 우리는 레드 스폰지점에 오로지 레드 팀만을 위한 문을 만들겁니다.
filter_activator_tfteam
우선, filter_activator_tfteam엔티티를 놓아주세요. 이것은 어떤 팀이 문을 열수 있는지를 결정하는 필터 입니다. 당신은 이것의 Team, Filter mode, 그리고 Name을 적절하게 설정해야합니다. 이 예제에서는, Team 은 Red로 Filter mode는 "Allow entities that match criteria"로 설정하고 Name은 red_filter로 하겟습니다.
당신은 맵마다 하나의 filter_activator_tfteam가 있어야 합니다. 당신의 모든 팀-전용 트리거들은 이 두개의 엔티티들중 하나를 참고할수 있습니다. 이것은 어떤 기억하기에 쉬운 장소에 놓는 것은 좋은 생각입니다. 이 예제에서는, 레드 팀의 스폰지점에다가 우리의 red_filter를 놓을것입니다.
prop_dynamic
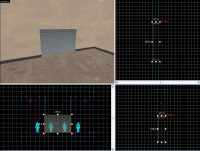
다음은,prop_dynamic을 놓고 이것의 World Model을 멋진 문으로 설정해주세요. 이 예제에서 우리는 use models/props_gameplay/door_slide_large_door.mdl을 사용할겁니다. "parent"설정을 func_door의 이름과 같게 하는것을 잊지 마십시요, 그렇지 않으면 모델은 트리거가 작동 됬는데도 정지된 상태로 유지될 겁니다.
func_door
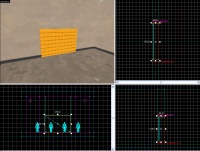
문의 두번째 부분은 문의 방향을 결정하는 func_door brush-based entity입니다. 이 엔티티는 모델의 방향을 계획하는 유일한 엔티티입니다, tools/toolsnodraw 텍스쳐를 사용하세요.func_door는 이제 어떤 플레이어가 뛰어들어도 보이지 않는 방어막처럼 활동합니다, 그래서 모양을 최대한 모델의 크기와 가깝게 하고 두겹으로 겹치는데에는 최고입니다.
당신이 설정해야할 func_door의 숫자들:
설정 이름 설명 값 Name 이것은 적절한 것이여야 합니다, 예를 들자면 저희 예제에서는 door_red_spawn_01입니다. door_red_spawn_01 Speed 이것은 얼마나 문이 빠르게 열리고 닫히는지를 바꿉니다. 보통, 400아니면 500으로 설정하면 당신은 문이 열릴때까지 기다릴필요가 없습니다. Move direction 이것은 문이 열릴때 어느 방향으로 열릴지 결정합니다. 이 예제에서는 위로 열립니다, 끌어 당기는 방식으로 설정하실수 있습니다. (이것은 업데이트 되었습니다, 이제는 끌어당기는 방식 대신에 xyz 숫자들이 있습니다). Up (-90 0 0) Lip 이것이 완전하게 열렷을때 Hammer에서 얼마나 크게 튀어나올지 결정합니다. 이 예제에서는, 3으로 설정합니다. 3 Delay Before Reset -1로 설정하면 누군가가 출입구에 있는이상 문은 절대로 닫히지 않습니다. 그렇지 않으면, 트리거에서 모든 사람들이 사라질때까지 문이 닫히고 절대로 다시 열리지 않습니다. -1이 아닌 다른 숫자는 플레이어들을 비통하게 할수 있습니다. (즉 한 팀의 플레이어가 팀 전체의 스폰장소를 막고 있을수 있습니다). -1
다음으로, 우리는 func_door의 설정에 Flags 탭으로 가서, Touch Opens 가 체크해제 되어있는지 확인해야합니다. 만약 체크 되어있었다면, 다른 팀이 문에 닿음으로써 필터를 우회하고 문을 열게 할수 있습니다! 또한, Toggle을 체크해주세요.
이제 우리가 우리의 func_door에 문 모델의 결정권을 주어야 합니다. [[prop_dynamic] 문 모델을 선택하시고, 이것의 Parent 설정을 우리의 func_door 이름으로 설정해주세요. 이번 경우에는, door_red_spawn_01입니다.
trigger_multiple
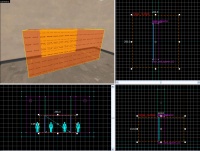
문의 3번째 그리고 마지막 요소인 플레이어가 트리거에 닿았을때 문이 열릴건지 또는 닫힐 건지를 말해주는 trigger_multiple 엔티티 입니다.
트리거는 다양한 각도들로부터 플레이어들이 다가와도 다룰수 있을 만큼의 크기가 되어야합니다 그리고 반드시 플레이어가 문에 닿기전에 문이 열려야 합니다. 당신은 보통 트리거의 크기를 쭉 늘려서 문의 양쪽 면에서도 작동할수 있게 하기를 원할겁니다, 두개를 만드는 것보단 낳겟죠. tools/toolstrigger 텍스쳐를 이용하셔야 합니다.
"Delay Before Reset" 이 0으로 설정되었는지 확인하세요. 기본적으로는 -1로 설정되어 있습니다, 이것은 한번열리면 다시는 닫히지 않는 것을 뜻합니다.
trigger_multiple의 설정 창에서 Outputs 탭으로 가주세요. 당신은 보시는 것과 같이 두개의 Outputs를 추가 해야 합니다. :
마지막으로, trigger_multiple의 Filter Name 설정이 당신의 filter_activator_tfteam의 이름으로 설정해야 팀-전용 문이 됩니다. 이번 경우에는, red_filter입니다.
됫습니다, 우리는 오로지 레드팀에게만 열릴 문을 만들었습니다!
디자인 개론
Placement
공론으로, 팀-전용 문들은 어디에나 놓을수 있습니다, 하지만 매우 조심하세요 왜냐면 그들은 맵의 밸런스를 크게 붕괴시킬수 있습니다.
충돌
공식 맵들의 문들은 그들의 prop_dynamic의 Collisions 설정이 Not Solid로 되어있다. 이것은 꼭 필요하지 않습니다, 그러나 이것은 매우 효율적입니다. 이 경우에는, 문의 func_door가 이것의 충돌을 결정합니다, 그리곤 대게 충분히 정확합니다.
건축
func_nobuild brush-based entity를 출입구에 추가하는것 또한 필요합니다. 이것은 엔지니어들이 어떤 건물들을 예를 들자면 센트리 건들이나 디스펜서들을 출입구에 설치하는 것을 막아줍니다. 그렇지 않으면 다양한 문제들이 일어납니다 : 건물은 위로 문이 닫히고 열리고 하는것은 보기에 비현실적으로 보입니다, 그리고 당신이 설정에서 "Force-closed"를 설정에서 "yes"라고 하지않았는데도 문이 열리는 것을 방지합니다. (어쨋건 그 설정은 플레이어가 문 모델에 끼는것을 방지하기 위해서 항상 설정이 "No"로 되어있어야 합니다.)


