Basic Construction: Difference between revisions
No edit summary |
m (Nesciuse moved page Basic Construction/en to Basic Construction without leaving a redirect: Move en subpage to basepage) |
||
| (10 intermediate revisions by 7 users not shown) | |||
| Line 1: | Line 1: | ||
{{ | {{LanguageBar}} | ||
}} | |||
{{first room menu}} | {{first room menu}} | ||
Simple 3D solids (cubes, cylinders, etc.) are referred to as [[brush]]es inside the Hammer editor. | Simple 3D solids (cubes, cylinders, etc.) are referred to as [[brush]]es inside the Hammer editor. These objects are the basic building blocks for all maps built for Source. | ||
Floors, walls and ceilings—in short all geometry other than [[model]]s—consist of brushes. | Floors, walls and ceilings—in short all geometry other than [[model]]s—consist of brushes. | ||
== Creating brushes == | == Creating brushes == | ||
#Select the {{hammer block}}. | #Select the {{hammer block}}. | ||
#Specify the size of your brush by clicking and dragging your mouse in the Top 2D View (the upper-right window pane by default) to create a box, as shown in Figure 2. | #Specify the size of your brush by clicking and dragging your mouse in the Top 2D View (the upper-right window pane by default) to create a box, as shown in Figure 2. | ||
| Line 22: | Line 14: | ||
{{tip|If your object does not appear textured already, click on the Camera view and go to '''View''' > '''3D Textured Polygons''' to view a textured version of your object.}} | {{tip|If your object does not appear textured already, click on the Camera view and go to '''View''' > '''3D Textured Polygons''' to view a textured version of your object.}} | ||
{| | |||
| [[File:Hammer blocktool.png|thumb|left|300px| '''Fig. 1''' The Block Tool.]] | |||
| [[File:Hammer top2dview1.png|thumb|left|380px| '''Fig. 2''' Clicking and dragging to create a brush.]] | |||
|} | |||
== Selecting brushes == | == Selecting brushes == | ||
[[File:hammer_selectiontool.png|thumb|left|300px|link=Hammer Selection Tool|The Selection Tool.]] | |||
[[ | |||
Click on the {{hammer select}}. It is used to isolate an object or group of objects you wish to manipulate. With the '''Selection Tool''' active, highlight your brush by clicking on it in one of the windows. (In a 2D window click on the edges or center of the brush. In the Camera view, click anywhere on the object.) | Click on the {{hammer select}}. It is used to isolate an object or group of objects you wish to manipulate. With the '''Selection Tool''' active, highlight your brush by clicking on it in one of the windows. (In a 2D window click on the edges or center of the brush. In the Camera view, click anywhere on the object.) | ||
| Line 38: | Line 32: | ||
{{clr}} | {{clr}} | ||
== The | == The Grid == | ||
A grid is displayed in all the 2D views. By default, all objects snap to the grid. Although you can turn this off by pressing {{key|Shift|W}}, it is considered good practice to leave it on because it prevents [[leak]]s and other errors in your map. | A grid is displayed in all the 2D views. By default, all objects snap to the grid. Although you can turn this off by pressing {{key|Shift|W}}, it is considered good practice to leave it on because it prevents [[leak]]s and other errors in your map. | ||
The default grid size is 64 units, which means that each line is 64 units apart. You can change the grid size by: | The default grid size is 64 units, which means that each line is 64 units apart. You can change the grid size by: | ||
* Pressing {{key|[}} or clicking the '''Smaller Grid''' icon [[ | * Pressing {{key|[}} or {{key|Alt|A}} or clicking the '''Smaller Grid''' icon [[File:hammer_SmallerGrid.png|link=]]. This will make the grid half as small as before, allowing finer adjustments. | ||
* Pressing {{key|]}} or clicking the '''Larger Grid''' icon [[ | * Pressing {{key|]}} or {{key|Alt|S}} or clicking the '''Larger Grid''' icon [[File:hammer_LargerGrid.png|link=]]. This will make the grid twice as big, for larger adjustments. | ||
To help determine the appropriate scales needed for a playable map, please see the article on [[Dimensions]]. | To help determine the appropriate scales needed for a playable map, please see the article on [[Dimensions]]. | ||
== Resize, Rotate, & Skew == | == Resize, Rotate, & Skew == | ||
{{important|All three of the following operations ''can'' cause vertices to land '''off grid''' which normally is to be avoided, especially for [[world brush]]es. Resizing and skewing single axis-aligned cuboids for example is never problematic whereas rotating any brush by any angle other than 0, 90, 180, ... degrees always results in vertices off grid. Sometimes the {{hammer vertex}} is what you are actually looking for.}} | |||
==== Resize ==== | |||
: Select a brush using the {{hammer select}} and mouse over one of its eight white handles. The cursor should change to arrows, indicating along which axis you can move that handle. To resize, simply click and drag one of these handles. | :Scales the selection. Select a brush using the {{hammer select}} and mouse over one of its eight white handles. The cursor should change to arrows, indicating along which axis you can move that handle. To resize, simply click and drag one of these handles. | ||
: | :{| | ||
| [[File:Hammer resize1.png|frame|none|White squares on each corner mean the brush can be resized.]] | |||
: Select the object you wish to rotate using the {{hammer select}}, then click on the object once again. You should see the squares surrounding the object at the corners turn into circles. | | [[File:Hammer resize2.png|frame|none|Click and drag the edge up or down in any 2D view to resize.]] | ||
: | |} | ||
==== Rotate ==== | |||
: Select the object you wish to skew using the {{hammer select}}, then click twice on the object. You should see small white squares at the center of each edge of the object. | :Spins the selection. Select the object you wish to rotate using the {{hammer select}}, then click on the object once again. You should see the squares surrounding the object at the corners turn into circles. | ||
: | :{| | ||
| [[File:Hammer rotate1.png|frame|none|Circles on each corner mean the brush can be rotated.]] | |||
| [[File:Hammer rotate2.png|frame|none|Click and drag in a circle in any 2D view to rotate.]] | |||
|} | |||
==== Skew ==== | |||
:Distorts the selection along an axis. Select the object you wish to skew using the {{hammer select}}, then click twice on the object. You should see small white squares at the center of each edge of the object. | |||
:{| | |||
| [[File:Hammer skew1.png|frame|none|White squares at the center of each edge mean the brush can be skewed.]] | |||
| [[File:Hammer skew2.png|frame|none|Click & drag a white square in any 2D view to skew.]] | |||
|} | |||
{{Navbar|View Navigation|Your First Map|Creating a Room}} | {{Navbar|View Navigation|Your First Map|Creating a Room}} | ||
[[Category:Level Design]] | |||
[[Category:Level Design Tutorials]] | [[Category:Tutorials]] | ||
Latest revision as of 05:06, 12 July 2024
Simple 3D solids (cubes, cylinders, etc.) are referred to as brushes inside the Hammer editor. These objects are the basic building blocks for all maps built for Source.
Floors, walls and ceilings—in short all geometry other than models—consist of brushes.
Creating brushes
- Select the Block tool
 .
. - Specify the size of your brush by clicking and dragging your mouse in the Top 2D View (the upper-right window pane by default) to create a box, as shown in Figure 2.
- Create the object by pressing ↵ Enter. Alternatively, right-click inside the brush and choose Create Object.


Selecting brushes
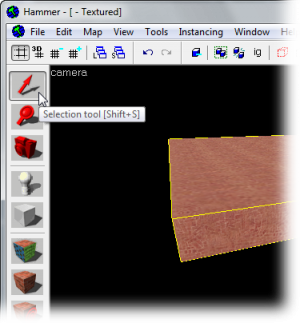
Click on the Selection tool ![]() . It is used to isolate an object or group of objects you wish to manipulate. With the Selection Tool active, highlight your brush by clicking on it in one of the windows. (In a 2D window click on the edges or center of the brush. In the Camera view, click anywhere on the object.)
. It is used to isolate an object or group of objects you wish to manipulate. With the Selection Tool active, highlight your brush by clicking on it in one of the windows. (In a 2D window click on the edges or center of the brush. In the Camera view, click anywhere on the object.)
You will notice that the selected brush will be highlighted with red and will get eight little white square handles in the 2D views. These handles allow you to rotate and transform the selection (see below).
Note that the brush looks like a 3D wireframe box. Flatten the box so that it looks like a thin slab and move it so that the camera is above it. Think of the brush as a 3D chunk of ceiling or floor or wall, not a room all by itself. It takes 6 brushes to make a room.
The Grid
A grid is displayed in all the 2D views. By default, all objects snap to the grid. Although you can turn this off by pressing ⇧ Shift+W, it is considered good practice to leave it on because it prevents leaks and other errors in your map.
The default grid size is 64 units, which means that each line is 64 units apart. You can change the grid size by:
- Pressing [ or Alt+A or clicking the Smaller Grid icon
 . This will make the grid half as small as before, allowing finer adjustments.
 - Pressing ] or Alt+S or clicking the Larger Grid icon
 . This will make the grid twice as big, for larger adjustments.
To help determine the appropriate scales needed for a playable map, please see the article on Dimensions.
Resize, Rotate, & Skew
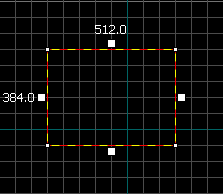
Resize
- Scales the selection. Select a brush using the Selection tool
 and mouse over one of its eight white handles. The cursor should change to arrows, indicating along which axis you can move that handle. To resize, simply click and drag one of these handles.
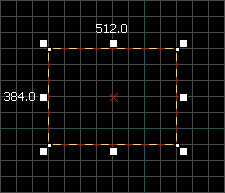 White squares on each corner mean the brush can be resized.
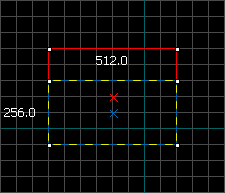 Click and drag the edge up or down in any 2D view to resize.


Rotate
- Spins the selection. Select the object you wish to rotate using the Selection tool , then click on the object once again. You should see the squares surrounding the object at the corners turn into circles.
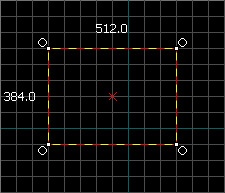 Circles on each corner mean the brush can be rotated.
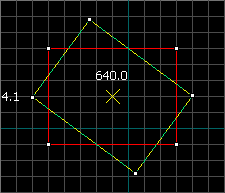 Click and drag in a circle in any 2D view to rotate.


Skew
- Distorts the selection along an axis. Select the object you wish to skew using the Selection tool , then click twice on the object. You should see small white squares at the center of each edge of the object.
 White squares at the center of each edge mean the brush can be skewed.
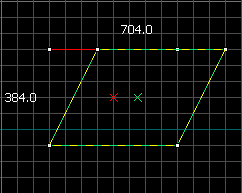 Click & drag a white square in any 2D view to skew.

