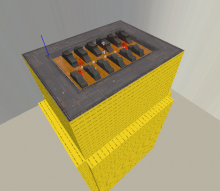
Grinders
| Skill Level
This tutorial expects you to have this amount of knowledge within the topic to follow along smoothly. | |||||
|---|---|---|---|---|---|
| Novice | Familiar | Competent | Proficient | Expert | |
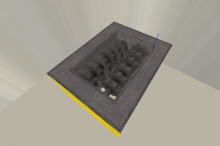
Grinders are an environmental hazard seen most prominently in the MvM map Mannhattan. They resemble a wood shredder, and they are a direct danger to not only humans, but robots as well. Be careful where and how you implement this element, as it may allow for tele-trapping and team killing.
This article will cover creating the Grinder outside of an MvM map, which means robots will not be affected by it.
Basic Setup
Creation
Create 4 brushes, essentially forming a 192w 288l 96h hole. Next, create two prop_dynamic entities and place them next to eachother. Set the World Model property to ![]()
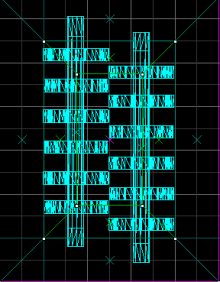
props_urban/urban_shredder, match your two models on the grid to make sure they don't clip. Now, flip one model horizontally by selecting it in the 3D view, then pressing right mouse button on it now in the 2D view, hover over the Flip Objects dropdown menu and hit Flip Horizontally. Position the blades as shown in the picture. After you're done, extend the shredder hole to 224 units deep. Create a 48w 48l 64h brush on one of the sides of the pit. Using the Clipping Tool, clip the brush once into a triangular shape, then using the Vertex Tool, grab the top vertice and expand your brush until it's height is 128 units tall, then copy and paste these brushes on each side, clip off anything that goes through the walls of our shredder. Turn the triangular slants into a func_detail entity, as to conserve resources. Now, we can texture our grinder's top faces with metal/ibeam001. Texture the inside faces with metal/ibeam001b. Don't do anything with the bottom yet, we'll cover that soon.
After texturing, connect the edges of the grinder's walls using the Vertex Tool. After you're done, make sure the triangles are func_detail and that there are no misaligned brushes/subunits and that your grinders are placed properly.
Once that's done, we will now get into making the large pit which items and corpses fall into upon being sucked into the grinder.
Texturing
Application
Now, we can texture our grinder's top faces with metal/ibeam001. Texture the inside faces with metal/ibeam001b. Don't do anything with the bottom yet, we'll cover that soon. After texturing, connect the edges of the grinder's walls using the Vertex Tool. After you're done, make sure the triangles are func_detail and that there are no misaligned brushes/subunits and that your grinders are placed properly.
Creating The Pit
Grinder Pit
As seen in Mannhattan, the grinder has a black void below to store corpses/things that fall in. This makes respawning someone who fell into this machine impossible.
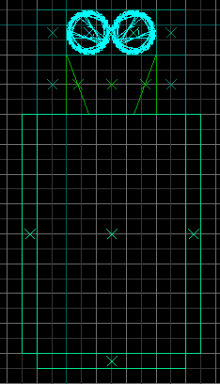
To start, create a 448w 544l 512h hollow box out of several brushes. Now, texture the bottom of the grinder with tools/toolsblack and the inside on the box. If you want to, place a func_illusionary just before the floor of our pit to hide anything that falls in.
Congratulations, you just completed the visual part of the grinder! Now, we can begin bringing it to life.
Making Grinders Rotate
Animation
You do not need any func_rotating entities to do this! Infact, the model itself simply has a rotating animation called shredderanim. Set the Default Animation property to this. Make sure your blades rotate inward, not outward! Flip them horizontally if they rotate the wrong way. Set the Collisions property to Not Solid and disable shadows.
Functionality
Scripting
Create two ambient_generic entities. Call the first one grinder_shred_human_snd, call the second one grinder_idle_snd. Set the volume of the first one to 4, the volume of the second one however should be 5. With that out of the way, go to the Flags section for the second one and uncheck Is NOT Looped and Start Silent. Place your ambient_generic entities right above the grinder, make sure they are centered and are positioned in the middle, between the two blades. Set the first entity's Sound Name property to grinder_human, the second one's should be grinder_loop.
Set the Sound Range property to 224 for both entities. Lower the second entity (the one with the looping sound) 32 units down into the grinder, it should ideally rest near the blades.
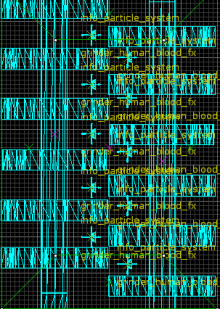
Let's get into making the shredder hurt people. Create a 192w 288l 720h brush with the texture tools/toolstrigger. Make it a trigger_multiple entity, you do not need to name it. Begin placing down info_particle_system entities. You need five of them. Place 3 on one side, closer to the middle and 2 on the other. Make sure they're close, but not too close. DO feel free to place as many as you want. Name these entities grinder_human_blood_fx. The positions of each entity can be seen in the screenshot. Set the Particle System property to env_sawblood. This is the same particle used for the sawblade blood effect.
We can begin scripting our trigger to activate blood effects and kill players that fall in. Set the trigger_multiple's Delay Before Reset property to 0.
Add 4 new outputs to it, which should look like this:
| My Output | Target Entity | Target Input | Parameter | Delay | Only Once | |
|---|---|---|---|---|---|---|
| OnTrigger | grinder_human_blood_fx | Start | <none> | 0.00 | No | |
| OnTrigger | grinder_shred_human_snd | StartSound | <none> | 0.00 | No | |
| OnTrigger | !activator | SetHealth | -10000 | 0.00 | No | |
| OnTrigger | grinder_human_blood_fx | Stop | <none> | 1.50 | No |
Completion
Final Touches
And that's it. Your grinder is ready to be implemented into a map and fully function. Here are some finishing touches you can add to make it just right!
- Raise the blades 16 units higher
- Pull one blade down 8 units
- Add blood decals near the grinder/the side a player will most likely enter the grinder from
- Add the banana peel (which is a trigger_push with a sound that plays when it pushes a player. It's too easy to make in order for it to be included in this article)
Implementation
Simply make a hole for the grinder and plop it inside the hole, seal all func_detail entities if there is a leak. Your grinder should now eat you up once you drop in. Particle effects and visceral sounds included. Robots will not be affected by this. This may be covered in a future article soon. The very basic implementation of your grinder is complete with all functionality needed. It is recommended you add a skip brush around your grinder.
