Mesh Texturing
Texturing in Hammer is similar to previous iterations of Hammer except that it has a few more methods to apply textures due to the change in how geometry can be generated.
Basic Texturing
With some geometry created, click Browse on the Active Material pane located in the bottom left by default. It likely is currently still set to the default developer material. Type "reflect" and several shades of grey materials will show up. Selecting one of them will move it to the Active Material pane.
Switch to Faces mode and right-click on any of surfaces you want to apply the active material. To change scaling, rotation and so on, use the Align, Scale, Shift, Rotate, Fit and Justify buttons in the Face Editing tab. Select the appropriate faces and click a button to make changes.
To transfer the UVs from an existing face to a new face use Alt+![]() and the texture along with the alignment will be transferred to the new face.
and the texture along with the alignment will be transferred to the new face.
Maintaining Texture Alignment
Added to Hammer are new forms of texture lock which are accessible through buttons to the right of the toolbar at the top. These can allow some advanced manipulations.
Texture Lock
With this mode active and Translate T meshes around in the Meshes, Objects or Groups selection modes, and texture alignment will be maintained. Disabled, texture alignment will not be maintained. Potentially useful if you're duplicating, say, chunks of brick wall or cliff face and you don't want the same texture alignment to appear in each segment.
Texture Lock Scale
When active and Scale E meshes up and down in the Meshes, Objects or Groups selection modes, and again texture alignment will be maintained. As before, texture alignment will not be maintained when disabled - of use if scaling a section of wall and you don't want textures to be stretched.
Texture Lock Component Manipulations
In any selection mode, texture alignment will be maintained on faces - it locks the underlying UV representation so that you can significantly deform the mesh and still have it attempt to keep the same texture alignment.
For example if texturing a bent or destroyed object - start with a correctly-textured undamaged version, switch on Texture lock component manipulations, then move vertices, edges and faces around to introduce some bends. If you're not careful, you can cause some serious texture-stretching.
UV Peel
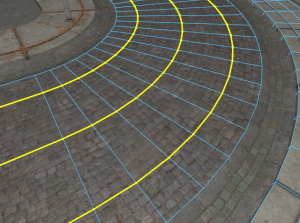
Useful for texturing around curvy arbitrarily-shaped meshes such as arches or road surfaces is the UV peel mode.
In the Edges selection mode, at the bottom of the Tool Properties tab is the UV peel section. Select World Space to keep texture scaling and repetition relative to the world, select an edge loop that spans the length of the curve, then click the UV Peel button. The active texture should now "flow" around your mesh, maintaining alignment at all points.
Next: Creating Your First Room


