Your first Alien Swarm map
For help, see the VDC Editing Help and Wikipedia cleanup process. Also, remember to check for any notes left by the tagger at this article's talk page.
You can help by finishing the translation.
If this page cannot be translated for some reason, or is left untranslated for an extended period of time after this notice is posted, the page should be requested to be deleted.
Also, please make sure the article complies with the alternate languages guide.
Создание карт для Alien Swarm аналогично созданию карт для других игр на Source Engine. Хоть местами и есть разница, но в целом структура проста и легко осваивается. Это руководство предназначено для первоначального ознакомления с постороением карт в редакторе Hammer Editor. Ты сможешь создать эту карту не обладая никакими навыками. В конце туториала ты найдешь ссылку на скачивание этой карты Действия, означающие взаимодействие с клавиатурой выделены жирным шрифтом.
Редактор Hammer
Если у тебя ещё не установлены необходимые инструменты, то сделать это можно, прочитав SDK Installation.
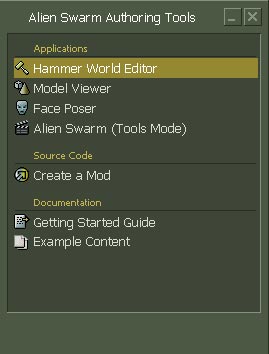
Вот так оно выглядит а понадобится нам сейчас Hammer World Editor, так что его и запускай.
Загрузка займёт некоторое время. Выбирай в меню File и New для создания новой карты.
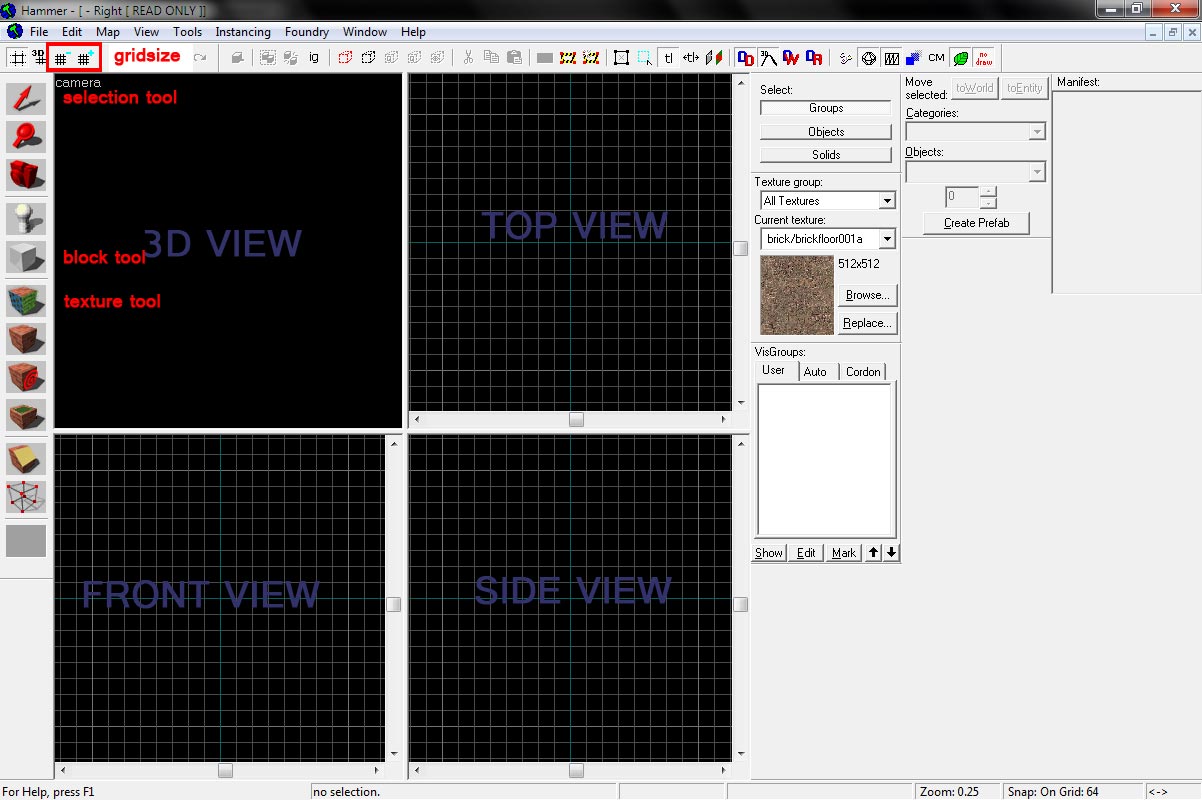
Редактор выглядит так:
На картинке обозначены основные функции которые рассматриваются в этом руководстве. Вот их краткое описанеи:
The view (вид)
- Черные квадратные поля показывают вид твоей карты. В 3d и в 2d проекции вид сверху, сбоку и спереди, отображая всё что присутствует на твоей карте. Сейчас перемести указатель мышки в левый верхний угол поля 3d проекции и правым кликом на camera выбери 3D Textured. Чтобы в поле 3d вида оторажались текстурированные объекты.
The tools (инструменты)
- selection tool - этот инструмент выбирает те объекты на которые вы кликнете. кто бы мог подумать.
- block tool - этот инструмент создаёт трёхмерные блоки. ещё их называют браши.
- texture tool - этот инструмент поможет привязать текстуры к блокам.
- entity tool - После блоков это второй по частоте использования инструмент - объекты. (Эту кнопку на картинке не обозначили. но ты найдешь её сразу над кнопкой "блоки".)
Как маневрировать в этих джунглях
Есть несколько способов, которые вы можете использовать для маневров в окружении.
Обратите внимание на зеленые линии, которые пересекаются в двумерном виде. Они образуют центр вашего мира(карты). Начинайте строительство карты здесь.
Вы можете использовать ваше колесико мыши для приближения или уменьшения вида. Сделайте так и используйте для следующего:
С двумя кнопками изменения размера сетки вы можете сделать сетку меньше или больше. Сетка важна, так как ваша кисть(объект?) привяжется там, где вы создали, перетащили или изменили размер объекта. Так что с маленькой сеткой вы можете создавать небольшие предметы или просто сделать настройку больших объектов.
Полезные советы
* Сохраняйтесь всегда, когда можете. Если вы испортили что-то вы можете загрузить предыдущую версию. Нажмите ctrl + s для быстрого сохранения.
* Вы можете отменить ваши действия.Например: если вы выделили несколько объектов и случайно кликнули где-нибудь, вы можете отменить это действие и выделить объекты снова. Нажмите ctrl + z для отмены.
Первый Блок
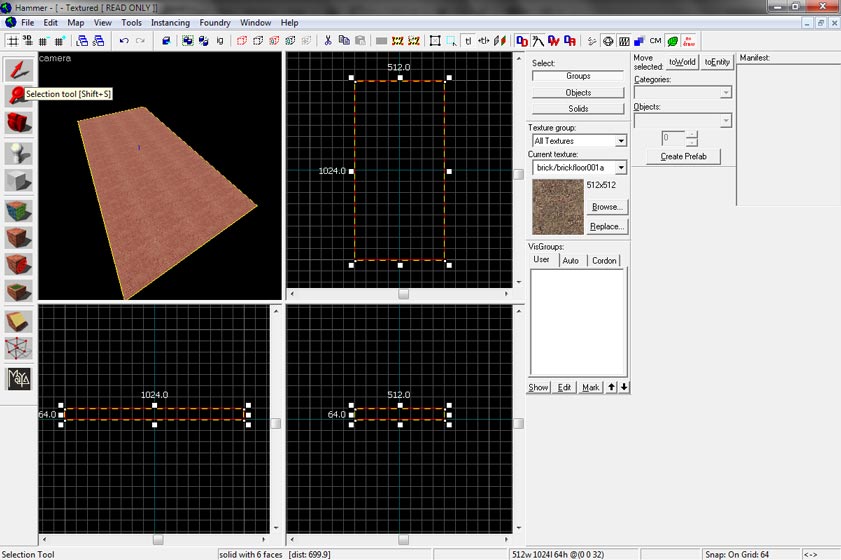
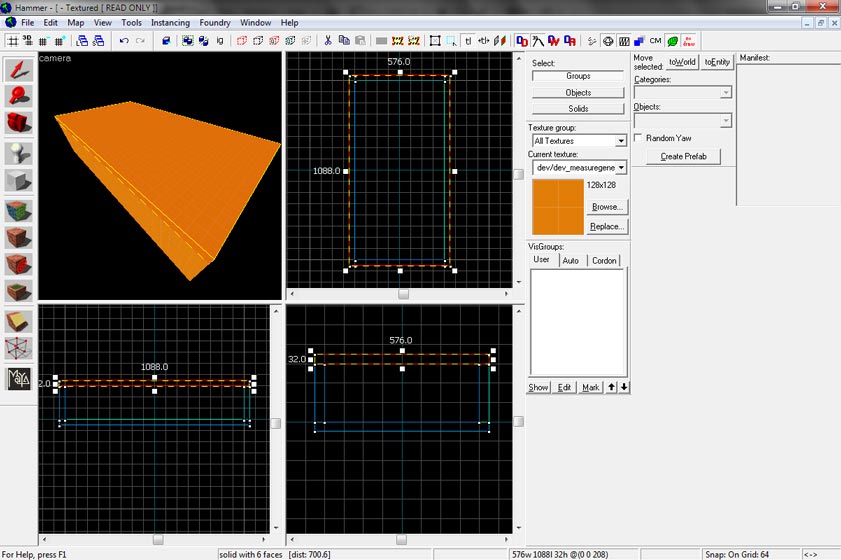
Кликните на block tool и перетащите квадрат с помощью вашей мыши в top view. Вы увидите белую пунктирную линию. Вы можете отпустить мышь и отрегулировать размер. Минимальный размер должен быть 512 *1024 или больше. Нажмите ↵ Enter или Правую кнопку мыши на белой пунктирной коробке и нажмите Create Object. Это создаст сплошной объект из ранее определенного блока. Если вы не сделаете этот шаг, ваша коробка не будет создана.
Самое время изучить окно 3D-вида. Передвиньте ваш указатель мыши на окно 3D-вида и нажмите z на клавиатуре. Сейчас вы управляете видом камеры на 3D-сцене просто как в шутере от первого лица. Вы можете масштабировать вид с помощью mousewheel (колесика мыши) и перемещаться в стороны с помощью a и d. Вы так же можете отдалять с помощью клавиши s и приближать с помощью w. Установите вашу камеру так как вы видите картину, затем нажмите z снова, чтобы покинуть окно 3D-вида.
Нажмите на selection tool (инструмент выбора, красная стрелка) и убедитесь, что вы выбрали selected your box. Объект выбран, если в 3D-виде он имеет слегка красные очертания или красные линии в 2D-окне.
Потом нажмите texture tool
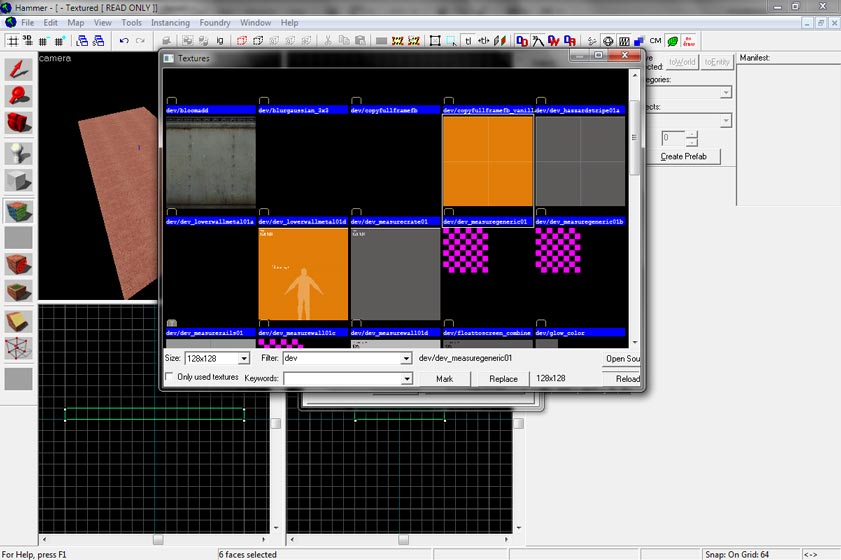
Во всплывающем окне выберите Browse
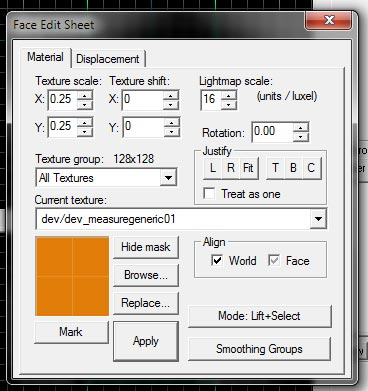
В этом окне вы можете искать текстуры. Когда дело доходит до текстур, то есть два вида: одни вы увидите в игре, а другие вы не увидите в игре, но сможете видеть в редакторе. Для этого блока мы будем использовать текстуру, которую вы можете увидеть как в игре, так и в редакторе. Я выбрал dev_measuregeneric01. Это текстура для разработчика - она имеет простой цвет и хорошо показывает размеры блока. Чтобы найти эту текстуру нужно использовать опцию Filter в нижней части экрана. Просто напишите dev для поиска этой текстуры. Прочие поисковые запросы, которые вероятно понадобятся вам в будущем: wall (стена), floor (пол), metal (металл), water (вода).
Дважды щелкните мышкой на dev_measuregeneric01. Активное окно закроется и вы вернетесь к предыдущему окну. Убедитесь, что оранжевая текстура отображается в небольшом окне предварительного просмотра и нажмите Apply. Новая текстура будет теперь на всем объекте. Если нет, то ваш объект не был выбран перед тем как вы вошли в texture tool (инструмент текстурирования).
Select your box. Rightclick on the selected box in any 2d view and chose Make Hollow. Enter -32 and click Okay. This will make your box hollow and leave you with four boxes. These boxes are now grouped. In order to select one piece of the block only and not the whole room we need to ungroup the created brush. You can either rightclick the selected box and the choose Ungroup or push ctrl + u. To select the box on the top click anywhere outside the box in any of the views. The click the top of the box in 3d view. Push delete on your keyboard. Again, feel free to move your mouse over the 3d view and push z to adjust your camera for this view.
Great work. This is the start of the leveling process
Let's make it a map
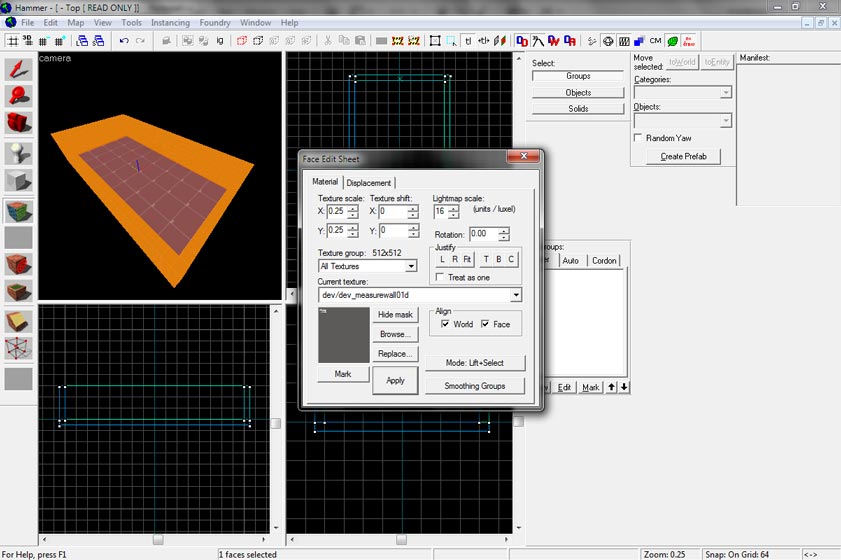
As the box looks nothing like a map you should first make some texture adjustments. Open the texture tool. With the texture tool open click on the bottom of your box. Only the bottom, and make sure the texture tool is open. You will now see that your bottom is slightly more red than the other sides of the cube. Select Browse and select the dev_measurewall01d with a doubleclick. Click Apply to apply the texture to the selected bottom. You will see this:
Alien Swarm does something different from other Source Games. Due to the third person perspective you will look a lot at the top of walls. Good thing we removed the roof already otherwise we would look at roofs and that would not be fun at all. Since the top of the walls are boring areas it is needed to blacken them out with the second type of texture. Those that you see in the editor but you will not see in-game. Open the texture tool if you closed it otherwise leave it open. The following action will train your skills: You have four walls and each wall has one top. Select one topside of any wall in the 3d view with the texture tool open. Hold ctrl as you select all the other top faces of these walls. You can release ctrl as long as you do not mark anything else. For example you would release ctrl, then push z to adjust your camera in 3d view, push z to leave the camera and then push ctrl and hold it to select the next face. With all four faces selected click on Browse in the texture tool. Use the Filter to search for nolight and select the toolsnolight texture with a doubleclick. Then apply the texture to the marked faces by clicking Apply. Note that you could also have selected one face after the other and apply the texture separately.
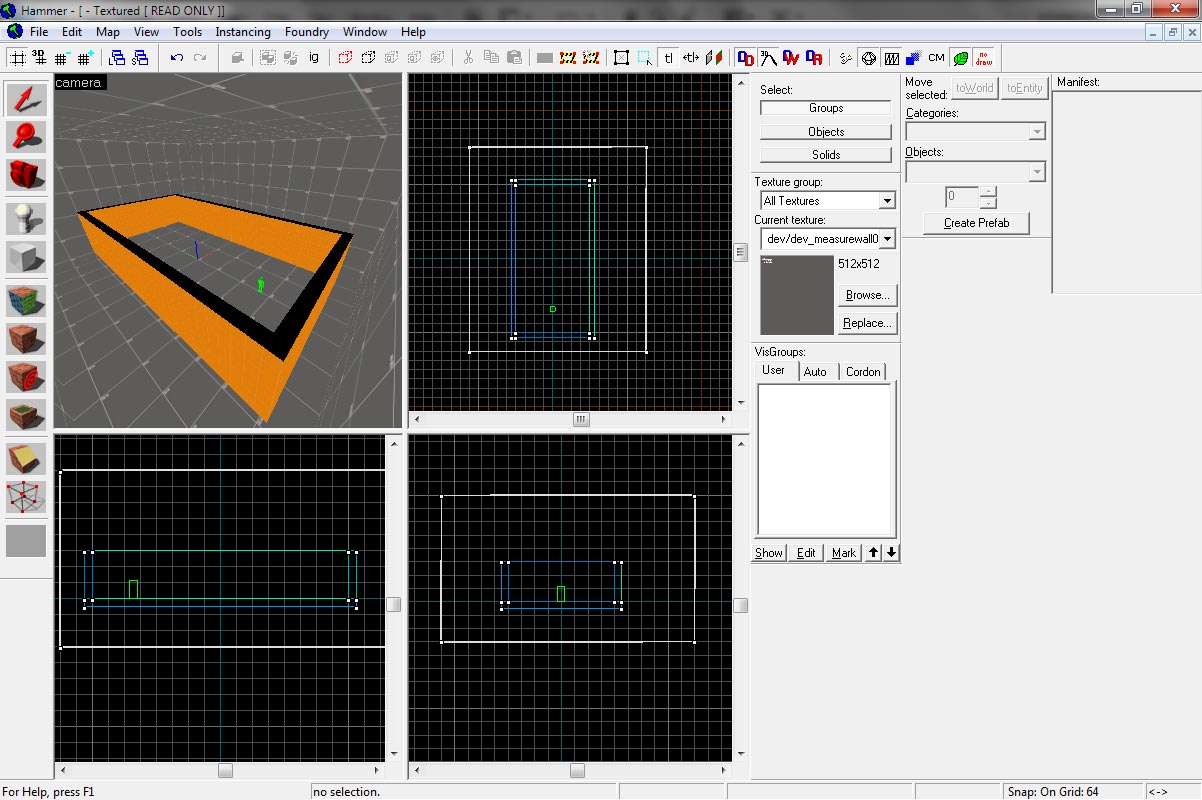
Before applying textures you have to do two things to have the map look like this:
Adding a player
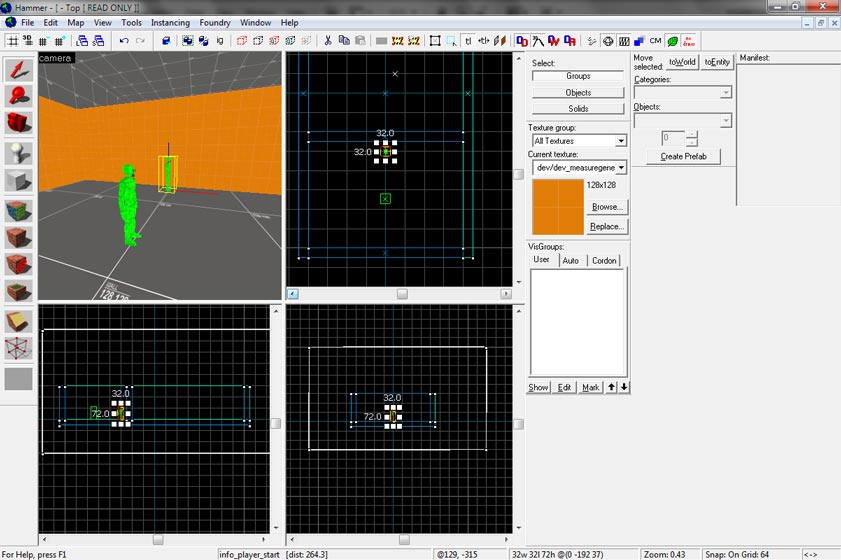
Click on the entity tool and then click inside your box in the 3d view. It will create the standard entity, which is a info_player_start and the starting position of the player. If you want you can rightclick the selected entity with the selection tool and choose Properties at the very bottom of the dropdown menu. In the top right of the window that opens up you will have a black circle with some kind of radar in it. Next to it is a field with a 0 in it. You can adjust your players direction with numbers from 0 to 359 (well, 360 degrees kind of is 0 again) or by dragging the white line in the radar. Click Apply and close the window when you are done.
Select the block tool and drag a really huge box in top view around the box we already have. If you want to zoom out on your top view, now is the time to use the mousewheel. Before you create the box check the side and front views to adjust the height of the box. Make sure it captures the box we already have and is about 3 times bigger. Then hit enter or rightclick the white dotted box and select Create Object. Without clicking anything else, click the selection tool. This way you will instantly select the new box. Rightclick the new box on any 2d view and select Make Hollow enter -4 and click Okay.
Now select the new box, it will become slightly red, then select the texture tool and apply the dev_measurewall01d texture.
Now we can go back to texturing the rest of the first cube:
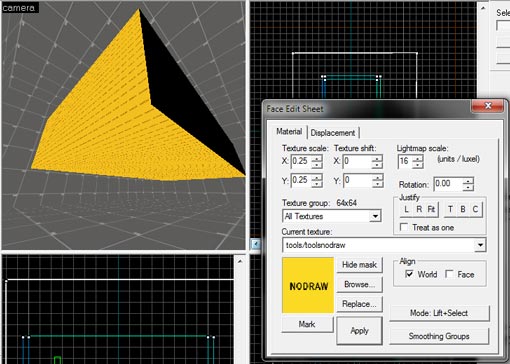
This is what we want. Every outer face of the cube has been textured with toolsnolight. The bottom and the back of the cube can be textured in toolsnodraw. The toolsnodraw texture is a texture that will not show up in game. The difference between NoDraw and NoLight is that NoDraw is invisible, while NoLight absorbs light and therefore becomes a clearly visible as solid black texture. As the player will definitely see the front of the level NoLight will be used there. He might see the sides of the box so it is suggested to use NoLight there as well. The player will (hopefully) never see the bottom and the back of the map so use a NoDraw texture here.
Adding a functional door
To keep things basic and give you a glimpse of everything here we will include a door with a basic trigger. Use the selection tool to select the info_player_start which looks like a green Gordon Freeman. We placed that earlier. Then us the top view and drag it while holding shift then release the mouse and then release the shift button. This way you will copy the object. Do the same with the front wall. The wall that you dragged into the middle of your room might need an orange texture on one side. Apply that.
Now select the copy-Gordon Freeman and rightclick it in 2d view and select Properties.
The door
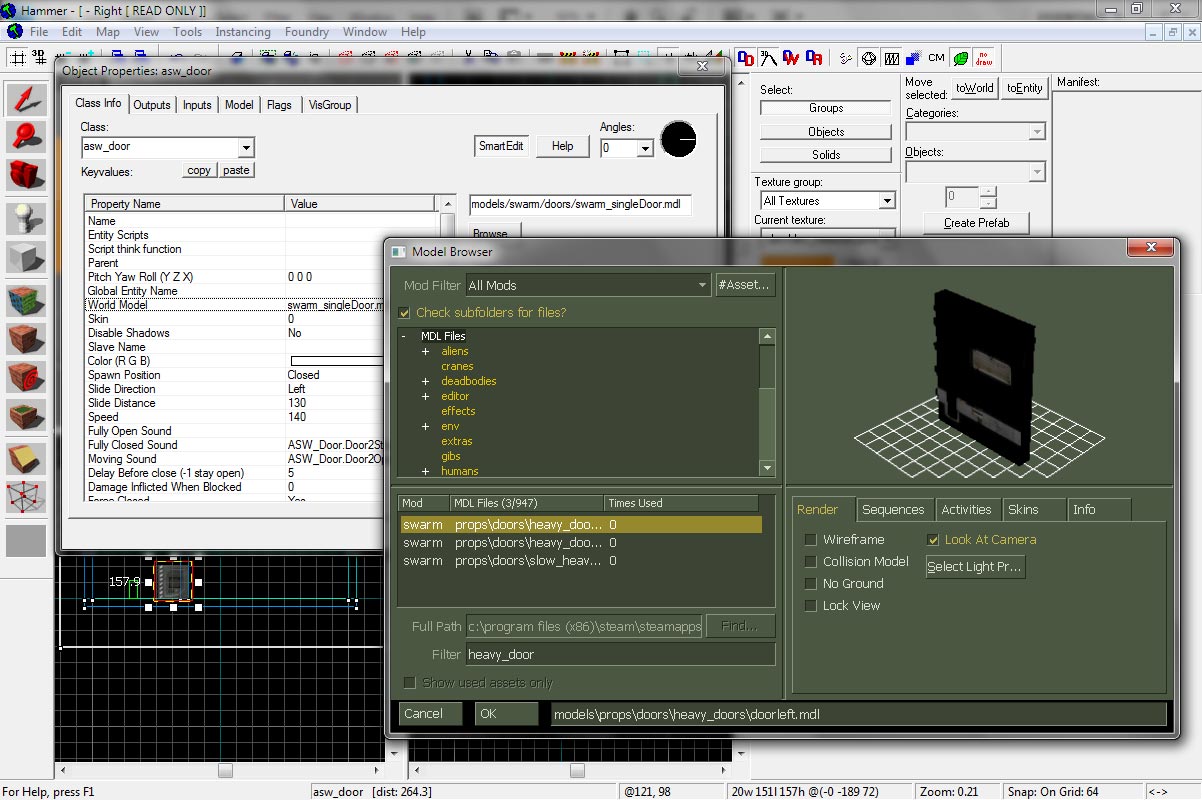
Change the class to asw_door (Asw_door) and click Apply. This way our info_player_start will become a door. Select World Model choose Browse and then use the Filter and enter heavy_door while having the MDL Files selected in the top left. This way you will search all the folders - which means all models. Select the doorleft.mdl click OK. Name the asw_door (which is just the class) by clicking on Name and enter door1. Before you close the properties window adjust the direction of the door so that the bolts face left. You do this by entering numbers like 90, 180, 270, 0 in the top right. Click Apply and close the Properties window.
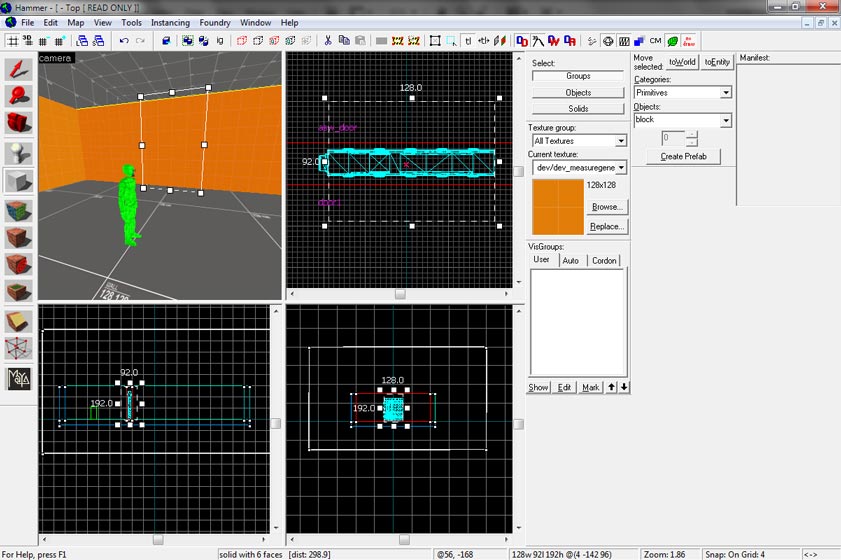
Drag the door into the middle of the wall that sits in the middle of your room. Make sure it is aligned with the floor in the side or front view, It actually should be since the info_player_start was aligned with the floor. Adjust the gridsize so that the door sits right in the wall and does not stick out anywhere. Also make sure that the wall in the middle is only slightly higher than the door. Then select the middle wall. Click the block tool and drag a block like this in top view:
With the wall previously selected it will use the height of this wall for the new block - because in top view you cannot instantly give a value for the height. Make sure the new box has exactly the same dimensions as on the screenshot. It should slightly touch the door on one side and cut through the bolts on the other. Create the object by hitting enter and the rightclick it and select Carve. Carving will delete anything in the objects way - except entities. Which is a good thing since we want to keep the door and just get rid of the extra wall blocking our door. Delete the box that you used to carve with and you should be left with a door sitting between two walls. Perfect.
The trigger
To open the door we will need a trigger area. Which means whenever a player walks into this area the door1 will be triggered to open. For this create a new box in the size of the area that you desire.
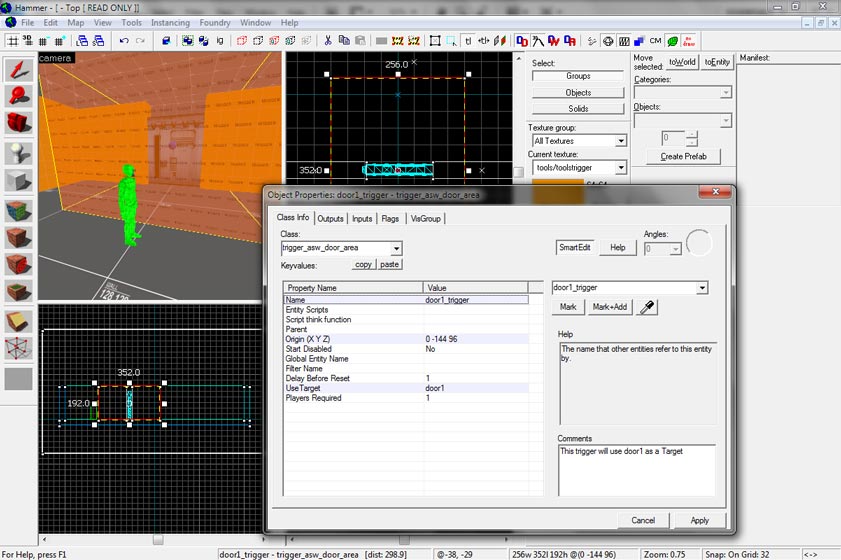
The trigger brush has about the same dimension in every direction of the door since we want to open the door from either side. Apply a texture called toolstrigger to the whole box. The box should have the height of the door! Then rightclick the triggerbox and select Tie to Entity or press ctrl + t. This way the box is now some kind of entity that can carry more options than just mere dimensions and a texture. Edit Class to trigger_asw_door_area Edit Name to door1_trigger This way you will know that this trigger belongs to door1. Every door would need a new trigger and a new doorname. Edit Use Target to door1 This way the trigger will know which door to affect. Every object that you want to refer to from another object will need a unique name. That is why the door has been named door1. You do not need to name every lightbulb in the universe, but name the doors.
Click Apply and the door is done.
Свет
For lights you can just copy the info_player_start entity again or create a new one using the entity tool. Rightclick the new entity Gordon and change the class to light. Note that there are different classes for light. light_dynamic for example uses more resources but can do more things than just glow. For our tutorial we keep it simple and use the simple light. Change the color to something grey by clicking on Brightness and then Pick color. The first three numbers correspond to the color's RGB values, respectively, and the last value refers to the light's intensity. If you leave it white the light will be superbright and you will not see anything in game.
Make sure the lights hang about one and a half times as high as your character and place one every few meters.
Объекты
As we only have one player on the map and we want to keep it simple we will use a simple Escape Objective. Which means that whoever survives this difficult map enters a certain area and escapes the infestation. You guess right. The area will be a trigger again. so make a brush / block in the second room at the wall. Apply the toolstrigger texture.
Before we edit this trigger we will need an entity that defines the map objective. Create an entity and change the class to: asw_objective_escape also name this entity map_objective because we will refer to it in the trigger. The position of this entity does not matter at all. I usually keep them either close to the trigger they will be used with or at some place on the map where I gather a lot of map-defining entities.
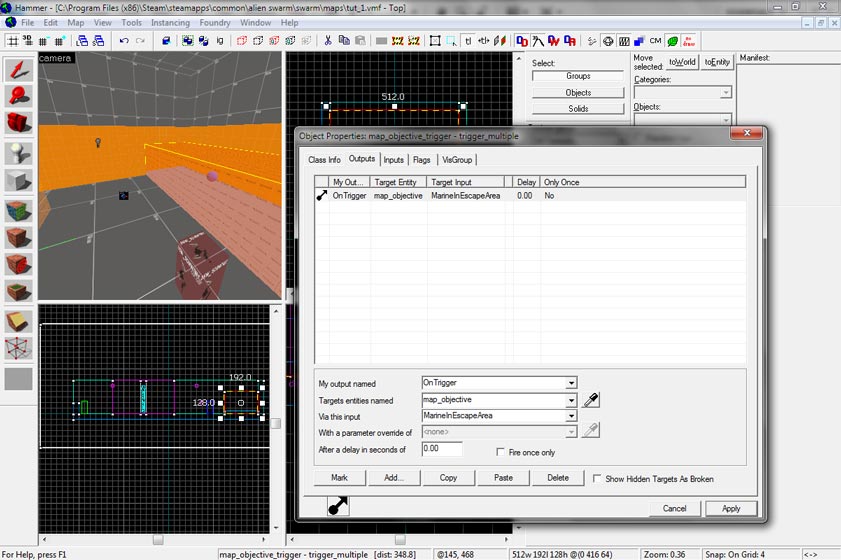
Select the trigger and push ctrl + t or rightclick and then select Tie to Entity. Change the class of the trigger to trigger_multiple which is a trigger that can be triggered more than once as opposed to trigger_once. Name it map_objective_trigger (you see the concept in naming things right?) Then click on Outputs and Add a new one.
Use these settings: My output named: On Trigger Target entities named: map_objective Via this input: MarineInEscapeArea
This is your map objective.
Спавнер пришельцев
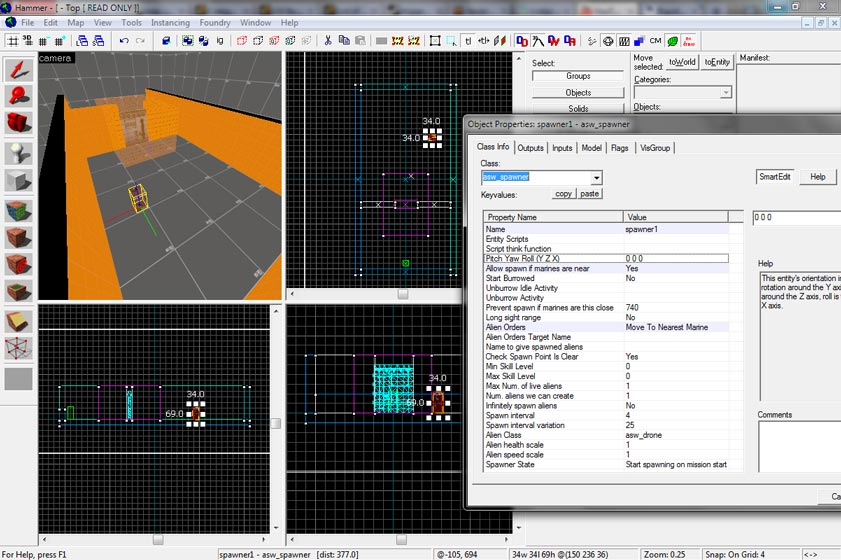
To spawn an alien we keep things simple. Create an entity, make it a class asw_spawner. You can name it spawner1 but since we will not refer to it you do not have to name this one. Change Allow spawn if Marines are near to Yes since our map is not very large and we might be very close to the aliens spawn point. Change Alien Orders to Move to nearest Marine Everything else can use default options here. It will spawn only one unit (Num of aliens we can create = 1) but that is enough for now. The asw_spawner class is pretty self explanatory so feel free to experiment later.
Adding a structure_seal
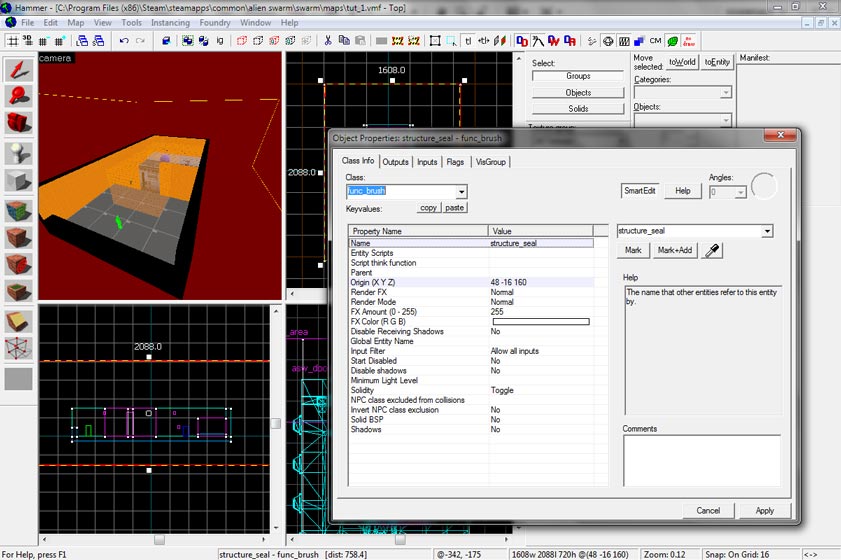
It is time that we bring the black back into the light. Select this hollowed box and apply the toolsnolight texture. Tie to Entity or push ctrl + t and change the class of this brush entity to func_brush. While you can define every name in the map as you like, this one is defined! Name this func_brush to structure_seal
Here is a screenshot:
This box is needed so you have an ending structure around your level. Otherwise it would be endless in every dimension (depending on how much time you have it still is endless on the 4th dimension). If you do not have this structure around every other object on your map your map will "leak". This means you will have parts of your map dripping out of your computer.
No, it means you will get an error when compiling. And nobody likes errors.
Checklist and last adjustments
Run a checklist in your mind before you compile the map. It helps avoiding obvious errors
- Do I have a structure_seal?
- Are there lights on my map or will I be blind?
- Do I have a player spawn position?
- Does my player spawn on a solid ground?
- Are all my floors and walls textured?
Compiling the map
This part is easy. Push F9 or go to File -> Run Map. To successfully compile Alien Swarm maps, you'll need to press the button labeled "Expert...", which brings up the Advanced compile settings. In this mode, there is one command in particular that has been added that will allow Alien Swarm maps to compile called -alldetail. -alldetail turns all world brushes into func_detail except for any func_brush entities that have "structure_seal" as their name.
If you see red or yellow lines during compiling something went wrong. You can activate that you have to push a key after compiling to close the compile process and check for the errors. Some of them are easy to understand. Some. In this case you would not want to start the game after compiling. So tick that option.
It might be useful to save the map in this folder: .\steamapps\common\alienswarm\swarm\maps\
