Bonus Maps
This article describes the step by step process for packaging user created maps for easy import through the in-game Bonus Maps UI, and using Bonus Maps in your mod.
Adding bonus maps to your mod
If you aren't making bonus maps for ![]() Portal, you should build your mod on
Portal, you should build your mod on ![]() Source 2013 engine branch and add the following strings to your mod's
Source 2013 engine branch and add the following strings to your mod's ![]()
resource\gamemenu.res file:
	"3"
	{
		"label" "#GameUI_GameMenu_BonusMaps"
		"command" "OpenBonusMapsDialog"
		"InGameOrder" "50"
		"notmulti" "1"
	}
You can set your own bonus maps menu button placement in your game menu. In ![]() Portal, the button is placed below
Portal, the button is placed below New Game button.
Gather your maps
You may need to first create maps. Collect your BSPs into a folder. BSPs may be grouped into sub folders. Any custom materials and models should be embedded using Bspzip.
Thumbnail images (optional)
Custom thumbnail images can be used for the map pack, individual maps in the pack, and any subfolders. They should be 256x128 TGA files. The visible area of images is 180x100 from the top-left corner. The easiest way to create one is to play the level and create a saved game. Then you can get the auto-created TGA from the <mod>/SAVE/ directory. You must change the dimensions of the TGA to 256x128 without resizing the picture itself. The picture must be placed in the top-left corner. Your vmt must be placed under the materials/vgui root, the game does not search above that root.
Create bonus description files (.BNS)
Bonus description files list the maps contained in the pack and some details about them. They are standard keyvalue text files (with a .bns extension). The descriptions for the maps can be split across multiple BNS files or descriptions for all of them can be contained as multiple entries in a single BNS file. Here's an example BNS file:
"Test Map 1"
{
	"map"		"./super_test"
	"image"		"./super_test_thumbnail.tga"
	"comment"	"This map is awesome."
}
"Test Map 2"
{
	"map"		"./another_test"
	"comment"	"Part 2 of this map pack."
	"lock"		"1"
}
You can also add comments and images for the map pack and its subfolders by putting a "folderinfo.bns" in each directory.
.BNS file keyvalues
- map <string>
- File name of the map. The "./" at the beginning starts the file path from the same directory as this BNS, rather than starting from the <mod>/maps/ directory.
- image <string>
- Thumbnail image name. The "./" at the beginning starts the file path from the same directory as this BNS, rather than starting from the <mod>/materials/ directory. If no image name is specified for a map it assumes the same name as the map with a .tga extension (super_test.bsp -> super_test.tga). If no image name is specified for a folder it assumes "foldericon.tga".
- comment <string>
- A short description of the map (or directory).
- lock <boolean>
- Set to 1 to have the map (or directory) initially locked. Maps (and directories) can be unlocked via point_bonusmaps_accessor.
 Tip:If this is a standalone map that isn't unlocked by another map, set the lock to "0" or the map will remain locked and unplayable.
- challenges <key>
- A subset of key values that define the challenges and goals.
Challenge keyvalues
Example:
"Test Map 1 With Challenges"
{
	"map"		"./super_test"
	"comment"	"Challenges for the awesome map."

	"challenges"
	{
		"Time Challenge!"
		{
			"comment"	"This one is hard!"
			"type"		"2"

			"bronze"	"100"
			"silver"	"80"
			"gold"		"60"
		}
		"Challenge for steps!!"
		{
			"comment"	"I like this one!"
			"type"		"1"

			"bronze"	"500"
			"silver"	"200"
			"gold"		"100"
		}
	}
}
- comment <string>
- A short description for the challenge.
- type <integer>
- The type of challenge. For Portal: 0 is Portals, 1 is Steps, and 2 is Time.
- bronze <integer>
- Bronze medal goal.
- silver <integer>
- Silver medal goal.
- gold <integer>
- Gold medal goal.
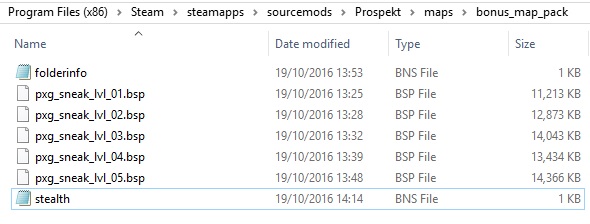
All files should go in the directory shown below with whatever you would like to put into your scripts.
Zip the files
Zip all the files into a standard uncompressed .zip file (a program called 7Z or 7zip can do it, just be careful not to use the .7z format). Change the extension to .bmz (bonus map zip).
Test the BMZ
Use the "Import Bonus Maps..." button in the Bonus Maps menu and select your BMZ. If everything was done properly the new icon will be added to the Bonus Maps menu. If nothing happens, ensure that your BMZ uses the standard uncompressed ZIP format.
Return to Portal Level Creation
