Indicator Lights (Portal 2)
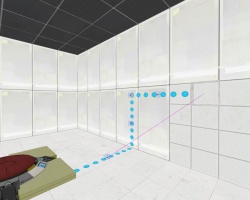
Indicator Lights are lines of small lights that are present in test chambers to indicate the interaction between two or more entities in the map, for example a button and a cube dropper. The typical usage of the lights is the lights being blue when inactive, and orange when active.
Contents
How to make Indicator Lights
This tutorial assumes basic knowledge of Hammer.
Step 1
In your map, create two entities you want to interact with each other. These could vary from a Heavy Duty Super-Colliding Super-Button opening a simple exit door, to a button that will temporarily interact with a Diversity Vent which will deliver gel bringing the player one step closer to the solution. Whatever you decide to do is up to you, but always next to the activated thing place an env_texturetoggle entity — this will help us change the indicator colors further in the tutorial and help you remember were you place your entities, resulting in a cleaner map.
Step 2
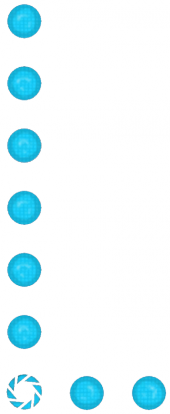
Select a texture for the lights in the texture browser, for this tutorial use "signage/indicator_lights/indicator_lights_floor" (Easily found by typing "indicator" in the filter bar).
A1. signage/indicator_lights/indicator_lights_floor
A2. signage/indicator_lights/indicator_lights_wall
B1. signage/indicator_lights/indicator_lights_corner_wall
B2. signage/indicator_lights/indicator_lights_corner_floor
Step 3
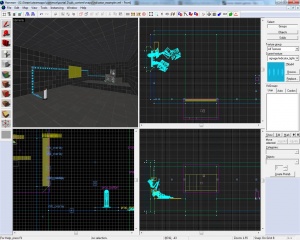
Select the Overlay option in hammer, and place your lights overlays as desired. Functionally it doesn't matter how they're placed, though a logical line between the entities interacting is desired, usually the shortest way between the two entities; don't forget the shortest way could travel on walls at some point. Also, to keep consistent with Valve's approach to these lights, when the line turns a corner (not including transitions from wall to floor, for example), a signage/indicator_lights/indicator_lights_corner_wall should be in the corner, as well as at the start of the activator (but not the activated thing).
The length of one strip is four circles, however sometimes you might want to have fewer overlays to keep your map clean. Luckily you can adjust the overlay properties to make it longer rather than make duplicates of the strip. This is accomplished by editing the U Start or U End keyvalue in the properties window for the overlay. Another way of accomplishing this is to stretch 'physically' the overlay in one of the 2D views — make sure that the 'Texture Lock' is unchecked. Remember that indicator lights never go in between tiles!
Step 4
Select the overlays you just placed (and ONLY the overlays you want) and name them all the same. Use "indlights_1" for this tutorial. Then open up the env_texturetoggle you previously placed, and enter the same name into the Target Brush(es) field. Now name the env_texturetoggle "texturetoggle_lights_01"
Step 5
Select the activator entity, and go to the outputs menu. In this tutorial a simple button entity was used, so all output parameters in the table would relate to it. All you need to do is to add these two outputs to your activator:
My Output > Target Entity Target Input Parameter Delay Only Once 
OnPressed texturetoggle_lights_01 SetTextureIndex 1 0.00 No 
OnButtonReset texturetoggle_lights_01 SetTextureIndex 0 0.00 No
So basically, now when the button is pressed the texturetoggle_lights_01 will change the overlays connected to it to the alternate "skin" of theirs, namely the appropriate orange texture. After that when the button will reset the "skin" would return to the normal color of blue.
Done! Your indicator lights should now be working!
Checkmark Box
A checkmark box is a binary indicator, meaning it only has off and on states. It is used to indicate the operated entity 'active state' - a blue 'X' mark when inactive and an orange checkmark when active.
Step 1
Use the Clipping Tool to cut the surface so there is a single brush 32x32 units in size where the indicator panel will go. Texture this brush with tools/toolsnodraw. (The nodraw will be covered up by the indicator panel.)
Step 2
Place a prop_indicator_panel. Rotate it to match the orientation of the surface, and position it one unit in front of the nodraw tile.
prop_indicator_panel's appearance in Hammer; in-game it is drawn as the checkmark box.Step 3
Fill the prop_indicator_panels fields as desired. Give the entity a name, and make sure it is linked to the overlay not the env_texturetoggle.
Property Name Value Name checkmark_indlights_1 Indicator Lights indlights_1
Step 4
Add to the activator entity another two outputs:
My Output > Target Entity Target Input Parameter Delay Only Once 
OnPressed checkmark_indlights_1 Check 0.00 No 
OnButtonReset checkmark_indlights_1 Uncheck 0.00 No
You now have a functioning checkmark box.
Checkmark Timer
A checkmark timer acts almost as the checkmark box: showing the active state of the operated entity. However, it shows that the operation will last a limited amount of time. It is usually advised that the activator would be a simple pedestal button because when activating a floor button the player expects the operation to be permanent until they step off the button.
Before placing a timer think if you really need it, and if so, how much time is the timer's active state going to be? You don't want the task to be impossible, you just want to add an element of stress to the puzzle.
Step 1
Use the Clipping Tool to cut the surface so there is a single brush 32x32 units in size where the indicator panel will go. Texture this brush with tools/toolsnodraw. (The nodraw will be covered up by the indicator panel.)
Step 2
Place a prop_indicator_panel. Rotate it to match the orientation of the surface, and position it one unit in front of the nodraw tile. Set the following keyvalues:
Property Name Value Name checktime_indlights_1 Timer Duration <Number of seconds to count down> Is a timer Yes Is checked No Indicator Lights indlights_1
Step 3
Set the following properties on your prop_button:
Property Name Value Name button_01 Delay Before Reset <Number of seconds to remain active> Play timer sound Yes
Setting the time in the 'Delay Before Reset' field will tell the button how much time the button should remain pressed, and play the timer sound. Setting 'Prevent fast reset' to 'No' allows to re-press the button at any given time during the timer duration. This will allow the player to restart the timer when they understand they acted too slowly without having to wait for the timer to reset on its own.
Step 4
The last thing that needs to be done to make this timer functional is to add a single output to the button:
My Output > Target Entity Target Input Parameter Delay Only Once 
OnPressed checktime_indlights_1 Start 0.00 No
The timer will reset automatically when the time runs out. However, you can still add a 'Stop' command to stop the timer on it's current value or to send a 'Reset' output to reset it manually.
Old Aperture Indicator Lights
Select a texture for the lights in the texture browser (Easily found by typing "neon" in the filter bar).
In this tutorial we'll be using "signage/indicator_lights/indicator_neon_straight"
As you might have noticed the default texture size of each light is a lot bigger than what it should be. To simply fix it check the 'Texture Lock' key, and in one of the 2D views shrink the overlay until it's a 16x16 one light texture. Now go back to Step 2 to finish the indicator line and triggers.
Old Aperture CheckMark box
Create a 32Wx2Lx32H block brush textured with tools/toolsnodraw. Place a signage/indicator_lights/indicator_neon_check overlay on the front, and texture the sides with plastic/plasticwall004a_dirty. Make sure your 'Texture Lock' key is checked and shrink the overlay to fit the brush. Move this brush so it is aligned with your indicator lights.
Tie the brush to a func_brush entity and give it the same name as your info_overlay entities.
Everything should be working now.
Finishing up
To add a neon light-up flicker sound, simply place a ambient_generic on your checkmark box with the following properties:
Property Name Value Name <indicator_light_name>_sound Sound Name VFX.OGSignFlicker
Make sure, in the flags tab, that it is NOT looped, and add another Output to your activator:


