Hammer Overlay Tool
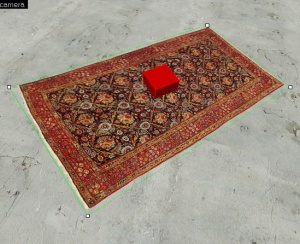
The Overlay Tool is used to place decals onto brush or displacement surfaces.
Overlays are similar to regular decals, but much more flexible. Unlike regular decals, overlays can be scaled, rotated, flipped, and sheared, and can be modified with env_texturetoggle and material_modify_control.
Placing overlays
To place an Overlay:
- Select the Overlay Tool as the active tool.
- Click Browse on the Texture Toolbar and pick a material for the overlay from the Texture Browser.
- Turn on 3D Texture Polygons mode, so you can see the texture you are placing the decal upon.
- Create the overlay by clicking in the 3D View on the surface you wish to add the overlay onto.
- After the overlay is created, the four corner handles can be dragged to change the shape of the overlay.
- To rotate or scale the overlay, switch to the Selection Tool and transform it in one of the 2D Views. (Scaling requires Texture lock to be enabled.)
When an overlay is placed, it creates an info_overlay entity. The Object Properties dialog for info_overlay has additional parameters that can be changed, including the material that is used.
Changing overlay face assignments
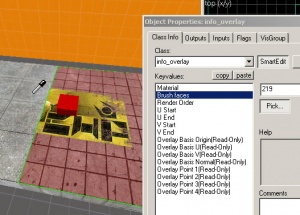
Overlays can be assigned to multiple brush or displacement faces. Face assignments are changed using the face picker in the Object Properties dialog.
To change the face assignment for an overlay:
- Select the Selection Tool as the active tool.
- Open the Object Properties dialog by double-clicking the info_overlay entity, or by selecting it and pressing ALT+↵ Enter.
- Select the Brush Faces field in the Object Properties dialog.
- Click the Pick... button to enter face selection mode. The mouse cursor will change to the eye dropper.
- In the 3D view, click on a face that the overlay should be rendered on. This will replace the face the overlay is currently applied to. To add or subtract faces to the selection, hold down CTRL while clicking faces in the 3D view.
- When you are finished with face selection, click the Pick button again to return to standard selection mode.
 Note:Depending upon the extents of the changes you've made, you may not see changes in face selections immediately. You can try forcing the the overlay entity to update by moving it slightly and returning it to its original position.
Resizing and rotating overlays
Existing overlays can be transformed using two main ways, using the Selection Tool or the Overlay tool.
Transforming overlays using the Selection Tool
Using the Selection Tool, you can simply drag the corner handles in any of the 2D views. Overlays can be resized or rotated just like other objects. The size of the selection box in the 2D views should match the size of overlay's bounding box.
You can stretch the overlay beyond the size of the faces it's assigned to. Doing so will clip the edges of the overlay to the size of those faces. If you want the overlay to continue onto more faces, you'll have to change the face assignments of the overlay to include the new faces.
Transforming overlays using the Overlay Tool
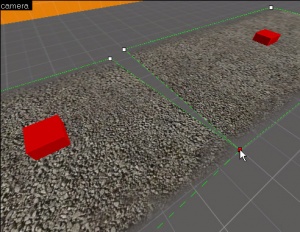
The size of overlays can also be adjust with the Overlay Tool itself, with different controls. When you have an overlay selected and switch to the Overlay Tool, four handles appear around the overlay in the 3D view. You can drag these handles to move the corner and change the shape of the overlay. The overlay is not restricted to a square shape, though making it concave will result in rendering errors.
An important thing about moving the corner points in this mode is that the corners cannot be moved beyond the bounds of the brush faces the overlay is applied to. In fact, if the points are outside the edges of the assigned faces, the handles will "snap" to the nearest face edge when you try and move them.
Connecting overlays
While moving corner points using the Overlay Tool, the points of two overlays can be "snapped" to one another, in order to create seamless connections for things like paths and roads. The connection is not a permanent one -- further dragging or moving of the handles will disconnect them again.
To connect two overlays:
- Switch to the Overlay Tool.
- Select one of the overlay by clicking it in the 3D View.
- Add the second overlay to the selection by holding down CTRL, and clicking it in the 3D View.
- Hold down the ⇧ Shift key, and drag the corner handle of one of the overlays near one of the corner handles of the second overlay. When the handle turns red, let go of the mouse button.
- The handles now share the same position. Repeat the process for any other corner handles you wish to connect.
Changing overlay wrapping and tiling
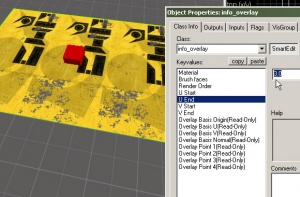
The tiling and cropping of overlays can be done by adjusting the UV coordinate parameters in the Object Properties of the info_overlay.
- Higher End values will increase the number of repetitions of the texture, in the U or V direction. An End V value of 3 will cause the overlay to repeat 3 times in the V direction (usually up and down, depending on the overlay placement).
- Negative values will flip (mirror) the material. An End value for U of -1 will flip the overlay in the U direction, with no tiling (usually means left-to-right).
- Values less than 1 will crop the texture. A Start value of 0 and an End value of 0.5 would clip the texture in half. A Start value of 0.25 and an End value of 0.75 would show only the middle section of the material.


