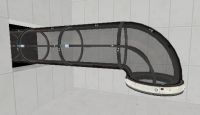
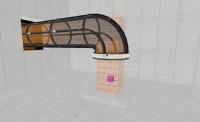
Diversity Vent
Pneumatic Diversity Vents are a testing element used very little in the final game, except in the 'Behind the scenes' theme where (Spoiler) the vent breaks and you and Wheatley are sucked into it. However, the tools to create them are still available. They are part of the Vital Apparatus Vent system which are an aesthetic element of Portal 2. They are used throughout Aperture to distribute objects, like cubes, turrets, and gel. Or, as a test element, to suck them away.
The cubes and turrets that fly through the tubes are animated. Look in the model folder "props_vac_anim".
Creating the vent
- Create several prop_static entities with the model name props_bts\vactube_128_straight_b.mdl.
- Line up the tubes, then place another prop_static entity with the model name props_bts\vactube_90deg_01.mdl. This is the curved tube.
- To finish the vent, place one more prop_static entity with the model name props_bts\vactube_connector.mdl
Creating the vacuum
This is the hard part. It's recommended that you use an info_placement_helper to help you find the correct directions for the pitch, yaw and roll values for the trigger_push. The info_placement_helper will have a big red arrow that will show you the direction it's facing when the pitch, yaw, and roll values are set. The direction of the red arrow is pointing towards is the same direction that objects will be pushed towards in the tube when set in the trigger_push properties, just copy over the pitch, yaw, and roll settings from the info_placement_helper into the push direction properties of the trigger_push.
- For straight tubes: create a 64x64 trigger_push brush entity and texture it with the Trigger texture. Place it inside the straight tubes and line it up with the origin of the straight tubes to ensure it's directly in the center.
- Make the brush length as long as the vent tubes.
- For the curved tube: create another 64x64 trigger_push brush entity textured with Trigger. Place it inside the curved tube and stretch it down to the floor and up to the bottom of the straight tube's trigger_push entity. This will lift physics objects into the straight tubes, then carried away.
In the object properties of all trigger_push entities, ensure the Physics Objects flag is checked. The Speed of Push should be set to 1500, and make sure the Push Direction is correctly set with the direction of the tubes.
Note: the NPCs flag should be checked as well if you want the brush to affect turrets!
Removing vacuumed objects
- At the opposite end of the tube, where the player may lose sight of objects being carried away by the vacuum, place a trigger_multiple brush entity that is 128x128x16 large. This will be used to remove the physics objects in the tube.
- For the trigger_multiple entity:
Finishing up
- Directly underneath the entry tube where objects will be sucked in, place a info_placement_helper on the floor. Set the Radius to 64.
- Above the info_placement_helper, and below the entry tube, place a point_push facing up (-90, 0, 0). Adjust the Radius to about 250, and set the Magnitude to -40. This will add an effect of dust being sucked into the portal when placing portals.
- At the opening of the vent place an info_particle_system facing down (90, 0, 0) with Particle System Name of broken_tube_suck. Make sure Start Active? is set to yes. This will add an effect of dust being sucked in the vent, not only to the portal, but also from it.
External links
- Original tutorial with example map (Portal 2 Mods) - appears to be broken

