Maps Workshop
Port maps and assets over to S2.
Import Tool Documentation
As part of CS2’s Workshop Tools, we have included a Python script for helping content creators to quickly port maps and assets over to S2. Before getting started there is some preparation work which must be done.
Prerequisites
Precompiled Content
Precompiled content (such as any custom vmt, vtf, mdl, etc.) must be located in the \steam\steamapps\common\counterstrike source 15\csgo folder. For example:
\steam\steamapps\common\counterstrike source 15\csgo\materials\ \steam\steamapps\common\counterstrike source 15\csgo\models\
Notes: Any custom content archived in a .bsp will need to be extracted into the appropriate folders before importing. The import tool also requires a vmf, so if you only have a bsp for your map, you will need to decompile it to a .vmf. Finally, do not copy .vmf files to the above folder as it will confuse the import tool.
Source Map Files
Your map files (.vmfs) can live anywhere outside of \counterstrike source 15\ as long as they are in a \maps\ folder. Any prefab or instance vmfs referenced by your map must be in whatever subfolder structure is expected by the map. For example:
c:\mymapfolder\maps\mymap.vmf c:\mymapfolder\maps\prefabs\mymapprefab.vmf c:\mymapfolder\maps\instances\mymapinsstance.vmf
Source Texture Files
If you have uncompressed source files for textures, (tga, psd, etc.) the import tool will try to use those when importing materials, otherwise it will fall back to converting and recompressing vtf files (which can decrease texture quality). For this to be successful, make sure your source files are in a mirrored location of the vtfs in \steam\steamapps\common\counterstrike source 15\csgo\materials\ For example:
c:\steam\steamapps\common\counterstrike source 15\csgo\materials\mymaterial\mytexture.vtf c:\mymapfolder\materials\mymaterial\mytexture.tga
Getting Started
1. Installing Python 2.7.14
To run the import script you will need to install Python 2.7.14 which you can grab here: https://www.python.org/downloads/release/python-2714/
2. Setting Environment Variables
Next you will need to set two environment path variables so that Windows knows where your python installation lives and other import libraries in the Steam\steamapps\common\counterstrike source 15\game\csgo\bin\win64 folder:
Press the Windows key+X to access the Power User Task Menu.
- In the Power User Task Menu, select the System option.
- In the System window, scroll to the bottom and click the About option.
- In the System > About window, click the Advanced system settings link at the bottom of the Device specifications section.
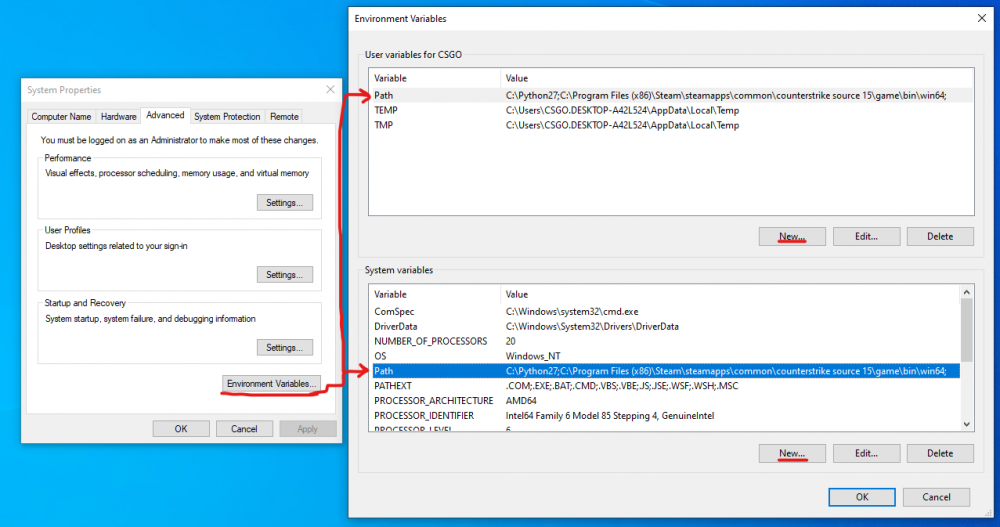
- In the System Properties window, click the Advanced tab, then click the Environment Variables button near the bottom of that tab.
- In the Environment Variables window (pictured below), highlight the Path variable in the System variables section and/or click the New button.
- Add a path variable with the Value being the path to where you installed Python, and the path to your counterstrike source 15\game\bin\win64 folder , separated by a semicolon. e.g. C:\python27; C:\Program Files (x86)\Steam\steamapps\common\counterstrike source 15\game\bin\win64
- Do this for both User Variables and System Variables:
Note: To be sure that the Path variables are applied properly, it may be necessary to restart your computer.
3. Installing the Colorama Extension
Next you will need a Python extension called colorama. To install this, simply open up a command prompt (search for cmd in Windows Start Menu) and type
python -m pip install colorama
4. Creating a new Addon with the Workshop Tools
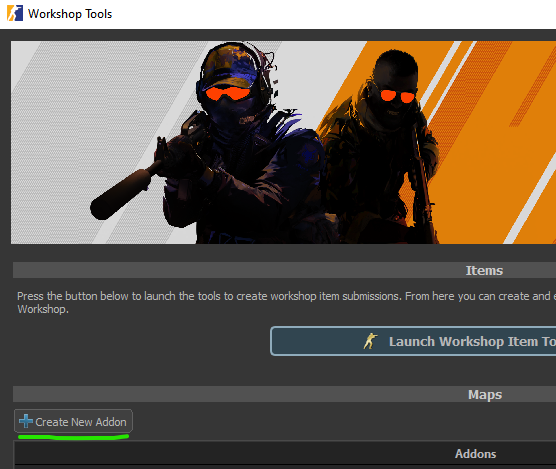
Before running an import, you will need to create a Workshop Tools addon so that the imported content has a valid destination. To make a new addon, simply launch the game with Workshop Tools, and from the UI click "Create New Addon" and take note of the name for later.
5. Locating the Import Script
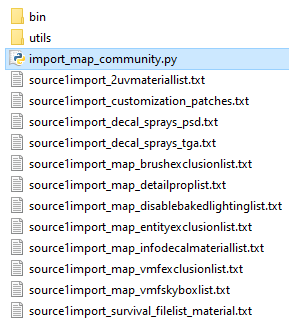
First up is locating the python import script, which can be found in the following folder: (YourSteamInstallFolder)\Steam\steamapps\common\counterstrike source 15\game\csgo\import_scripts
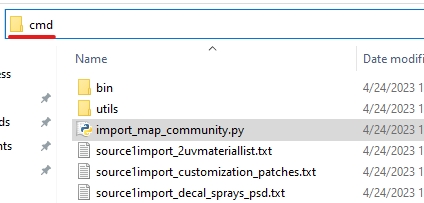
Once you have located the folder, you will want to open up a command prompt here. This can be done by simply typing "cmd" in Windows Explorer address bar and hitting enter:
Note: There is also an experimental GUI called import_map_community_gui.exe more info on this can be found at the end of this document.
6. Running the Script + Parameters
Now you are ready to run the script by entering the following:
python import_map_community.py <s1gameinfopath> <s1contentpath> <s2gameinfopath> <s2addon> <mapname> -usebsp
Script Parameters
- <s1gameinfopath>
- Path to folder containing CSGO's gameinfo.txt, this MUST be the path that contains the compiled CSGO model and material content you want to import (e.g. .mdl, .vmt).
- <s1contentpath>
- Path to folder containing source content, (.vmf .psd .tga etc.). As mentioned above, for the importer to successfully find and use source texture files, make sure they are in a mirrored location to that of the .vtfs (see example above)
- <s2gameinfopath>
- Path to folder containing CS2's gameinfo.gi
- <s2addon>
- The name of CS2 Workshop addon that you created earlier. This is where your assets will be imported to.
- <mapname>
- This is the map name (.vmf) without extension, e.g. de_examplemap that you wish to import. If your map sits under a subdirectory of the /maps/ folder in <s1contentpath>. Be sure to add this path before your map name. For example: my_maps/de_examplemap
- -usebsp
- This runs the map through a special vbsp process to generate clean map geometry from brushes, removing hidden faces and stitching up edges, making the CS2 version easier to work with in Hammer. It preserves world (vis) brushes and func_detail brushes for compatibility with S2. This parameter will also merge all func_instances in your map. Note that the final geometry will be triangulated, but cleaning it up is a fairly simple process, which will be explained in another guide.
- -usebsp_nomergeinstances
- Use this instead of -usebsp if you wish to both generate clean geo and also preserve func_instances. Note that this takes a little longer as it has to run through the import process twice. The final geometry will also be triangulated.
- -skipdeps
- Optional: skips importing all dependencies/content and only generates the vmap file(s). This provides a 'quick' import when iterating entities for example. Do not run with this if you are importing for the first time.
- Example:
- python import_map_community.py "C:\steam\steamapps\common\counterstrike source 15\csgo" "c:\map_sources\" "C:\steam\steamapps\common\counterstrike source 15\game\csgo" de_example_cs2 de_examplemap -usebsp
Experimental GUI
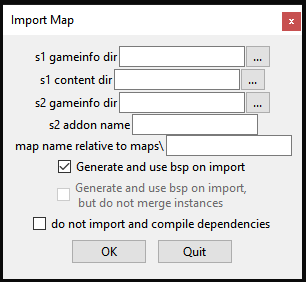
In (YourSteamInstallFolder)\Steam\steamapps\common\counterstrike source 15\game\csgo\import_scripts we have included a experimental GUI for the map importer which might help streamline the import process somewhat called import_map_community_gui.exe
This GUI has the advantage of useful tool tips, easily selectable import options and it will also remember your settings between sessions. Note that you will still need to complete the prerequisites and steps 1-4 above for this to work correctly. We have also included the source python scripts for the community to customize as they see fit.
Post Import Fixup steps
Tips for fixing skyboxes, cleaning up meshes and converting cubemaps.
Hammer Minimum Specs
Hammer now leverages GPU accelerated raytracing to both preview and bake lighting for CS2 maps, drastically speeding up compile times, even on lower end hardware. As such, a GPU capable of raytracing is now required for Hammer to be fully functional.
GPU Minimum Specs:
- Nvidia 2060Ti 6gb
- AMD 6600XT
GPU Recommended Specs:
- Nvidia 2080Ti+
- AMD 6800XT+
