Team Fortress 2/Your First Map: Difference between revisions
(Expansion) |
m (→Make a cube) |
||
| Line 19: | Line 19: | ||
# Left-click and drag in the '''Top''' 2D view in a movement that is ''Right'' and ''Downward'' as shown below. | # Left-click and drag in the '''Top''' 2D view in a movement that is ''Right'' and ''Downward'' as shown below. | ||
# You should see a dotted outline of a rectangle or square as you drag. | # You should see a dotted outline of a rectangle or square as you drag. | ||
# Create a square 512x512 units and let go of the left-mouse button. Please make the 512x512 square visible not only at '''Top''' but also at '''Right''' and '''Downward'''. | # Create a square 512x512 units and let go of the left-mouse button. Please make the 512x512 square visible not only at '''Top''' but also at '''Right''' and '''Downward''' viewport. | ||
# Press {{key|Enter}} on your keyboard to create this brush that you've just drawn. | # Press {{key|Enter}} on your keyboard to create this brush that you've just drawn. | ||
Revision as of 02:57, 26 May 2025
In ![]() Team Fortress 2, players can play lot of community maps, such as jump, dodgeball, MGE, trading maps, training maps, etc. Even if you are just vaguely trying to do map making, there will be a type of map you want to make. This article will cover common needs across various maps. Anyone running
Team Fortress 2, players can play lot of community maps, such as jump, dodgeball, MGE, trading maps, training maps, etc. Even if you are just vaguely trying to do map making, there will be a type of map you want to make. This article will cover common needs across various maps. Anyone running ![]() Hammer for the first time is the intended audience for this article. Whether you use Hammer or
Hammer for the first time is the intended audience for this article. Whether you use Hammer or ![]() Hammer++, either is fine.
Hammer++, either is fine.
Getting started
The Hammer editor is built in TF2. Refer to Getting Started for running Source's level editor.
Create main stage and applying a skybox
Make a cube
Before dealing with this topic, We need to think about what a sky is in the Source engine. Many Source engine game users imagine a world is a flat platform and there is an open space above it. However, Source engine maps are actually in a box! When players see a wallpaper with a picture of the sky on it, they think it's the sky. Now let's implement this. Let's create a cube-shaped world.
- Press ⇧ Shift+B or select the
 "Block tool" in the left tool bar.
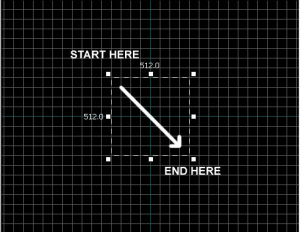
 - Left-click and drag in the Top 2D view in a movement that is Right and Downward as shown below.
- You should see a dotted outline of a rectangle or square as you drag.
- Create a square 512x512 units and let go of the left-mouse button. Please make the 512x512 square visible not only at Top but also at Right and Downward viewport.
- Press ↵ Enter on your keyboard to create this brush that you've just drawn.
Dig It!
Now it's time to dig inside.
- To go back to selection mode, click on the
 Selection tool icon on the Tool bar or press the Esc key.
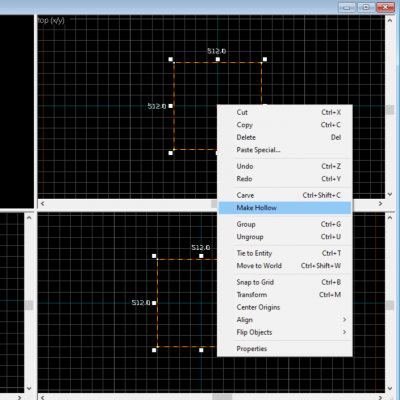
 - Right-click the "x" in the center of the square to select it. Left-click, then choose Make Hollow. Set the thickness to 16.
A new cube is created inside the cube.
Moving around in 3D is a bit different from the 2D viewports:
- Hold down Space and left-click and drag to rotate the camera.
- Hold down Space and right-click and drag to move up/down and left/right.
- Hold down Space and both right and left-click and drag to move forward and backward.
- You can also use the WASD keys to move forward, backward, strafe left and strafe right respectively.
- The Z key toggles on and off "mouse look" mode. Move your mouse cursor over the 3D Camera viewport and press the Z key. You can now move your mouse around as if mouse look was on in the game.
Apply Skybox
Now we will put on the skybox.
- Move the camera view into the cube.
- Select Toggle Texture application with ⇧ Shift+A
- Select face of the cube inside.
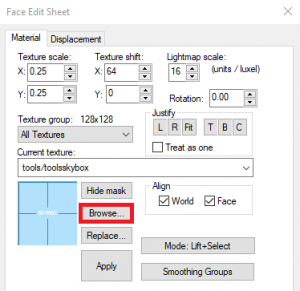
- In the face edit sheet, click Browse....
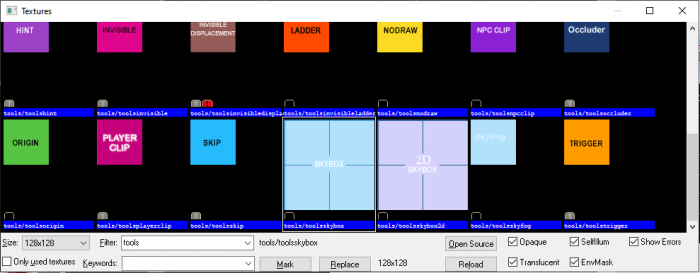
Search tools/toolsskybox. You can find it more easily by typing tools in the filter field.
Once you have selected the skybox, apply it to the surface you want to apply it to. Using current texture will make your work easier.
The side to which toolsskybox is applied becomes the sky.
Make starting locate
Now let's go into the game. Source games require an entity to spawn players.
- Select the
 Entity Tool by hitting ⇧ Shift+E or selecting on the Tool Bar.
 - Stand it on center of square.
The grid
A grid is displayed in all the 2D views. By default, all objects snap to the grid. Although you can turn this off, it is considered good practice to leave it on because it prevents leaks and other errors in your map.
The default grid size is 64 units, which means that each line is 64 units apart. The current size of the grid is displayed in the status bar at the bottom of the Hammer window.
- Clicking the Smaller Grid icon
 will make the grid half as big, for finer adjustments. You can also decrease the grid size with the [ key
 - Clicking the Larger Grid icon
 will make the grid twice as big, for larger adjustments. You can also increase the grid size with the ] key.
To bring the grid size down to 16 units, press the [ key twice. Look at the Status bar at the bottom right of the Hammer window and make sure it reads Grid: 16. If it doesn't, press [ or ] until is does.
Going back to the main topic
Select the entity by using the Selection Tool.
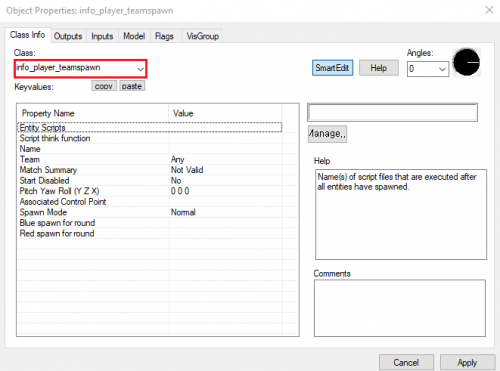
Now it's time to set its properties.
Press Alt+↵ Enter, or right-click and enter Properties.
Change the entity name to info_player_teamspawn.
Compile and Run
When everything is ready and finalized, press F9 to compile.
If you want to try your map, move the BSP file to [your Steam Directory]\steamapps\common\Team Fortress 2\tf\maps
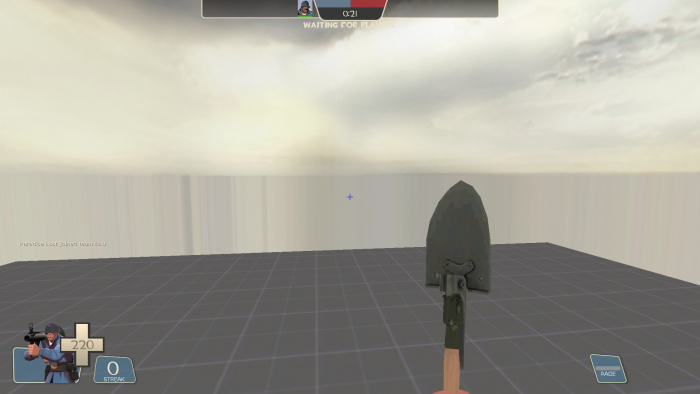
Then in the TF2 client, click on "Create Server" and search for your map to start. Make sure Steam Networking is disabled if you want to stop players from joining your server!
As you can see, we did well.
