Ricochet Level Creation/Pad: Difference between revisions
Jump to navigation
Jump to search
")

")
 Note:There is no known beam color for dual-color pads.
Thunder4ik (talk | contribs) m (→top: clean up, replaced: Category:Level Design Tutorials → Category:Level Design) |
(badly moved multipage) |
||
| Line 1: | Line 1: | ||
{{ | {{LanguageBar|title = Ricochet Level Creation/Pad}} | ||
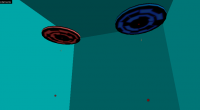
[[File:Ricochet pads.png|thumb|200px|Pads in Hammer. [[Ricochet Level Creation/Pad/Example|Download this map]].]] | |||
Pad is the primary element of gameplay in [[Ricochet]]. This tutorial explains how to create it. | |||
== The brush == | |||
* Create a 256x256x16 cylinder brush with 20 faces and make it <code>[[func_wall]]</code> entity. | |||
* Paint its faces with following textures: | |||
{|border="1" | |||
!Color | |||
!Up and down | |||
!Sides | |||
|- | |||
!bgcolor="#0078ff"|Blue | |||
|disc_blue1/2/3 | |||
|trim_blue1 | |||
|- | |||
!bgcolor="#ff0000"|Red | |||
|disc_red1/2/3 | |||
|trim_red1 | |||
|- | |||
!bgcolor="#803C80"|Dual-color | |||
|disc_dual1 | |||
|North-west and south-east: trim_red1<br /> | |||
North-east and south-west: trim_blue1 | |||
|} | |||
* Make the side faces have 0.5 Y texture scale. | |||
* Create <code>[[info_target]]</code> 8 units above the pad at its center for jumping on it and call it some name. | |||
== The beam == | |||
On Arena, there is beam under pads. | |||
{{Note|There is no known beam color for dual-color pads.}} | |||
To make the beam, create 2 <code>[[info_target]]</code>s under the pad. Place the first <code>info_target</code> right under the pad in the middle, and the second 384 units below it. Create <code>[[env_beam]]</code> in any place with the following parameters: | |||
* '''Start entity:''' first info_target | |||
* '''Ending entity:''' second info_target | |||
* '''Render FX:''' Normal | |||
* '''Brightness:''' 100 | |||
* '''Beam color:''' <span style="background-color:#0078ff; color:white">0 120 255</span> (for blue pad) / <span style="background-color:#ff0000; color:white">255 0 0</span> (for red pad) | |||
* '''Radius:''' 256 | |||
* '''Life:''' 0 | |||
* '''Width of beam:''' 255 | |||
* '''Amount of noise:''' 20 | |||
* '''Sprite name:''' sprites/laserbeam.spr | |||
* '''Texture Scroll Rate:''' 35 | |||
* '''Frames per 10 seconds:''' 0 | |||
* '''Starting frame:''' 0 | |||
* '''Strike again time:''' 1 | |||
* '''Damage:''' 0 | |||
* '''Flags:''' Start On, Shade End | |||
The pad is ready. Attach some [[Ricochet Level Creation/Jump arrow|jump arrows]] to it. | |||
[[Category:Level Design]] | [[Category:Level Design]] | ||
[[Category:Ricochet]] | [[Category:Ricochet]] | ||
Latest revision as of 09:43, 12 July 2024

Pads in Hammer. Download this map.
Pad is the primary element of gameplay in Ricochet. This tutorial explains how to create it.
The brush
- Create a 256x256x16 cylinder brush with 20 faces and make it
func_wallentity. - Paint its faces with following textures:
| Color | Up and down | Sides |
|---|---|---|
| Blue | disc_blue1/2/3 | trim_blue1 |
| Red | disc_red1/2/3 | trim_red1 |
| Dual-color | disc_dual1 | North-west and south-east: trim_red1 North-east and south-west: trim_blue1 |
- Make the side faces have 0.5 Y texture scale.
- Create
info_target8 units above the pad at its center for jumping on it and call it some name.
The beam
On Arena, there is beam under pads.
To make the beam, create 2 info_targets under the pad. Place the first info_target right under the pad in the middle, and the second 384 units below it. Create env_beam in any place with the following parameters:
- Start entity: first info_target
- Ending entity: second info_target
- Render FX: Normal
- Brightness: 100
- Beam color: 0 120 255 (for blue pad) / 255 0 0 (for red pad)
- Radius: 256
- Life: 0
- Width of beam: 255
- Amount of noise: 20
- Sprite name: sprites/laserbeam.spr
- Texture Scroll Rate: 35
- Frames per 10 seconds: 0
- Starting frame: 0
- Strike again time: 1
- Damage: 0
- Flags: Start On, Shade End
The pad is ready. Attach some jump arrows to it.