Door creation: Difference between revisions
No edit summary |
(started revamping article) |
||
| Line 1: | Line 1: | ||
{{lang|Door creation|title¿Door Creation}} | {{lang|Door creation|title¿Door Creation}} | ||
{{warning|This article is being revamped, please excuse inconsistencies}} | |||
In this tutorial, you will learn how to create a functioning brush-based door. | |||
== | == Brush or Point Based? == | ||
It is important to know the difference between a "[[brush entities|brush]]-based" and a "[[point entities|point]]-based" door. For starters, brush-based doors are, obviously, created from a brush that is tied to an entity. You generally have more control over how the door is shaped and how it looks compared to a point-based door. Point-based doors, however, can have functioning opening hardware, such as handles, push bars, and keypads. They are, however, restricted to a select few models that may not be present in more modern titles, such as {{p2|4}}. | |||
[[ | == Making the Doorway == | ||
{{note|The pictures were taken in the Portal 2 hammer editor, but it works the same in older versions as well.}} | |||
To create a brush-based door, make a wall with a gap that the player can move through. See [[dimensions]] for sizing. To make a gap in the wall, use the [[Hammer Clipping Tool|Clipping Tool]] to create a separated section, then make a hole at the bottom of that section. Make sure to put a [[brush]] underneath the doorway or there will be a [[leak]]. | |||
== Creating | [[Image:Door_brush_1.png|800px]] | ||
To | {{note|click on the image for a higher quality}} | ||
== Creating the Brush Door == | |||
To create the actual door, create a brush that fills the hole in the doorway. It is recommended to make the door have a different texture to make it stand out against the wall. | |||
[[Image: | [[Image:Door_brush_2.png|800px]] | ||
== Turning the Brush Into the Door == | == Turning the Brush Into the Door == | ||
To turn the brush into a door, | To turn the brush into a functioning door, select it and press {{key|ctrl}}+{{key|T}}. If you want a door that raises up and down, select {{ent|func_door}}. For rotating, select {{ent|func_door_rotating}} | ||
== Making a Button for Your Door == | |||
Name your door something like <code>door1</code>. To make a button for the door, create a small brush (can be any shape you want), and tie it (via <i>Tie to Entity</i>) to {{ent|func_button}}. Name your button as well (e.g., <code>door1_button</code>). Then, once you have selected 'Apply', select 'Outputs' and 'Add Output'. The output should be: | |||
:{| {{OutputsTable}} | |||
| [[Image:Io11.png]] || OnPress || door1 || Open || || 0.00 || No | |||
:{| {{OutputsTable}} | |} <br> | ||
| [[Image:Io11.png]] || OnPress || door1 || Open || | |||
|} | |||
<br> | |||
Then press 'Apply' again, to make the button.<br> When you test the map, walk up to the button and press 'Use'. The door should then open. | |||
<br> | |||
== Making Double Doors == | |||
To make two <code>func_door</code>s or <code>func_door_rotating</code>s open and close together, it is necessary to use a combination of Outputs and {{ent|logic_relay}}s. First, make two doors through the process stated above and name them accordingly (e.g., <code>door1</code> and <code>door2</code>). Second, add two logic_relay's somewhere near the doors (the location is not important, but it helps for organizational reasons to keep them close) and name them as well (e.g., <code>door1_relay</code> and <code>door2_relay</code>). Third, open the properties of the first door, go to the 'Outputs' tab, and add an output similar to the following: | |||
:{| {{OutputsTable}} | |||
| [[Image:Io11.png]] || OnOpen || door2 || Open || || 0.00 || No | |||
|} <br> | |||
Do this for the other door too, but change the Target Entity to <code>door1</code>. What these outputs do is open one door when another one is opened (whether that be done via Touch, Toggle, a button, etc.). At this point, you could save and compile to test the doors out if you wanted, but they would only be able to open each other, not close each other. That is where the logic_relay's come in. <br> <br> Now normally, you would think that you could repeat the process for closing the doors via Outputs (i.e., having one door be closed by the other), but such is not the case. If you try it out for yourself, you will find that the game crashes as soon as you go to close one of the doors. So, to work around this little bug, you need to introduce a <code>logic_relay</code> for each door. If you've followed the above process so far, you should already have the two relays placed and named. Now, open the properties of the first door and add an output similar to this: : | |||
{| {{OutputsTable}} | [[Image:Io11.png]] || OnClose || door1_relay || Trigger || || 0.00 || No |} <br> | |||
[[Category:Level Design]] | Again, repeat this for the other door, changing the Target Entity to <code>door2_relay</code>. Next, open the properties for the first relay and add an output like so: : | ||
[[Category:Tutorials]] | |||
{| {{OutputsTable}} | [[Image:Io11.png]] || OnTrigger || door2 || Close || || 0.00 || No |} <br> | |||
Repeat this for the other relay, changing the Target Entity to <code>door1</code>. Now save and compile, and you should have a working set of double doors. <br> <be> | |||
To help you understand this concept of Outputs and logic_relay's better, here is a little diagram for the above example: | |||
Player opens <code>door1</code> -->The opening of <code>door1</code> triggers <code>door2</code> to open via the Output of <code>door1</code> | |||
Player opens <code>door2</code> -->The opening of <code>door2</code> triggers <code>door1</code> to open via the Output of <code>door2</code> | |||
Player closes <code>door1</code> -->The closing of <code>door1</code> triggers <code>door1_relay</code> -->The triggering of <code>door1_relay</code> triggers <code>door2</code> to close | |||
Player closes <code>door2</code> -->The closing of <code>door2</code> triggers <code>door2_relay</code> -->The triggering of <code>door2_relay</code> triggers <code>door1</code> to close | |||
[[Category:Level Design]] [[Category:Tutorials]] | |||
Revision as of 16:50, 7 September 2022
In this tutorial, you will learn how to create a functioning brush-based door.
Brush or Point Based?
It is important to know the difference between a "brush-based" and a "point-based" door. For starters, brush-based doors are, obviously, created from a brush that is tied to an entity. You generally have more control over how the door is shaped and how it looks compared to a point-based door. Point-based doors, however, can have functioning opening hardware, such as handles, push bars, and keypads. They are, however, restricted to a select few models that may not be present in more modern titles, such as ![]() Portal 2.
Portal 2.
Making the Doorway
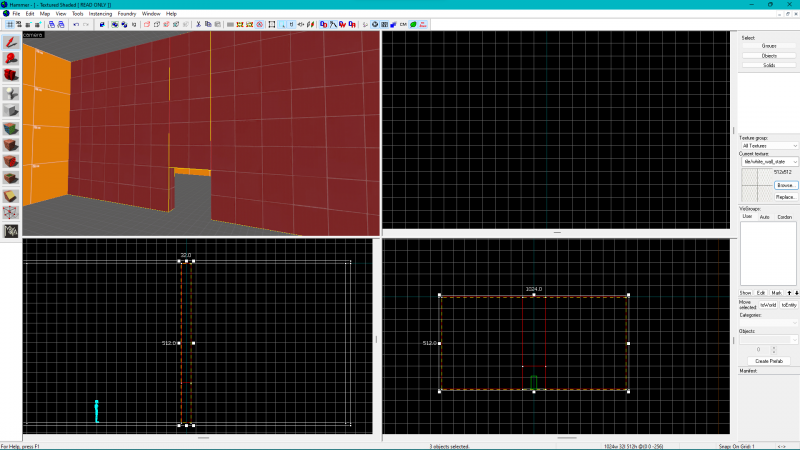
To create a brush-based door, make a wall with a gap that the player can move through. See dimensions for sizing. To make a gap in the wall, use the Clipping Tool to create a separated section, then make a hole at the bottom of that section. Make sure to put a brush underneath the doorway or there will be a leak.
Creating the Brush Door
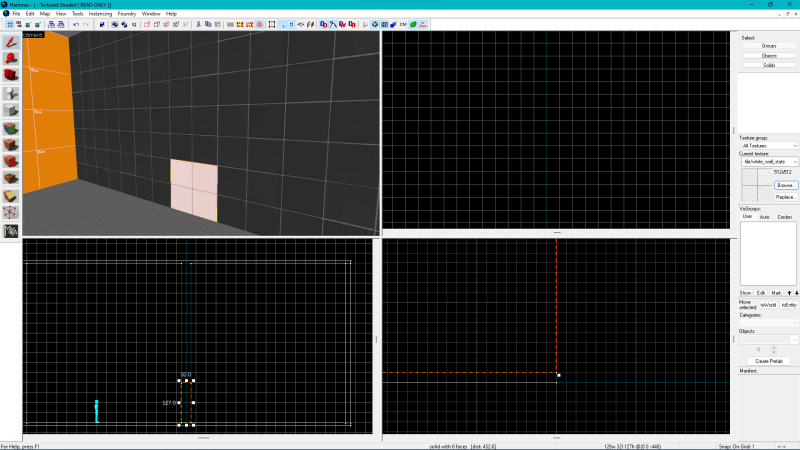
To create the actual door, create a brush that fills the hole in the doorway. It is recommended to make the door have a different texture to make it stand out against the wall.
Turning the Brush Into the Door
To turn the brush into a functioning door, select it and press ctrl+T. If you want a door that raises up and down, select func_door. For rotating, select func_door_rotating
Making a Button for Your Door
Name your door something like door1. To make a button for the door, create a small brush (can be any shape you want), and tie it (via Tie to Entity) to func_button. Name your button as well (e.g., door1_button). Then, once you have selected 'Apply', select 'Outputs' and 'Add Output'. The output should be:
Then press 'Apply' again, to make the button.
When you test the map, walk up to the button and press 'Use'. The door should then open.
Making Double Doors
To make two func_doors or func_door_rotatings open and close together, it is necessary to use a combination of Outputs and logic_relays. First, make two doors through the process stated above and name them accordingly (e.g., door1 and door2). Second, add two logic_relay's somewhere near the doors (the location is not important, but it helps for organizational reasons to keep them close) and name them as well (e.g., door1_relay and door2_relay). Third, open the properties of the first door, go to the 'Outputs' tab, and add an output similar to the following:
Do this for the other door too, but change the Target Entity to door1. What these outputs do is open one door when another one is opened (whether that be done via Touch, Toggle, a button, etc.). At this point, you could save and compile to test the doors out if you wanted, but they would only be able to open each other, not close each other. That is where the logic_relay's come in.
Now normally, you would think that you could repeat the process for closing the doors via Outputs (i.e., having one door be closed by the other), but such is not the case. If you try it out for yourself, you will find that the game crashes as soon as you go to close one of the doors. So, to work around this little bug, you need to introduce a logic_relay for each door. If you've followed the above process so far, you should already have the two relays placed and named. Now, open the properties of the first door and add an output similar to this: :
door2_relay. Next, open the properties for the first relay and add an output like so: :
| My Output | Target Entity | Target Input | Parameter | Delay | Only Once |
|---|
door1. Now save and compile, and you should have a working set of double doors. <be> To help you understand this concept of Outputs and logic_relay's better, here is a little diagram for the above example: Player opens
door1 -->The opening of door1 triggers door2 to open via the Output of door1
Player opens door2 -->The opening of door2 triggers door1 to open via the Output of door2
Player closes door1 -->The closing of door1 triggers door1_relay -->The triggering of door1_relay triggers door2 to close
Player closes door2 -->The closing of door2 triggers door2_relay -->The triggering of door2_relay triggers door1 to close
| My Output | Target Entity | Target Input | Parameter | Delay | Only Once |
|---|

