WiseElec: Difference between revisions
m (idea->tip) |
(minor formatting to be more like a wiki page. also links.) |
||
| Line 1: | Line 1: | ||
{{DISPLAYTITLE:WiseElec: Electrified Obstacles}} | |||
{{morescreenshots}} | {{morescreenshots}} | ||
== | {{wisemxport|[[User:Plykkegaard|Peter [AGHL]]] 14:57, 6 Feb 2008 (PST)}} | ||
==Introduction== | |||
[[image:wiseElec01.jpg|thumb|150px|right|Typical electrified obstacle.]] | [[image:wiseElec01.jpg|thumb|150px|right|Typical electrified obstacle.]] | ||
In this tutorial, we will create an obstacle such as a fence, in which it is electrified and can be toggled by a [[trigger]]. You can any as one but as a recommendation, using a [[model]] prop for this makes it easy. For the tutorial we will use a railing from ''Half Life 2'' (see right). | In this tutorial, we will create an obstacle such as a fence, in which it is electrified and can be toggled by a [[trigger]]. You can any as one but as a recommendation, using a [[model]] prop for this makes it easy. For the tutorial we will use a railing from ''Half-Life 2'' (see right). | ||
{{tip|It doesn't have to be a fence! Try a ladder, door/gate or even water/ground!}} | {{tip|It doesn't have to be a fence! Try a ladder, door/gate or even water/ground!}} | ||
For the purpose of this tutorial the rail obstacle is initially electrified, since that is what many will require. For that purpose, the example map shows that it can be disabled by standing on a small red carpet and re-enabled by standing on a small green carpet (the carpets are not shown in screenshots). | For the purpose of this tutorial the rail obstacle is initially electrified, since that is what many will require. For that purpose, the example map shows that it can be disabled by standing on a small red carpet and re-enabled by standing on a small green carpet (the carpets are not shown in screenshots). | ||
| Line 17: | Line 15: | ||
{{tip|To create a realistic effect, you may want to add sounds and possibly smoke.}} | {{tip|To create a realistic effect, you may want to add sounds and possibly smoke.}} | ||
<code>[[trigger_hurt]]</code> is used to start off the series of events when the player touches it. Additionally, it outputs to entities to create the "blow back" of the player and sparks. These are: one <code>[[env_physexplosion]]</code>, eight <code>[[env_spark]]</code>s, one <code>[[trigger_push]]</code>, and one <code>[[logic_timer]]</code> to lend some logic. | |||
[[trigger_hurt]] is used to start off the series of events when the player touches it. Additionally, it outputs to entities to create the "blow back" of the player and sparks. These are: | |||
one | |||
It is recommended that you have basic understanding of the Hammer editor, and with placing a [[entity]] and the manipulation of such. | It is recommended that you have basic understanding of the Hammer editor, and with placing a [[entity]] and the manipulation of such. | ||
| Line 30: | Line 21: | ||
{{note|You can load the example map file at the bottom to see how things should go together.}} | {{note|You can load the example map file at the bottom to see how things should go together.}} | ||
==Creation== | |||
[[image:wiseElec02.jpg|thumb|150px|right|Hammer design view.]] | |||
== | |||
So let's get going on creating that electrified obstacle. | So let's get going on creating that electrified obstacle. | ||
First, we should find a spot in our level or map in which we think we should place one. As with ''Half-Life 2'' players solve "puzzles" to continue progressing the game - and this can be thought as of such. | |||
Next, we will make the obstacle that will be "electrified". This can be a <code>[[prop_static]]</code> or a displacement. It is recommended to use something like a fence, or a railing (shown in the first screenshot), since it logical item to a player. You could just as easily use motion enabled entity types. Remember the player has to get around the obstacle. | |||
Next, we will make the obstacle that will be "electrified". This can be a [[prop_static]] or a displacement. It is recommended to use something like a fence, or a railing (shown in the first screenshot), since it logical item to a player. You could just as easily use motion enabled entity types. | |||
{{idea|This concept could be extended to a gate that would swing open once the electricity was turned off, or even a loose cable trapped under a vehicle.}} | {{idea|This concept could be extended to a gate that would swing open once the electricity was turned off, or even a loose cable trapped under a vehicle.}} | ||
| Line 47: | Line 33: | ||
Now, we will create the entities for the electrified fence. | Now, we will create the entities for the electrified fence. | ||
{{todo|The table showing setup of the entities is not currently available.}} | |||
Most people will require a way of shutting the "electricity" off to the obstacle. Follow these steps: | Most people will require a way of shutting the "electricity" off to the obstacle. Follow these steps: | ||
{{todo|The table showing setup of the entities is not currently available.}} | |||
{{idea|You could easily create a switch for this, another kind of "secret" trigger or the lever like Valve used in [[Ravenholm]].}} | {{idea|You could easily create a switch for this, another kind of "secret" trigger or the lever like Valve used in [[Ravenholm]].}} | ||
==See Also== | |||
*[http://type3studios.com/downloads/tutorials/SdkNutsTutorials/WiseElec.zip Example VMF] | |||
== | *[https://cdn.discordapp.com/attachments/434089157875466242/459207641009487882/WiseElec.vmf Example VMF backup] | ||
* [ | |||
* | |||
Revision as of 20:10, 20 June 2018

You can upload screenshots at Special:Upload. For help, see the Help:Images.
This tutorial was originally created by wisemx. It was originally posted on SDKnuts.net.
Introduction
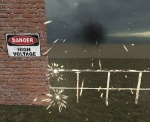
In this tutorial, we will create an obstacle such as a fence, in which it is electrified and can be toggled by a trigger. You can any as one but as a recommendation, using a model prop for this makes it easy. For the tutorial we will use a railing from Half-Life 2 (see right).
For the purpose of this tutorial the rail obstacle is initially electrified, since that is what many will require. For that purpose, the example map shows that it can be disabled by standing on a small red carpet and re-enabled by standing on a small green carpet (the carpets are not shown in screenshots).
When a player "touches" the fence in this tutorial while it is electrified there will be sparks, and the player will get blown back a few feet.
trigger_hurt is used to start off the series of events when the player touches it. Additionally, it outputs to entities to create the "blow back" of the player and sparks. These are: one env_physexplosion, eight env_sparks, one trigger_push, and one logic_timer to lend some logic.
It is recommended that you have basic understanding of the Hammer editor, and with placing a entity and the manipulation of such.
Creation
So let's get going on creating that electrified obstacle.
First, we should find a spot in our level or map in which we think we should place one. As with Half-Life 2 players solve "puzzles" to continue progressing the game - and this can be thought as of such.
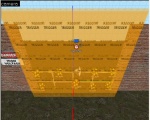
Next, we will make the obstacle that will be "electrified". This can be a prop_static or a displacement. It is recommended to use something like a fence, or a railing (shown in the first screenshot), since it logical item to a player. You could just as easily use motion enabled entity types. Remember the player has to get around the obstacle.
Now, we will create the entities for the electrified fence.
Most people will require a way of shutting the "electricity" off to the obstacle. Follow these steps:

