Adding Point Entities: Difference between revisions
Jump to navigation
Jump to search
m (Changed images to PNG and re-adjusted thumbnail sizes) |
mNo edit summary |
||
| Line 6: | Line 6: | ||
{{first room menu}} | {{first room menu}} | ||
Now | Now we’ll '''add some [[entities]]''' to the map. Entities are objects which have behaviors, and which can (usually) be interacted with somehow. | ||
This page covers [[point entities]], which are those that exist at a single point on the grid. [[Brush entities]], covered by the next article, are slightly different. | This page covers [[point entities]], which are those that exist at a single point on the grid. [[Brush entities]], covered by the next article, are slightly different. | ||
| Line 15: | Line 15: | ||
#* Deathmatch game: [[info_player_deathmatch]] | #* Deathmatch game: [[info_player_deathmatch]] | ||
#* Team game: info_player_<team> (red/blue, terrorist/counterterrorist, axis/allies, etc.) | #* Team game: info_player_<team> (red/blue, terrorist/counterterrorist, axis/allies, etc.) | ||
# Now | # Now we’ll place this entity in the map. When placing entities aligned with a surface, you can do this simply by clicking where on the surface you want it in the '''3D View''', so click somewhere on the floor of the room, like in the image here, and the entity will be placed at the spot you click:<p>[[File:Hammer placeentity.png|thumb|left|400px|Left-click on the floor in the 3D View to place the starting entity.]]</p>{{clr}} {{tip|You can also position entities by clicking in a 2D view and dragging around the crosshairs that appear. When you’re happy, with your mouse still over a 2D view hit {{key|Enter}} to create the entity. (Dragging works ''after'' they’ve been created too!)}} | ||
# Most Source games involve shooting guns, so | # Most Source games involve shooting guns, so let’s place one. Weapons also vary from game to game, of course, but they ''always'' have names starting with “<code>weapon_</code>”. You can search the entity list for that term to see a list of what’s available. If you’re working with anything related to Half-Life 2 you’ll have the option of creating a [[weapon_357]], like this: {{clr}}<div style="float:left;">[[File:Hammer pick357.png|thumb|left|150px|Pick the [[weapon_357]] from the entity list...]]</div><div style="float:left;"> [[File:Hammer place357.png|thumb|left|400px|..and place it on the floor.]]</div>{{clr}} | ||
# Depending on the rules of the game | # Depending on the rules of the game you’re working with, you may need to create ammunition for the gun too before the player is able to fire it. Not all games provide ammo entities however, and it’s not obvious which ammo type goes with which weapon even for those that do. Try searching for “<code>item_ammo_</code>” entities, but if that fails you can always use the [[developer console]] to enable [[sv_cheats|cheats]], and then give yourself ammo (after picking the weapon up) with the “<code>givecurrentammo</code>” command. | ||
== Compiling == | == Compiling == | ||
Once a player start exists you can compile your map and walk around in it, hopefully without seeing any strange warnings. If you want to do this now, [[Saving and Compiling|skip ahead to | Once a player start exists you can compile your map and walk around in it, hopefully without seeing any strange warnings. If you want to do this now, [[Saving and Compiling|skip ahead to “Saving and Compiling”]]. | ||
{{Navbar|Applying Textures|Your First Map|Creating Brush Entities}} | {{Navbar|Applying Textures|Your First Map|Creating Brush Entities}} | ||
[[Category:Level Design Tutorials]] | [[Category:Level Design Tutorials]] | ||
Revision as of 16:26, 1 May 2012
Now we’ll add some entities to the map. Entities are objects which have behaviors, and which can (usually) be interacted with somehow.
This page covers point entities, which are those that exist at a single point on the grid. Brush entities, covered by the next article, are slightly different.
- Entities are placed using the Entity tool
 . Select it with Shift+E, or from the left-hand icon bar:
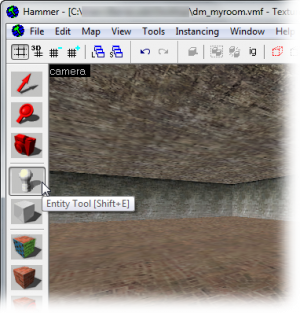 Switch to the Entity Tool.
 - Next we pick which entity to insert. There is a list of available entities in the Object Toolbar, which is in the lower-right corner of the Hammer window: The one that we want at the moment is a spawn location for the player. Its exact name varies slightly:
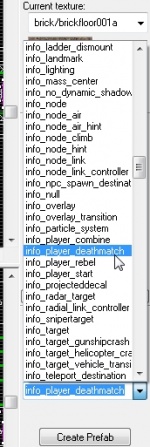
 Tip:You can search the list by typing into its text box. There is rarely any need to scroll around.
- Singleplayer game: info_player_start
- Deathmatch game: info_player_deathmatch
- Team game: info_player_<team> (red/blue, terrorist/counterterrorist, axis/allies, etc.)
- Now we’ll place this entity in the map. When placing entities aligned with a surface, you can do this simply by clicking where on the surface you want it in the 3D View, so click somewhere on the floor of the room, like in the image here, and the entity will be placed at the spot you click: Tip:You can also position entities by clicking in a 2D view and dragging around the crosshairs that appear. When you’re happy, with your mouse still over a 2D view hit ↵ Enter to create the entity. (Dragging works after they’ve been created too!)
- Most Source games involve shooting guns, so let’s place one. Weapons also vary from game to game, of course, but they always have names starting with “
weapon_”. You can search the entity list for that term to see a list of what’s available. If you’re working with anything related to Half-Life 2 you’ll have the option of creating a weapon_357, like this: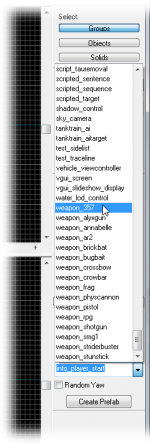 Pick the weapon_357 from the entity list...
 - Depending on the rules of the game you’re working with, you may need to create ammunition for the gun too before the player is able to fire it. Not all games provide ammo entities however, and it’s not obvious which ammo type goes with which weapon even for those that do. Try searching for “
item_ammo_” entities, but if that fails you can always use the developer console to enable cheats, and then give yourself ammo (after picking the weapon up) with the “givecurrentammo” command.


Compiling
Once a player start exists you can compile your map and walk around in it, hopefully without seeing any strange warnings. If you want to do this now, skip ahead to “Saving and Compiling”.