Zh/Teleporters: Difference between revisions
mNo edit summary |
(重要→关键) |
||
| Line 34: | Line 34: | ||
{{note|这意味着 '''teleport_destination_1''' 应当挨着的是 '''teleport_entrance_2''', 并且 '''teleport_destination_2''' 应当挨着的是 '''teleport_entrance_1'''}} | {{note|这意味着 '''teleport_destination_1''' 应当挨着的是 '''teleport_entrance_2''', 并且 '''teleport_destination_2''' 应当挨着的是 '''teleport_entrance_1'''}} | ||
{{warning|确保没有任何 ''info_teleport_destination'' 实体的部分接触到旁边的 ''trigger_teleport'' 固体。 如果真的发生了: 当你传送的时候, 它将要么通过另一个传送门把你扔回来,要么引起一个你在两个目的地之间不断传送的无限循环。}} | {{warning|确保没有任何 ''info_teleport_destination'' 实体的部分接触到旁边的 ''trigger_teleport'' 固体。 如果真的发生了: 当你传送的时候, 它将要么通过另一个传送门把你扔回来,要么引起一个你在两个目的地之间不断传送的无限循环。}} | ||
{{note| | {{note|这些实体的名字并不关键, 但是却可以使其更容易理解}} | ||
<br> | <br> | ||
现在当你踏入 '''teleport_entrance_1''' 你将会被传送去 '''teleport_destination_1''' ,然后对于 '''teleport_entrance_2''' 和 '''teleport_destination_2'''也一样。 | 现在当你踏入 '''teleport_entrance_1''' 你将会被传送去 '''teleport_destination_1''' ,然后对于 '''teleport_entrance_2''' 和 '''teleport_destination_2'''也一样。 | ||
Revision as of 07:59, 16 January 2022
传送门能通过标准的起源实体制作。
OnBlah > !activator > RunScriptCode > self.SetVelocity(Vector(0,0,0))
单向传送门
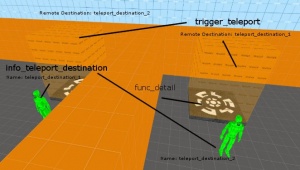
开始创建一个 固体(brushes) 并用 纹理工具(tools/toolstrigger) 添加纹理。 现在选择固体通过 CTRL + T 或者右键固体并选中 转换成实体(Tie To Entity), 然后选择 trigger_teleport 然后点击应用(apply)。 这将会是玩家要被传送必须进入的区域 (参见右图)。
- 设置 '目的地(Remote Destination)' 为一个合适的名字 (比如 teleport_destination_1)
- 切换到 '标志(Flags)' 标签栏 然后check '客户端(Clients)' 标记来允许玩家传送。
接着, 从 实体 列表之中制作一个 info_teleport_destination 在你想要作为传送 出口 的地方. 这将会是玩家想要传送去的点。
- 设置 '名称(Name)' 属性为前一步用过的那个合适的名字 (teleport_destination_1)
现在游戏中, 当你触碰 trigger_teleport, 你将会从 info_teleport_destination 送出来.
双向传送门
制作一个双向传送门和制作单向传送门的办法差不多, 如果你能成功做出其中一个, 那剩余的便是手到擒来。
首先, 创建两个 固体(brushes) 来作为你的传送门入口, 然后用 纹理工具(tools/toolstrigger) 添加纹理。 现在, 和单向传送门一样, 按下 CTRL + T 或者右键并选择 转换成实体(Tie To Entity) 然后给它们全部选择 trigger_teleport。
- 设置 键值(keyvalues) 和 标志(flags) 与单向传送门相同, 除了 目的地(Remote Destination).
- 设置其中一个传送入口的 目的地(Remote destination) 键值 为一个合适的名字 (比如 teleport_destination_1)。 并且另一个入口为另一个名字比如 teleport_destination_2。
- 给这些 固体实体 起个合适的名字, 比如 teleport_entrance_1 或者 teleport_entrance_2.
现在创建两个 info_teleport_destination 实体, 这些会是你想传送去的地方。
- 设置它们每一个的 名称(Name)为早些想出的合适的名字 ( 比如teleport_destination_1 和 teleport_destination_2)。
- 将一个 传送目的地 (teleport_destination) 放在 入口 附近不会被传送的位置。
- 将别的 传送目的地 (teleport destination) 放在别的 传送入口(teleport entrance) 附近。
现在当你踏入 teleport_entrance_1 你将会被传送去 teleport_destination_1 ,然后对于 teleport_entrance_2 和 teleport_destination_2也一样。
制作团队专用传送器
If you have teleporters in your map that are out in the open, and you want to make them team-specific, add 1 filter_activator_tfteam per teleporter that you are making team-specific.
- In the filter_activator_tfteam properties, name your activator, and set the 'Team' to RED/BLU based on which team you want the teleporter to be used by.
- Open your trigger_teleport properties, and set 'Filter Name' to the name of the corresponding filter_activator_tfteam.
