|
|
| (30 intermediate revisions by 9 users not shown) |
| Line 1: |
Line 1: |
| {{first room menu}} | | {{LanguageBar|title = Ajouter un modèle}} |
|
| |
|
| Prop models sont des modèles 3D créer à partir d'un programme de modélisation telle [[XSI Mod Tool]] ou 3DS Max.
| | {{first room menu:fr}} |
| | Les 'Props' sont des modèles 3D créés à partir d'un programme de modélisation tel {{L|XSI Mod Tool}} ou 3DS Max. |
|
| |
|
| Il y a 3 types de props : | | Il y a 3 types de props : |
| * ''Static'' props qui sont fixe. | | * ''Static'' qui sont fixe. |
| * ''Dynamic'' props qui peuvent être animés ou bougé. | | * ''Dynamic'' qui peuvent être animés ou bougé. |
| * ''Physics'' props qui peuvent être bougé et obeissent au lois de la gravité. | | * ''Physics'' qui peuvent être bougé et obeissent au lois de la physiques. |
|
| |
|
| Vous verrez dans ce tuto comment placé deux types de ces entités. | | Vous verrez dans ce tuto comment placer deux types de ces entités. |
|
| |
|
| <br clear="both">
| |
|
| |
|
| [[Image:hammer_pickpropstatic.jpg |thumb|left|200px| Select [[prop_static]] from the drop-down list.]] | | == Prop static == |
| [[Image:hammer_placepropstatic.jpg |thumb|right|200px| Place the ''prop_static'' entity on the floor by clicking in the 3D View.]] | | [[File:hammer_pickpropstatic.png|thumb|left|200px|Choisissez {{L|prop_static}} dans la liste des entitée.]] |
| | [[File:hammer_placepropstatic.png|thumb|right|200px|Placez l'entitée ''prop_static'' sur le sol en cliquant dans la vue 3D.]] |
|
| |
|
| We will start by adding a static prop.
| | Nous allons commencer par ajouter un prop static. |
|
| |
|
| All props are entities, and handled as such, so switch to the '''Entity Tool''' again.
| | Tous les props sont des entités, et traité comme telle, vous pourrez donc les gérez avec le menu '''Entity Tool'''. |
|
| |
|
| Then pick [[prop_static]] from the entity list in the '''Objects Toolbar'''.
| | Ensuite choisissez {{L|prop_static}} de la liste entité. |
|
| |
|
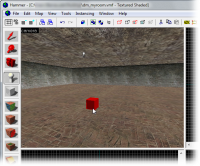
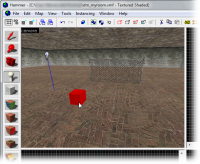
| Place the ''prop_static'' in the map by clicking on the floor brush in the 3D view.
| | Placez le ''prop_static'' dans la map sur le sol dans la vue 3D. |
|
| |
|
| The result is a little red box. That’s because we haven't decided what the prop will look like yet.
| | Vous aurez pour résultat une petite boite rouge, car vous n'avez pas encore choisi votre modèle, juste le type de modèle par le choix de l'entité ''prop_static''. |
|
| |
|
| We will have to choose a model for this prop to do that.
| | Nous allons maintenant choisir le modèle. |
|
| |
|
| <br clear="both">
| | {{clr}} |
|
| |
|
| [[Image:hammer_pickworldmodel.gif |thumb|right|500px| Switch to the World Model field.]] | | [[File:hammer_pickworldmodel.png|thumb|right|500px|Cliquez sur Word model.]] |
|
| |
|
| Switch to the Selection Tool and double-click the ''prop_static'' to bring up its properties.
| | Prenez l'outil Selection et double-cliquez sur l'entité. |
|
| |
|
| # Click the '''World Model''' field in the '''Object Properties''' dialog. | | # Cliquez sur '''World Model''' |
| # Click the '''Browse...''' button and wait patiently while the '''Model Browser''' list populates. (You will only have to wait once; after that, the list will be cached for future searches.) | | # Puis sur '''Browse...''', le '''Model Browser''' ou explorateur de modèles va s'afficher. |
|
| |
|
| {{note|There are currently two types of model browsers in Hammer, depending of whether the ''Use VGUI model browser'' flag is checked in the Hammer options. This tutorial will only focus on the new and default VGUI model browser. The older browser functions a lot like a normal Windows file explorer does.}} | | {{clr}} |
|
| |
|
| <br clear="both">
| | [[File:Hammer_ModelBrowser_PickFolder.jpg|thumb|right|400px|Click a folder to change to that sub-directory.]] |
|
| |
|
| [[Image:Hammer_ModelBrowser_PickFolder.jpg |thumb|right|400px| Click a folder to change to that sub-directory.]]
| | Ne vous inquiétez pas si vous voyez le message “ERROR”, c'est juste que vous n'avez sélectionné aucun modèles. |
|
| |
|
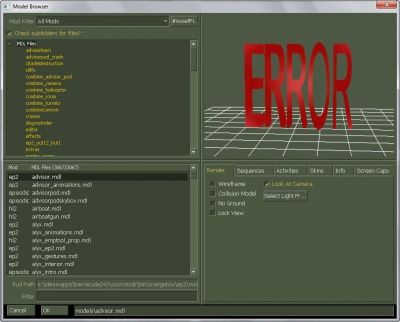
| Don't worry that it says “ERROR” in big red letters in the preview window of the Model Browser. That’s just because we haven't chosen any model to preview yet.
| | Cliquez sur le dossier ''props_c17'' pour lister les modèles à l'intérieur. |
|
| |
|
| Click the ''props_c17'' folder in the model browser to list the models in it in the lower right window.
| | {{clr}} |
|
| |
|
| <br clear="both">
| | [[File:Hammer_ModelBrowser_PickFence.jpg|thumb|right|400px|Click the ''fence01a'' model to select it, and then click ''OK'' to close the browser.]] |
|
| |
|
| [[Image:Hammer_ModelBrowser_PickFence.jpg |thumb|right|400px| Click the ''fence01a'' model to select it, and then click ''OK'' to close the browser.]]
| | Il y a beaucoup de modèles comme pour les textures, nous nous servirons des filtres. Pour notre clôture tapez "<code>fence</code>" dans le champ filtre. |
|
| |
|
| There are a lot of models in this folder, so instead of scrolling through the entire list, we can simply filter the content like we did with the texture browser, by typing in "<code>fence</code>" in the text box just beneath the list.
| | Puis choisissez le modèle <code>fence01a.mdl</code>, vous aurez un aperçu dans la vue en 3D. Puis faites Ok pour l'ajouter à votre entité ''prop_static''. |
|
| |
|
| Click the model file <code>fence01a.mdl</code> to select it. | | [[File:hammer_pickapply_sm.png|thumb|right|400px|Click the ''Apply'' button to confirm your changes.]] |
|
| |
|
| A preview of the model will be displayed in the preview window. You can drag your mouse in that window to freely rotate the model if you want.
| | Faite ''Apply''. Votre entité doit avoir pris l'apparence de votre modèle. |
|
| |
|
| When you're done with inspecting the preview, confirm your choice of the model by clicking ''OK''.
| | {{clr}} |
|
| |
|
| The Model Browser will close and the ''fence01a'' model will be selected as the model for the ''prop_static'' entity.
| | [[File:hammer_closeprop.png|thumb|right|200px|Close the '''Object Properties''' dialog.]] |
|
| |
|
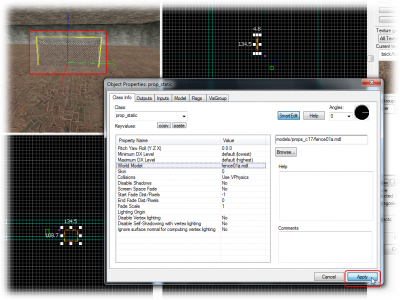
| [[Image:hammer_pickapply_sm.jpg |thumb|right|400px| Click the ''Apply'' button to confirm your changes.]]
| | {{clr}} |
|
| |
|
| Click the ''Apply'' button to commit the changes.
| | *Note : Le placement des prop static est assez libre, vous pouvez les placer légèrement au dessus du sol, ou un peu en dessous cela ne causera aucun problème contrairement au prop physic plus contraignant. |
|
| |
|
| The ''prop_static'' will now change into displaying the fence model you selected in the 3D view.
| | == Prop physics == |
|
| |
|
| You can also change the direction the fence faces by changing the pitch yaw and roll settings or using the angle circle and typing in a value of 0 to 360.
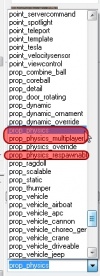
| | [[File:hammer_pickpropphysics.jpg|thumb|left|100px|Choose the appropriate physics prop entity.]] |
| | [[File:hammer_placepropphysics.png|thumb|right|200px|Place the physics prop entity by clicking the floor in the 3D view.]] |
|
| |
|
| | Nous allons maintenant ajouter un modèle avec des propriétés physiques. |
|
| |
|
| <br clear="both">
| | Sélectionnez '''Entity Tool'''. |
|
| |
|
| [[Image:hammer_pickpropphysics.jpg |thumb|left|100px| Choose the appropriate physics prop entity.]]
| | Le type de l'entité prop_physics depend du jeu pour lequel la map est destinée. |
| [[Image:hammer_placepropphysics.jpg |thumb|right|200px| Place the physics prop entity by clicking the floor in the 3D view.]]
| |
|
| |
|
| We will now add a prop model with physics properties.
| | * Si elle est pour {{L|Half-Life 2}}: Single Player, choisissez l'entité {{L|prop_physics}} entity. |
| | * Si elle est pour {{L|Half-Life 2: Deathmatch}} ou un autre jeux multi, choisissez l'entité {{L|prop_physics_multiplayer}}. |
|
| |
|
| Switch to the '''Entity Tool'''.
| | Choisissez votre entité, placez la sur le sol et allez dans l'explorateur de modèles. |
|
| |
|
| The type of prop_physics entity we are going to choose depends on what game your map is for.
| | {{clr}} |
|
| |
|
| * If you are mapping for [[Half-Life 2]]: Single Player, choose the [[prop_physics]] entity.
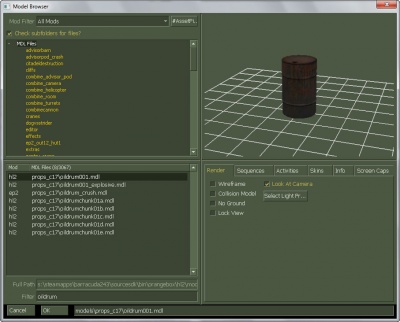
| | [[File:Hammer_ModelBrowser_PickOildrum.jpg|thumb|right|400px|After having opened the browser, search for <code>oildrum</code>, choose the ''oildrum001'' model, and click ''OK''.]] |
| * If you are mapping for [[Half-Life 2: Deathmatch]], choose the [[prop_physics_multiplayer]] entity.
| |
|
| |
|
| Choose the appropriate entity from the entity list in the ''Object Toolbar''.
| | Pour un tonneau, tapez "<code>oildrum</code>" dans le champ filtre, et choisissez le modèle <code>oildrum001.mdl</code>, puis confimer. |
|
| |
|
| Place the physics prop entity somewhere on the floor of the room.
| | {{clr}} |
|
| |
|
| Re-open the '''Object Properties''' dialog if you've closed it, to display the properties of the physics prop. Otherwise the dialog will automatically have changed to display its properties.
| | *Note : Pour leur placement il est conseillé de les surélever légèrement par rapport au sol. |
| | | {{ACategory|Level Design}} |
| <br clear="both">
| | {{ACategory|Tutorials}} |
| | |
| [[Image:Hammer_ModelBrowser_PickOildrum.jpg |thumb|right|400px| After having opened the browser, search for <code>oildrum</code>, choose the ''oildrum001'' model, and click ''OK''.]]
| |
| | |
| Again click the '''Browse...''' button in the '''World Model''' field in the '''Object Properties''' dialog to load up the model browser.
| |
| | |
| # Instead of "<code>fence</code>", search for "<code>oildrum</code>".
| |
| # Pick the <code>oildrum001.mdl</code>.
| |
| # Close the browser with ''OK''.
| |
| | |
| <br clear="both">
| |
| | |
| [[Image:hammer_pickapply_sm2.jpg |thumb|right|400px| Click ''Apply'' to make the change and update the 3D view.]]
| |
| | |
| Click the '''Apply''' button to confirm your changes, and the physics prop will change to the barrel model you selected.
| |
| | |
| <br clear="both">
| |
| | |
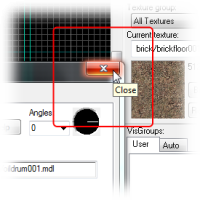
| [[Image:hammer_closeprop.jpg |thumb|right|200px| Close the '''Object Properties''' dialog.]]
| |
| | |
| Close the '''Object Properties''' dialog.
| |
| | |
| <br clear="both">
| |
| | |
| == Moving objects ==
| |
| [[Image:hammer_pickselect.jpg |thumb|left|200px| Switch to the Selection Tool.]]
| |
| [[Image:hammer_selectfence_sm.jpg |thumb|right|400px| Select the fence model in the 3D view by clicking it, and then click and drag the fence in one of the lower views to move it.]]
| |
| | |
| You may have noticed that the fence model is stuck half-way into the floor. We are going to move it up now.
| |
| | |
| Entities are moved just like brushes are:
| |
| | |
| Switch to the '''Selection Tool''' and click on the fence to select it.
| |
| | |
| Then select the fence model by clicking on it in the 3D view.
| |
| | |
| A box will appear around the model in all the views, showing that it has been selected.
| |
| | |
| To move something along the z axis (up or down), you’ll need to move it in one of the lower views (named ''front (y/z)'' or ''side (x/z)'').
| |
| | |
| Click inside the red bounding box in one of these 2D views, and then drag the fence upward until it’s closer to the floor.
| |
| | |
| <br clear="both">
| |
| | |
| [[Image:hammer_movefence_sm.jpg |thumb|right|400px| Decrease the size of the grid so the objects can be moved in finer steps.]]
| |
| | |
| You may find that you can’t quite line up the bottom of the model with the floor because the current size of the grid prevents it. It won’t matter that much if the fence sticks somewhat into the floor, but if you want it exactly aligned you will need to decrease the grid size:
| |
| | |
| # Click the '''Smaller Grid''' button in the grid toolbar in the upper left corner of the Hammer window.
| |
| {{note|Alternatively, you can use the shortcut key '''[''' to decrease the grid size, or the ''']''' key to increase the grid size}} | |
| # Zoom in a bit on where the fence meets the floor, so that you can see better.
| |
| # Adjust the height of the fence.
| |
| # Repeat steps 1-3 until you're satisfied. (For a perfect fit, you will need to decrease the grid size to 2.)
| |
| | |
| [[Image:hammer_picksmgrid.jpg |thumb|left|400px| With the grid size smaller, the fence can be lined up with the floor.]]
| |
| | |
| <br clear="both">
| |
| | |
| You are finally done with the blueprints for this map.
| |
| | |
| {{NavBar|Adding Light|Your First Map|Saving and Compiling}} | |
| | |
| {{otherlang:en}}
| |
| {{otherlang:en:zh-cn|Adding Prop Models:zh-cn}}
| |
| | |
| [[Category:Level Design Tutorials]]
| |
Les 'Props' sont des modèles 3D créés à partir d'un programme de modélisation tel XSI Mod Tool(en) ou 3DS Max.
Il y a 3 types de props :
- Static qui sont fixe.
- Dynamic qui peuvent être animés ou bougé.
- Physics qui peuvent être bougé et obeissent au lois de la physiques.
Vous verrez dans ce tuto comment placer deux types de ces entités.
Prop static
Placez l'entitée
prop_static sur le sol en cliquant dans la vue 3D.
Nous allons commencer par ajouter un prop static.
Tous les props sont des entités, et traité comme telle, vous pourrez donc les gérez avec le menu Entity Tool.
Ensuite choisissez prop_static(en) de la liste entité.
Placez le prop_static dans la map sur le sol dans la vue 3D.
Vous aurez pour résultat une petite boite rouge, car vous n'avez pas encore choisi votre modèle, juste le type de modèle par le choix de l'entité prop_static.
Nous allons maintenant choisir le modèle.
Prenez l'outil Selection et double-cliquez sur l'entité.
- Cliquez sur World Model
- Puis sur Browse..., le Model Browser ou explorateur de modèles va s'afficher.
Click a folder to change to that sub-directory.
Ne vous inquiétez pas si vous voyez le message “ERROR”, c'est juste que vous n'avez sélectionné aucun modèles.
Cliquez sur le dossier props_c17 pour lister les modèles à l'intérieur.

Click the
fence01a model to select it, and then click
OK to close the browser.
Il y a beaucoup de modèles comme pour les textures, nous nous servirons des filtres. Pour notre clôture tapez "fence" dans le champ filtre.
Puis choisissez le modèle fence01a.mdl, vous aurez un aperçu dans la vue en 3D. Puis faites Ok pour l'ajouter à votre entité prop_static.
Click the
Apply button to confirm your changes.
Faite Apply. Votre entité doit avoir pris l'apparence de votre modèle.
Close the
Object Properties dialog.
- Note : Le placement des prop static est assez libre, vous pouvez les placer légèrement au dessus du sol, ou un peu en dessous cela ne causera aucun problème contrairement au prop physic plus contraignant.
Prop physics
Choose the appropriate physics prop entity.
Place the physics prop entity by clicking the floor in the 3D view.
Nous allons maintenant ajouter un modèle avec des propriétés physiques.
Sélectionnez Entity Tool.
Le type de l'entité prop_physics depend du jeu pour lequel la map est destinée.
Choisissez votre entité, placez la sur le sol et allez dans l'explorateur de modèles.
After having opened the browser, search for
oildrum, choose the
oildrum001 model, and click
OK.
Pour un tonneau, tapez "oildrum" dans le champ filtre, et choisissez le modèle oildrum001.mdl, puis confimer.
- Note : Pour leur placement il est conseillé de les surélever légèrement par rapport au sol.


