Zh/Creating a working mini-map: Difference between revisions
(开始翻译“Creating a working mini-map”) |
m (obsolete language category) |
||
| (21 intermediate revisions by 4 users not shown) | |||
| Line 1: | Line 1: | ||
{{ | {{lang|Creating a working mini-map|title=制作一张可用的小地图}} | ||
| | |||
| | |||
}} | |||
__TOC__ | __TOC__ | ||
== 基本介绍 == | == 基本介绍 == | ||
部分 | 部分{{L|mod|模组}}(反恐精英:起源,胜利之日:起源)拥有一个能显示地图概要,玩家和物体位置的俯视小地图。构建这样一张由游戏内{{L|screenshot|屏幕截图}}所修改的小地图对于制作新关卡来说十分重要。 | ||
{{L|Counter-Strike: Global Offensive|反恐精英:全球攻势}}也提供小地图功能,它看上去和前几代反恐精英里的小地图没什么太大区别,但对于开发者来说,小地图的制作过程早已大相径庭。 | |||
主要的变动有: | |||
# 在CS:GO里小地图被称为"雷达。" | |||
# CS:GO里的雷达并不使用VTFs和VMTs。 | |||
# CS:GO里的雷达图片被保存为".DDS"格式。 | |||
# 现在只需要两个文件就能让小地图正常显示,一个'.DDS"文件以及一个".txt"文件。".DDS"文件就是小地图显示的地图图片本身,".txt"文件则是用来设定如何让游戏显示小地图。 | |||
如果你真的想仔细看看有什么具体的改变,又或者你想制作的是反恐精英:起源的小地图,请查阅:{{L|Level_Overviews|关卡俯视图}} | |||
== 获取一张无损俯视图 == | |||
[[File:Dust2_Overview_CSGO.png|200px|thumb|关卡俯视图的一个例子(de_dust2)]] | |||
# 首先开始游戏,接着打开'''选项'''界面''',并切换到'''视频设置''',然后将'''分辨率'''调整为"1280x1024"并把'''纵横比'''切换到"标准"。如果你无法调整分辨率(因为屏幕过小或其他原因),亦可以在启动选项中加上" -width 1280 -height 1024"。 | |||
# 用{{L|console command|控制台指令}} map <code><地图名></code> 打开地图并输入 <code>"sv_cheats 1"</code>。 | |||
# 随便选择一个队伍加入。 | |||
# 在{{L|console|控制台}}输入指令<code>"bot_quota 1"</code>来停用机器人。 | |||
# 在{{L|console|控制台}}输入指令<code>"bind p screenshot"</code>来将"{{L|screenshot|屏幕截图}}"指令绑定到一个按键上。这一点真的很重要,因为默认截图方式(F5截图)会产生一张压缩过的{{L|JPEG}}格式图片而不是无损的{{L|TGA}}格式图片。 | |||
# 用{{L|console command|控制台指令}}<code>"cl_drawhud 0"</code>,<code>"r_drawviewmodel 0"</code>以及<code>"hidepanel all"</code>来去除HUD。 | |||
# 用{{L|console command|控制台指令}}来去除一些无用的效果,例如天空盒(<code>"r_skybox 0"</code>),烟雾(<code>"fog_override 1"</code>和<code>"fog_enable 0"</code>),物体(''optional:'' <code>"r_drawstaticprops 0"</code>)及其他。 | |||
# 在{{L|console|控制台}}输入指令<code>"noclip"</code>来停用玩家碰撞,接着移动到一个能俯视全图的完美的位置。 | |||
# 用{{L|console command|控制台指令}}<code>"cl_leveloverview ''x''"</code>来切换到俯视模式(指令中的 x 指的是比例大小)。 | |||
# 在{{L|console|控制台}}输入指令<code>"cl_leveloverviewmarker 1024"</code>可以显示一条红色的辅助线,不过你需要在{{L|console|控制台}}输入<code>cl_drawhud 1</code>来暂时重启HUD。将视角对好,然后记得关闭HUD | |||
# 你可以在''cl_leveloverview''模式启用时自由移动,不过记住移动方向键将会把你带向与平时不同的方向。适应操作后,仔细调整镜头,注意地图的最右边不应该超出辅助红线,不然你会发现超出的部分在接下来的制作过程中会被整个砍掉。调整时你可以参考右边<code>de_dust2</code>的俯视图。 | |||
# 当前的镜头信息(位置和比例)都会在控制台中显示并实时更新,例如:"Overview: <code>scale 6.00, pos_x -2651, pos_y 4027</code>"。 | |||
# 当一切都接近完美之时,按下截图键(之前用控制台绑定的)并'''记下'''控制台显示的镜头信息,之后会用到。 | |||
你需要绑定的按键: | |||
* o => | * o => 俯视模式 | ||
* p => | * p => {{L|screenshot|屏幕截图}} | ||
// | //俯视模式 | ||
// | //由The RaZZeR App提供代码 | ||
bind "o" "change_resolution; clear_view; clear_map; clear_game; record_config; radar_image"; | bind "o" "change_resolution; clear_view; clear_map; clear_game; record_config; radar_image"; | ||
bind "p" "screenshot"; | bind "p" "screenshot"; | ||
| Line 59: | Line 47: | ||
alias "radar_image" "noclip; cl_leveloverviewmarker 1024; cl_leveloverview 5"; | alias "radar_image" "noclip; cl_leveloverviewmarker 1024; cl_leveloverview 5"; | ||
{{tip| | {{tip| 新建一个名叫overviewexec.cfg的文件(名称不重要)并把以上所有代码都复制黏贴进这个cfg文件,接着把这个文件放入csgo/cfg/ 并在{{L|console|控制台}}输入指令"exec overviewexec"。}} | ||
这些代码会把需要的{{L|console|控制台}}信息输出至"csgo/overview_info.log"。 | |||
游戏分辨率也同时会被切换到窗口化的1280x1024 (4:3)。 | |||
== | == 建立.DDS文件 == | ||
=== | === 使用Photoshop === | ||
# 开启Photoshop并打开你在<code>"%STEAMINSTALL%\SteamApps\common\Counter-Strike Global Offensive\csgo\screenshots"</code>建立的.TGA格式文件(<code>"%STEAMINSTALL%"</code>是你安装Steam的路径),默认是<code>"C:\Program Files (x86)\Steam"</code>。 | |||
# 重新设置画布尺寸(图像 -> 画布尺寸),将长宽都设置为1024像素,并将锚点放置在左上角。<br>[[File:PhotoshopScaleImage.PNG]] | |||
# 在图层界面双击''背景''图层,一个"新建图层"的窗口会出现,点确定。 | |||
[[File:PhotoshopScaleImage.PNG]] | # 选中你想要在小地图中透明显示的部分并按下退格键。 | ||
# 有些人喜欢精心装饰一番他们的小地图,如果你也想,现在就搞定。 | |||
# 将图片另存为文件格式是D3D/DDS的.DDS文件(文件 -> 储存为),文件名应是你的地图名加上<code>"_radar"</code>,例如(de_dust_radar.dds),最后将文件保存到<code>"%STEAMINSTALL%\SteamApps\common\Counter-Strike Global Offensive\csgo\resource\overviews"</code>。 | |||
# 如图所示,当Intel Texture Works选项框出现后,把“Texture Type”和“Compression”中的选项从<code>"Color"</code>换成<code>"Color + Alpha"</code>,<code>"BC1 4bpp(Linear)"# 换成<code>"BC3 8bpp(Linear)"</code>。<br>[[File:ITW_dialog.jpeg]] | |||
# 恭喜,属于你自己地图的.DDS文件已经被创建成功了! | |||
< | |||
[[File: | |||
{{note|如果"储存为..." .DDS文件的选项并不可用或者没有出现,就说明你还没有下载对应的Photoshop插件。你可以在Intel的网站下载:[https://software.intel.com/en-us/articles/intel-texture-works-plugin Intel® Texture Works Plugin for Photoshop](NVIDIA的Photoshop插件已经很久没有更新了。)}} | |||
=== | === 使用GIMP === | ||
'' | ''(本教程使用GIMP 2.6,但对GIMP 2.x应该也适用)'' | ||
# | # 在[http://registry.gimp.org/node/70/ GIMP DDS Plugin 2.0.2]下载并安装GIMP。 | ||
# | # 启动GIMP并打开你在<code>"%STEAMINSTALL%\SteamApps\common\Counter-Strike Global Offensive\csgo\screenshots"</code>建立的.TGA格式文件(<code>"%STEAMINSTALL%"</code>是你安装Steam的路径),默认是<code>"C:\Program Files (x86)\Steam"</code>。 | ||
# | # 重新设置画布尺寸(图像 -> 画布尺寸),将长宽都设置为1024像素。 | ||
# | # 选中你想要在小地图中透明显示的部分并按下删除键。 | ||
# | # 有些人喜欢精心装饰一番他们的小地图,如果你也想,现在就搞定。 | ||
# | # 将图片另存为文件格式是D3D/DDS的.DDS文件(文件 -> 储存为),文件名应是你的地图名加上<code>"_radar"</code>,例如(de_dust_radar.dds),最后将文件保存到<code>"%STEAMINSTALL%\SteamApps\common\Counter-Strike Global Offensive\csgo\resource\overviews"</code>。 | ||
# | # 当DDS设置窗口出现时打开左上角的下拉菜单,把压缩设置从"无"设置成"BC1/DXT1"并点选"OK" | ||
# | # 恭喜,属于你自己地图的.DDS文件已经被创建成功了! | ||
== | == 建立俯视图代码文件 == | ||
最后一步,在<code><game dir>\resource\overviews\</code>创建一个名叫<code><你的地图名>.txt</code>的.txt文件。此文件将用来定义俯视图所需要的种种数据,以下用地图de_vertigo作为例子: | |||
需要输入的内容来自你在[[#Make_the_raw_overview_image|获取一张无损俯视图]]中第12步所获得的数据。 | |||
// HLTV overview description file for de_vertigo.bsp | // HLTV overview description file for de_vertigo.bsp | ||
| Line 107: | Line 90: | ||
"pos_y" "1762" // Y coordinate | "pos_y" "1762" // Y coordinate | ||
"scale" "4.0" // scale used when taking the screenshot | "scale" "4.0" // scale used when taking the screenshot | ||
"rotate" "0" // map was rotated by 90 degrees in | "rotate" "0" // map was rotated by 90 degrees in {{L|image editor}} | ||
"zoom" "1.3" // optimal zoom factor if map is shown in full size | "zoom" "1.3" // optimal zoom factor if map is shown in full size | ||
| Line 133: | Line 116: | ||
} | } | ||
"pos_x" | "pos_x"(红线)以及"pos_y"(绿线)符合Hammer中的X(左右)和Y(上下),降低比例会让雷达图看上去更大。 | ||
要搞清楚你需要在哪里放置载入界面中的标识图标(出生点和爆破区),你需要打开Photoshop并按下{{key|Ctrl+R}}以使用标尺工具(记住要使用百分比模式)得到准确坐标。 | |||
在文件中不要使用百分比符号,举个例子,31.12%应被写成0.31。 | |||
== 不同高度 == | |||
* | 自从野火行动更新后,雷达已可以显示多个高度。你需要截取多个不同高度的雷达图,并根据玩家所在高度来设置它们,参考新的de_nuke地图文件。 | ||
* | * 你的地图名_lower_radar | ||
* | * 你的地图名_radar(这是普通高度) | ||
* 你的地图名_higher_radar | |||
接着建立新的俯视图.txt文件。 | |||
"verticalsections" | "verticalsections" | ||
| Line 167: | Line 150: | ||
} | } | ||
* | * 在控制台输入"cl_showpos 1"来检查当前高度。 | ||
* | * 高/低.dds文件将不会被在上传到创意工坊时被自动上传,你需要手动打包它们。 | ||
== | == 总结 == | ||
<p> | <p> | ||
下面是一张游戏内的雷达截图,如果没出什么差错,你的成品就应该和下图差不多。 | |||
</p> | </p> | ||
[[File:CSGO_Example_Radar.png]] | [[File:CSGO_Example_Radar.png]] | ||
== | == 资源 == | ||
无标识爆破区[[File:Bombsite_clear.png]] | |||
爆破区 A [[File:Bombsite_a.png]] | |||
爆破区 B [[File:Bombsite_b.png]] | |||
[[File: | CT重生区标志 [[File:Ct.png]] | ||
T重生区标志 [[File:T.png]] | |||
人质标志 [[File:Hostage.png]] | |||
新T重生区标志 [[File:T_spawn_icon_NEW.png]] | |||
== | == 其他教程 == | ||
[https://www.youtube.com/watch?v=SSheuw9ASuM TopHATTwaffle's CSGO Radar / Overview Creation Tutorial] | * [https://www.youtube.com/watch?v=SSheuw9ASuM TopHATTwaffle's CSGO Radar / Overview Creation Tutorial] | ||
* [http://csgo.gamebanana.com/tuts/11983 How to use CS:GO Radar Maker] | |||
{{ACategory|Level Design}} | |||
{{ACategory|Tutorials}} | |||
Latest revision as of 03:13, 22 August 2024
基本介绍
部分模组(反恐精英:起源,胜利之日:起源)拥有一个能显示地图概要,玩家和物体位置的俯视小地图。构建这样一张由游戏内屏幕截图所修改的小地图对于制作新关卡来说十分重要。
反恐精英:全球攻势也提供小地图功能,它看上去和前几代反恐精英里的小地图没什么太大区别,但对于开发者来说,小地图的制作过程早已大相径庭。
主要的变动有:
- 在CS:GO里小地图被称为"雷达。"
- CS:GO里的雷达并不使用VTFs和VMTs。
- CS:GO里的雷达图片被保存为".DDS"格式。
- 现在只需要两个文件就能让小地图正常显示,一个'.DDS"文件以及一个".txt"文件。".DDS"文件就是小地图显示的地图图片本身,".txt"文件则是用来设定如何让游戏显示小地图。
如果你真的想仔细看看有什么具体的改变,又或者你想制作的是反恐精英:起源的小地图,请查阅:关卡俯视图
获取一张无损俯视图

- 首先开始游戏,接着打开选项界面,并切换到视频设置,然后将分辨率调整为"1280x1024"并把纵横比切换到"标准"。如果你无法调整分辨率(因为屏幕过小或其他原因),亦可以在启动选项中加上" -width 1280 -height 1024"。
- 用控制台指令 map
<地图名>打开地图并输入"sv_cheats 1"。 - 随便选择一个队伍加入。
- 在控制台输入指令
"bot_quota 1"来停用机器人。 - 在控制台输入指令
"bind p screenshot"来将"屏幕截图"指令绑定到一个按键上。这一点真的很重要,因为默认截图方式(F5截图)会产生一张压缩过的JPEG格式图片而不是无损的TGA格式图片。 - 用控制台指令
"cl_drawhud 0","r_drawviewmodel 0"以及"hidepanel all"来去除HUD。 - 用控制台指令来去除一些无用的效果,例如天空盒(
"r_skybox 0"),烟雾("fog_override 1"和"fog_enable 0"),物体(optional:"r_drawstaticprops 0")及其他。 - 在控制台输入指令
"noclip"来停用玩家碰撞,接着移动到一个能俯视全图的完美的位置。 - 用控制台指令
"cl_leveloverview x"来切换到俯视模式(指令中的 x 指的是比例大小)。 - 在控制台输入指令
"cl_leveloverviewmarker 1024"可以显示一条红色的辅助线,不过你需要在控制台输入cl_drawhud 1来暂时重启HUD。将视角对好,然后记得关闭HUD - 你可以在cl_leveloverview模式启用时自由移动,不过记住移动方向键将会把你带向与平时不同的方向。适应操作后,仔细调整镜头,注意地图的最右边不应该超出辅助红线,不然你会发现超出的部分在接下来的制作过程中会被整个砍掉。调整时你可以参考右边
de_dust2的俯视图。 - 当前的镜头信息(位置和比例)都会在控制台中显示并实时更新,例如:"Overview:
scale 6.00, pos_x -2651, pos_y 4027"。 - 当一切都接近完美之时,按下截图键(之前用控制台绑定的)并记下控制台显示的镜头信息,之后会用到。
你需要绑定的按键:
- o => 俯视模式
- p => 屏幕截图
//俯视模式
//由The RaZZeR App提供代码
bind "o" "change_resolution; clear_view; clear_map; clear_game; record_config; radar_image";
bind "p" "screenshot";
alias "change_resolution" " mat_setvideomode 1280 1024 1;";
alias "clear_view" "sv_cheats 1; cl_drawhud 0; r_drawviewmodel 0; hidepanel all; net_graph 0;";
alias "clear_map" "bot_quota 1; bot_kick all; r_skybox 0; fog_override 1; fog_enable 0";
alias "clear_game" "mp_freezetime 0; mp_roundtime 9999; mp_roundtime_defuse 9999; mp_roundtime_hostage 9999; mp_roundtime_deployment 9999; mp_warmup_end;";
alias "record_config" "con_logfile overview_info.log;";
alias "radar_image" "noclip; cl_leveloverviewmarker 1024; cl_leveloverview 5";
这些代码会把需要的控制台信息输出至"csgo/overview_info.log"。 游戏分辨率也同时会被切换到窗口化的1280x1024 (4:3)。
建立.DDS文件
使用Photoshop
- 开启Photoshop并打开你在
"%STEAMINSTALL%\SteamApps\common\Counter-Strike Global Offensive\csgo\screenshots"建立的.TGA格式文件("%STEAMINSTALL%"是你安装Steam的路径),默认是"C:\Program Files (x86)\Steam"。 - 重新设置画布尺寸(图像 -> 画布尺寸),将长宽都设置为1024像素,并将锚点放置在左上角。
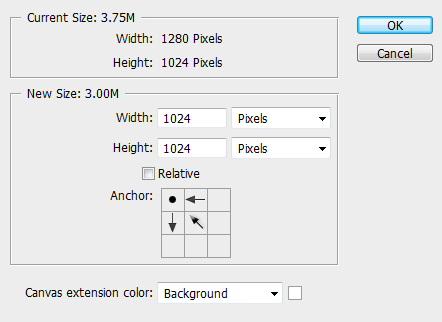
- 在图层界面双击背景图层,一个"新建图层"的窗口会出现,点确定。
- 选中你想要在小地图中透明显示的部分并按下退格键。
- 有些人喜欢精心装饰一番他们的小地图,如果你也想,现在就搞定。
- 将图片另存为文件格式是D3D/DDS的.DDS文件(文件 -> 储存为),文件名应是你的地图名加上
"_radar",例如(de_dust_radar.dds),最后将文件保存到"%STEAMINSTALL%\SteamApps\common\Counter-Strike Global Offensive\csgo\resource\overviews"。 - 如图所示,当Intel Texture Works选项框出现后,把“Texture Type”和“Compression”中的选项从
"Color"换成"Color + Alpha","BC1 4bpp(Linear)"# 换成"BC3 8bpp(Linear)"。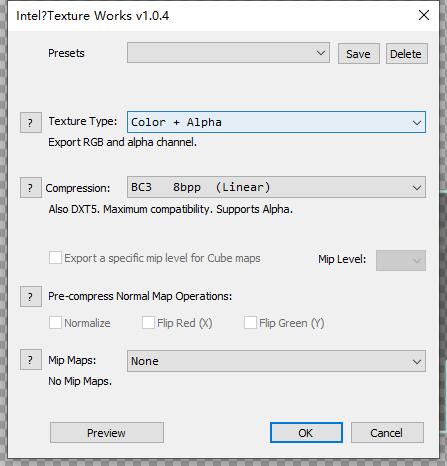
- 恭喜,属于你自己地图的.DDS文件已经被创建成功了!


 注意:如果"储存为..." .DDS文件的选项并不可用或者没有出现,就说明你还没有下载对应的Photoshop插件。你可以在Intel的网站下载:Intel® Texture Works Plugin for Photoshop(NVIDIA的Photoshop插件已经很久没有更新了。)
使用GIMP
(本教程使用GIMP 2.6,但对GIMP 2.x应该也适用)
- 在GIMP DDS Plugin 2.0.2下载并安装GIMP。
- 启动GIMP并打开你在
"%STEAMINSTALL%\SteamApps\common\Counter-Strike Global Offensive\csgo\screenshots"建立的.TGA格式文件("%STEAMINSTALL%"是你安装Steam的路径),默认是"C:\Program Files (x86)\Steam"。
- 重新设置画布尺寸(图像 -> 画布尺寸),将长宽都设置为1024像素。
- 选中你想要在小地图中透明显示的部分并按下删除键。
- 有些人喜欢精心装饰一番他们的小地图,如果你也想,现在就搞定。
- 将图片另存为文件格式是D3D/DDS的.DDS文件(文件 -> 储存为),文件名应是你的地图名加上
"_radar",例如(de_dust_radar.dds),最后将文件保存到"%STEAMINSTALL%\SteamApps\common\Counter-Strike Global Offensive\csgo\resource\overviews"。
- 当DDS设置窗口出现时打开左上角的下拉菜单,把压缩设置从"无"设置成"BC1/DXT1"并点选"OK"
- 恭喜,属于你自己地图的.DDS文件已经被创建成功了!
建立俯视图代码文件
最后一步,在<game dir>\resource\overviews\创建一个名叫<你的地图名>.txt的.txt文件。此文件将用来定义俯视图所需要的种种数据,以下用地图de_vertigo作为例子:
需要输入的内容来自你在获取一张无损俯视图中第12步所获得的数据。
// HLTV overview description file for de_vertigo.bsp
"de_vertigo"
{
"material" "overviews/de_vertigo_radar" // texture file
"pos_x" "-3168" // X coordinate
"pos_y" "1762" // Y coordinate
"scale" "4.0" // scale used when taking the screenshot
"rotate" "0" // map was rotated by 90 degrees in image editor
"zoom" "1.3" // optimal zoom factor if map is shown in full size
//loading screen icons and positions
"CTSpawn_x" "0.22"
"CTSpawn_y" "0.73"
"TSpawn_x" "0.63"
"TSpawn_y" "0.10"
"bombA_x" "0.17"
"bombA_y" "0.78"
"bombB_x" "0.73"
"bombB_y" "0.68"
"Hostage1_x" "0.56"
"Hostage1_y" "0.83"
"Hostage2_x" "0.48"
"Hostage2_y" "0.64"
"Hostage3_x" "0.47"
"Hostage3_y" "0.78"
"Hostage4_x" "0.30"
"Hostage4_y" "0.88"
"Hostage5_x" "0.42"
"Hostage5_y" "0.86"
}
"pos_x"(红线)以及"pos_y"(绿线)符合Hammer中的X(左右)和Y(上下),降低比例会让雷达图看上去更大。
要搞清楚你需要在哪里放置载入界面中的标识图标(出生点和爆破区),你需要打开Photoshop并按下Ctrl+R以使用标尺工具(记住要使用百分比模式)得到准确坐标。
在文件中不要使用百分比符号,举个例子,31.12%应被写成0.31。
不同高度
自从野火行动更新后,雷达已可以显示多个高度。你需要截取多个不同高度的雷达图,并根据玩家所在高度来设置它们,参考新的de_nuke地图文件。
- 你的地图名_lower_radar
- 你的地图名_radar(这是普通高度)
- 你的地图名_higher_radar
接着建立新的俯视图.txt文件。
"verticalsections"
{
	"default" // use the primary radar image
	{
		"AltitudeMax" "600"
		"AltitudeMin" "-500"
	}
	"lower" // lower radar file
	{
		"AltitudeMax" "-500"
		"AltitudeMin" "-10000"
	}
	"higher" // higher radar file
	{
		"AltitudeMax" "10000"
		"AltitudeMin" "600"
	}
}
- 在控制台输入"cl_showpos 1"来检查当前高度。
- 高/低.dds文件将不会被在上传到创意工坊时被自动上传,你需要手动打包它们。
总结
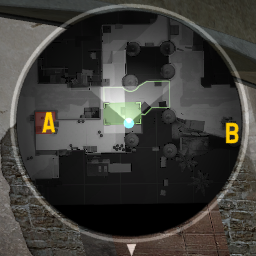
下面是一张游戏内的雷达截图,如果没出什么差错,你的成品就应该和下图差不多。

资源
无标识爆破区 爆破区 A
爆破区 A  爆破区 B
爆破区 B 
CT重生区标志  T重生区标志
  人质标志
人质标志 
新T重生区标志 


其他教程