Hammer Selection Tool: Difference between revisions
No edit summary |
Thunder4ik (talk | contribs) m (Unicodifying, replaced: [[Image: → [[File: (7)) |
||
| (6 intermediate revisions by 4 users not shown) | |||
| Line 1: | Line 1: | ||
{{lang|Hammer Selection Tool}} | |||
[[ | {{toc-right}} | ||
[[File:mt-selection.png|float|left]] | |||
The '''Selection Tool''' is used to accomplish a number of things. It is used to ''select'', ''move'', ''resize'', ''rotate'', and ''shear'' objects.{{clr}} | |||
== Selecting Objects == | |||
To select an object, click once on the object in any view window. To select multiple objects, drag a box around the items in any 2D View and press the {{key|Enter}} key. The selection box can be resized by dragging the selection handles before pressing {{key|Enter}}. The following image shows the creation of a selection box: | |||
[[File:Selection_Box.png]] | |||
[[ | |||
Add objects to the selection by holding | Add objects to the selection by holding {{key|Ctrl}} and clicking on other objects in any view window. Objects can likewise be removed from the selection by {{key|Ctrl}}+clicking them. | ||
{{note|While using the '''Selection Tool''', select multiple objects by dragging a selection box around them and pressing | {{note|While using the '''Selection Tool''', select multiple objects by dragging a selection box around them and pressing {{key|Enter}}. If [[Hammer 2D Views Options#Automatic infinite selection in 2D windows (no ENTER)|Automatic infinite selection]] is toggled on, pressing {{key|Enter}} is not necessary.}} | ||
{{tip|After clicking in a view to select an object, pressing | {{tip|After clicking in a view to select an object, pressing {{key|Page Up}} and {{key|Page Down}} will cycle forwards and backwards through all objects that could possibly be selected at that position.}}{{clr}} | ||
== Moving and | == Moving and Cloning Objects == | ||
Move selected objects in 2D views | Move selected objects in 2D views using the '''Selection Tool''' by clicking in the center area of the selection box and dragging the objects to a new location. | ||
{{tip|The cursor "arrow" keys can be used to move objects if the "nudge" option is set in the [[Hammer 2D Views Options]]. In the 3D view, objects are moved relative to the current camera position.}} | {{tip|The cursor "arrow" keys can be used to move objects if the "nudge" option is set in the [[Hammer 2D Views Options]]. In the 3D view, objects are moved relative to the current camera position.}} | ||
{{tip|Holding down | {{tip|Holding down {{key|Alt}} while moving an object with the mouse will ignore the current grid snap setting.}} | ||
=== Cloning === | === Cloning === | ||
[[ | [[File:cloning.png|right]] | ||
''Cloning'' provides a simple way to quickly duplicate an object or group of objects. This includes both brushes and entities, and groups can contain a mixture of both. Objects are cloned by holding down | ''Cloning'' provides a simple way to quickly duplicate an object or group of objects. This includes both brushes and entities, and groups can contain a mixture of both. Objects are cloned by holding down {{key|Shift}} while moving them. | ||
To clone an object or group of objects: | To clone an object or group of objects: | ||
# Switch to the '''Selection Tool'''. | # Switch to the '''Selection Tool'''. | ||
# Select the object (brush, entity, or group of brushes and/or entities) to be cloned. | # Select the object (brush, entity, or group of brushes and/or entities) to be cloned. | ||
# Hold | # Hold {{key|Shift}} and click-and-drag the selected object to its new position with the left mouse button. | ||
# While | # While {{key|Shift}} is still being held, release the mouse button. The object has now been cloned. | ||
{{tip|The cursor "arrow" keys can be also used in combination with | {{tip|The cursor "arrow" keys can be also used in combination with {{key|Shift}} to clone brushes. With each press of the cursor key, another clone will be created in the direction of the nudge.}} | ||
== Transformation | == Transformation Modes == | ||
[[ | [[File:Selection_Modes.png|right]] | ||
Clicking inside the selection box cycles through the three basic transformation modes: ''resize'', ''rotate'', and ''shear''. The handles around the selection change to reflect the current transformation mode. The following image shows the three modes for the '''Selection Tool'''. Objects can be selected and moved in any of the modes. | Clicking inside the selection box cycles through the three basic transformation modes: ''resize'', ''rotate'', and ''shear''. The handles around the selection change to reflect the current transformation mode. The following image shows the three modes for the '''Selection Tool'''. Objects can be selected and moved in any of the modes. | ||
{{tip|The [[Hammer Status Bar Toolbar|Status Bar]] shows helpful coordinates while transforming objects.}}{{clr}} | {{tip|The [[Hammer Status Bar Toolbar|Status Bar]] shows helpful coordinates while transforming objects.}}{{clr}} | ||
== Resize | ===Resize Mode=== | ||
[[ | [[File:selection_resize.png|right]] | ||
Resize mode allows objects to be resized by grabbing any corner or edge of the selected object and pulling it to the desired size. The [[Hammer Status Bar Toolbar|Status Bar]] shows the current width and height of the object while it is resized. | Resize mode allows objects to be resized by grabbing any corner or edge of the selected object and pulling it to the desired size. The [[Hammer Status Bar Toolbar|Status Bar]] shows the current width and height of the object while it is resized. | ||
| Line 48: | Line 49: | ||
# When the object is the correct size, release the mouse button. The object has now been resized. | # When the object is the correct size, release the mouse button. The object has now been resized. | ||
{{note|Prop (model) objects, such as | {{note|Prop (model) objects, such as {{ent|prop_static}}, cannot be resized in any game outside the {{csgobranch|4}}.}}{{clr}} | ||
== Rotate | ===Rotate Mode=== | ||
[[ | [[File:selection_rotate.png|right]] | ||
In rotate mode, grab any corner of a selected object and pull it around to rotate the object into any position desired. The status bar shows the current angle of rotation while rotating the object. | In rotate mode, grab any corner of a selected object and pull it around to rotate the object into any position desired. The status bar shows the current angle of rotation while rotating the object. | ||
{{tip|If rotations are set to 15 degrees by default in the [[Hammer 2D Views Options]], this can be behavior will be reversed by holding | {{tip|If rotations are set to 15 degrees by default in the [[Hammer 2D Views Options]], this can be behavior will be reversed by holding {{key|Shift}} while rotating the object, and vice-versa. Pressing {{key|Alt}} while rotating will allow the object to be freely rotated, regardless of the current settings.}} | ||
To rotate an object: | To rotate an object: | ||
| Line 63: | Line 64: | ||
# When the object is rotated to the proper angle, release the mouse button. The object has now been rotated.{{clr}} | # When the object is rotated to the proper angle, release the mouse button. The object has now been rotated.{{clr}} | ||
== Shear | ===Shear Mode=== | ||
[[ | [[File:selection_shear.png|right]] | ||
Shear mode lets drag the edges of an object parallel to its surface, angling the object. For example, grab the top edge of a selected object while in ''shear'' mode to drag that edge right or left. | Shear mode lets drag the edges of an object parallel to its surface, angling the object. For example, grab the top edge of a selected object while in ''shear'' mode to drag that edge right or left. | ||
| Line 73: | Line 74: | ||
# Click and drag one of the selection handles to create the shear. | # Click and drag one of the selection handles to create the shear. | ||
# When the object is sheared to the desired angle, release the mouse button. The object has now been sheared.{{clr}} | # When the object is sheared to the desired angle, release the mouse button. The object has now been sheared.{{clr}} | ||
[[Category:Hammer Tools]] | |||
Latest revision as of 00:08, 7 January 2024
The Selection Tool is used to accomplish a number of things. It is used to select, move, resize, rotate, and shear objects.
Selecting Objects
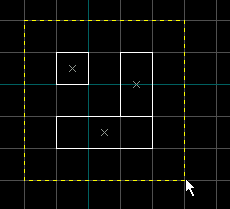
To select an object, click once on the object in any view window. To select multiple objects, drag a box around the items in any 2D View and press the ↵ Enter key. The selection box can be resized by dragging the selection handles before pressing ↵ Enter. The following image shows the creation of a selection box:
Add objects to the selection by holding Ctrl and clicking on other objects in any view window. Objects can likewise be removed from the selection by Ctrl+clicking them.
Moving and Cloning Objects
Move selected objects in 2D views using the Selection Tool by clicking in the center area of the selection box and dragging the objects to a new location.
Cloning
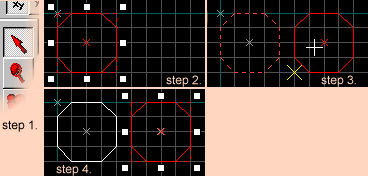
Cloning provides a simple way to quickly duplicate an object or group of objects. This includes both brushes and entities, and groups can contain a mixture of both. Objects are cloned by holding down ⇧ Shift while moving them.
To clone an object or group of objects:
- Switch to the Selection Tool.
- Select the object (brush, entity, or group of brushes and/or entities) to be cloned.
- Hold ⇧ Shift and click-and-drag the selected object to its new position with the left mouse button.
- While ⇧ Shift is still being held, release the mouse button. The object has now been cloned.
Transformation Modes
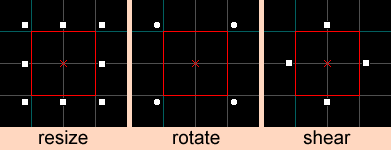
Clicking inside the selection box cycles through the three basic transformation modes: resize, rotate, and shear. The handles around the selection change to reflect the current transformation mode. The following image shows the three modes for the Selection Tool. Objects can be selected and moved in any of the modes.
Resize Mode
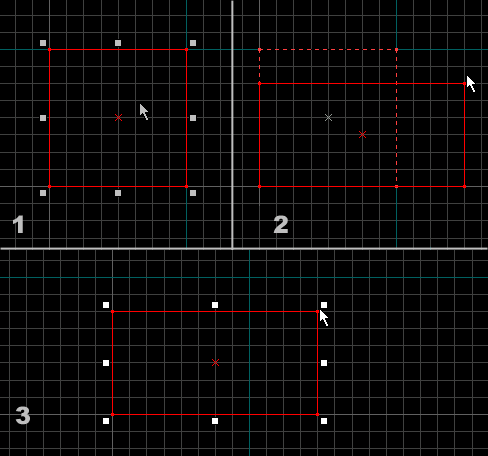
Resize mode allows objects to be resized by grabbing any corner or edge of the selected object and pulling it to the desired size. The Status Bar shows the current width and height of the object while it is resized.
To resize an object:
- Select the Selection Tool and left-click to select the object (brush, entity, or group of brushes and/or entities) to be resized.
- Click and drag one of the corner selection handles to start the resize.
- When the object is the correct size, release the mouse button. The object has now been resized.
Rotate Mode
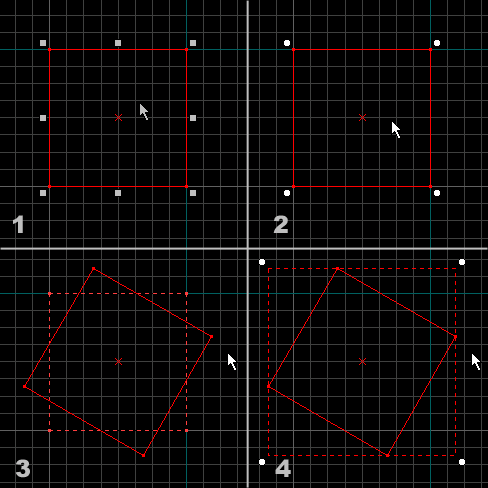
In rotate mode, grab any corner of a selected object and pull it around to rotate the object into any position desired. The status bar shows the current angle of rotation while rotating the object.
To rotate an object:
- Select the Selection Tool and left-click to select the object (brush, entity, or group of brushes and/or entities) that will be rotated.
- Click inside the selection to set the transformation mode to rotate.
- Click and drag one of the selection handles to start the rotation.
- When the object is rotated to the proper angle, release the mouse button. The object has now been rotated.
Shear Mode
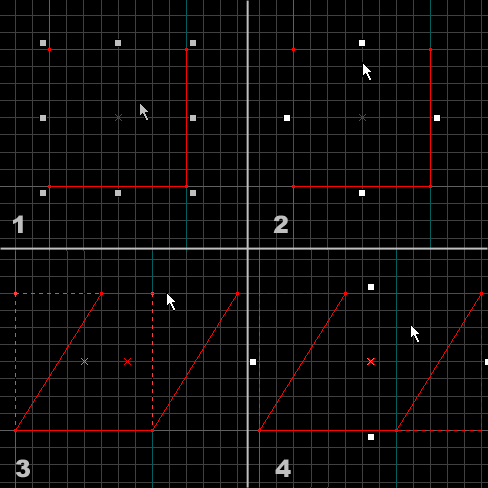
Shear mode lets drag the edges of an object parallel to its surface, angling the object. For example, grab the top edge of a selected object while in shear mode to drag that edge right or left.
To shear an object:
- Select the Selection Tool and select the object (brush, entity, or group of brushes and/or entities) to be sheared.
- Click inside the selection to set the transformation mode to shear.
- Click and drag one of the selection handles to create the shear.
- When the object is sheared to the desired angle, release the mouse button. The object has now been sheared.
