Create a Mod: Difference between revisions
mNo edit summary |
(Moved SDK wizard to the bottom) |
||
| (67 intermediate revisions by 34 users not shown) | |||
| Line 1: | Line 1: | ||
{{ | {{LanguageBar}} | ||
{{gldsrc topicon}} | |||
{{Source topicon}} | |||
{{TabsBar}} | |||
{{toc-right}} | |||
[[ | == Engine branch == | ||
Before starting a [[mod]], you need to choose which version (or ''branch'') of Source you will use. | |||
; {{src13|4}} | |||
: '''This branch is recommended for most users.''' This is the newest version of the Source SDK. The code is available on GitHub. | |||
:* To make a singleplayer mod, see: [[Setting up Source SDK 2013 Singleplayer]]. | |||
:* To make a multiplayer mod, see: [[Setting_up_Source_SDK_Base_2013_Multiplayer|Setting up Source SDK 2013 Multiplayer]] (specifically uses the {{Team Fortress 2 branch|3}}, which is a slightly incompatible version of Source 2013). | |||
=== | === Legacy branches === | ||
{{warning|These are older versions of the Source SDK, which you should avoid using, if at all possible.}} | |||
These branches are set up using an older tool simply called "Source SDK", which is available on Steam. Documentation for using this tool is at the bottom of this page, under ''' The SDK wizard '''. | |||
; {{src06|4}} | |||
: '''Outdated''' - Original {{episodic|4}} mod. Only included for backwards compatibility reasons. | |||
; {{src07|4}} | |||
: '''Outdated''' - Original {{orangebox|4}} mod. Only included for backwards compatibility reasons. | |||
; {{src09|4}} | |||
: '''Outdated''' - Updated [[Orange Box]] mod. You '''cannot make a mod for {{src09|4}}''' due to lack of SDK Base for this branch. However, you ''can'' make a content-only mod of a 2009 game by following [[#Creating a mod manually|Creating a Mod manually]]. | |||
; {{asw|4}} (via [[Alien Swarm SDK]]) | |||
: The oddball of the bunch. Alien Swarm is totally free to play, also has newer features from {{l4dbranch|1}}, and its SDK includes source code, but it's source code is for a top-down shooter. It also lacks many of the HL2-compatible code's peripheral tools and cannot access HL2's content. This branch is not cross-platform (Mac/Linux) friendly. | |||
{{Note|If you wish to compile on one of the engine branches, use the following Visual Studio version: Source 2006 is Visual Studio 2005, Source 2007 is Visual Studio 2005/2010, Alien Swarm engine branch is Visual Studio 2010 & Source 2013 is Visual Studio 2013.)}} | |||
{{Note|For compiling on Linux: Use GCC 4.2.x (or earlier) compiler for Source 2007 or earlier, GCC 4.6-4.8 or GCC 5.0 (and later) for Source 2013 is Visual Studio 2013. GCC does not support Alien Swarm engine branch.}} | |||
{{Note|At this time, {{csgo|4|nt=1}} and {{tf2|4|nt=1}} are the only Valve-made Source Engine titles with 64-bit support, and CS:GO is only 64-bit on MacOS and Linux. (By extension, this means that only mods based on CS:GO and TF2 will be able to work on macOS Catalina and later, as these lack 32-bit support.)}} | |||
[[ | {{warning|Your ''Engine Version'' in the [[Source SDK]] must match the Engine branch of your mod! Failing to do this will result in Source SDK tools being unable to load required resources.}} | ||
== Creating a mod manually == | |||
It's surprisingly simple: | |||
# Create a folder under {{Path|steamapps\SourceMods\}} ''(A mod can actually reside anywhere, but placing it here allows Steam to detect and launch it.)'' | |||
# Create a [[gameinfo.txt]] in the folder. You now have a mod! | |||
# Open the SDK launcher and switch to the relevant engine branch. | |||
# Choose "Edit Game Configurations" and click "Add". Enter your mod's name and folder. | |||
To get the source code (or indeed any other files of Valve's that you want to modify), visit GitHub's [https://github.com/ValveSoftware/source-sdk-2013 Source SDK 2013] page. | |||
[[ | For earlier versions of Source SDK (2006, 2007), you will need to use [[GCFScape]] and access <code>depot_211_dir.vpk</code> in the <code>Steam\SteamApps\common\SourceSDK\vpks</code> folder. Remember to change the custom build steps to point to your mod's folder. | ||
== | == Utilities == | ||
[[File:XBLAH's Modding Tool - Create a mod v2.5.0.png.png|thumb|392px|{{xblahmt|4}} - Creating a mod]] | |||
;{{Xblahmt|4}} | |||
:Creating a bare-bones {{src|4}} mod usually requires more than just creating a [[gameinfo.txt]]. Mods based on {{src|4}} games can be created with the {{Xblahmt|4}} using an intuitive interface, that creates all the required files and directories. {{mapbase|4}} mods are also supported. [[XBLAH's_Modding_Tool/Docs/Game/New_Mod|See more]].[[Category:Modding]] | |||
== The SDK wizard == | |||
{{obsolete|type=tool}} | |||
=== Overview === | |||
The '''Create a Mod''' wizard automates the process of creating a Source mod. It: | |||
[[ | * Creates a new mod under {{Path|steamapps\SourceMods\}} | ||
* Installs a copy of the source code, with associated Visual Studio Project File | |||
* Creates a Game Configuration for your mod in the [[Source SDK]] | |||
{{Note|You will need to restart Steam for a new mod to appear in your library.}} | |||
=== Project type === | |||
: {{HL2}} '''This section only applies to Half-Life 2 Mods!''' | |||
When you start the wizard, you will have to choose which project to work with. | |||
[[File:Create mod step1.png]] | |||
; Half-Life 2 Single Player | |||
: Projects for {{hl2ep1}} or {{hl2ep2}}. If you do not own {{hl2ep1}}/{{hl2ep2}} this option will be greyed out. | |||
; Half-Life 2 Multiplayer | |||
: Projects for ''{{hl2dm|1}}''. This option is only available if you own ''{{hl2dm|1}}''; otherwise it will be greyed out. | |||
; Multiplayer mod from template | |||
: A specially-created SDK project that allows you to configure settings such as if your mod is team based, or if you have abilities such as sprinting and prone. This option does '''not''' require ''{{hl2dm|1}}''. | |||
; Source code only | |||
: Dumps the code without creating an actual mod. This option is handy if you are just creating a [[server plugin]]. | |||
Whichever option you choose, you get the same actual source code files (even if you didn't own one or another game). You also get an "everything" solution which includes a collection of development tools. | |||
[[ | === Mod Information === | ||
[[File:Create mod step2.png]] | |||
The first option on this page is where you want the source code extracted to. The second is the name you want to use, which also defines the output folder for your compiled content (does not appear if you chose source code only). | |||
Latest revision as of 07:36, 6 July 2025
Engine branch
Before starting a mod, you need to choose which version (or branch) of Source you will use.
 Source 2013
- This branch is recommended for most users. This is the newest version of the Source SDK. The code is available on GitHub.
- To make a singleplayer mod, see: Setting up Source SDK 2013 Singleplayer.
- To make a multiplayer mod, see: Setting up Source SDK 2013 Multiplayer (specifically uses the Team Fortress 2 branch, which is a slightly incompatible version of Source 2013).
Legacy branches
These branches are set up using an older tool simply called "Source SDK", which is available on Steam. Documentation for using this tool is at the bottom of this page, under The SDK wizard .
 Source 2006
- Outdated - Original
 Half-Life 2: Episode One mod. Only included for backwards compatibility reasons.
  Source 2007
- Outdated - Original
 Orange Box branch mod. Only included for backwards compatibility reasons.
  Source 2009
- Outdated - Updated Orange Box mod. You cannot make a mod for
 Source 2009 due to lack of SDK Base for this branch. However, you can make a content-only mod of a 2009 game by following Creating a Mod manually.
  Alien Swarm (via Alien Swarm SDK)
- The oddball of the bunch. Alien Swarm is totally free to play, also has newer features from Left 4 Dead engine branch, and its SDK includes source code, but it's source code is for a top-down shooter. It also lacks many of the HL2-compatible code's peripheral tools and cannot access HL2's content. This branch is not cross-platform (Mac/Linux) friendly.
Creating a mod manually
It's surprisingly simple:
- Create a folder under

steamapps\SourceMods\(A mod can actually reside anywhere, but placing it here allows Steam to detect and launch it.) - Create a gameinfo.txt in the folder. You now have a mod!
- Open the SDK launcher and switch to the relevant engine branch.
- Choose "Edit Game Configurations" and click "Add". Enter your mod's name and folder.
To get the source code (or indeed any other files of Valve's that you want to modify), visit GitHub's Source SDK 2013 page.
For earlier versions of Source SDK (2006, 2007), you will need to use GCFScape and access depot_211_dir.vpk in the Steam\SteamApps\common\SourceSDK\vpks folder. Remember to change the custom build steps to point to your mod's folder.
Utilities

 XBLAH's Modding Tool
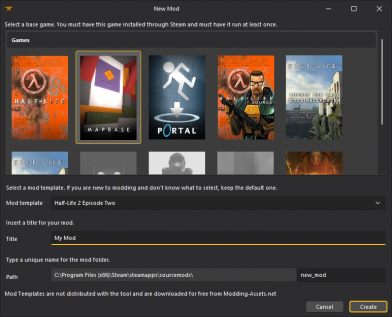
- Creating a bare-bones
 Source mod usually requires more than just creating a gameinfo.txt. Mods based on
  Source games can be created with the
  XBLAH's Modding Tool using an intuitive interface, that creates all the required files and directories.
  Mapbase mods are also supported. See more.
The SDK wizard
Overview
The Create a Mod wizard automates the process of creating a Source mod. It:
- Creates a new mod under

steamapps\SourceMods\ - Installs a copy of the source code, with associated Visual Studio Project File
- Creates a Game Configuration for your mod in the Source SDK
Project type
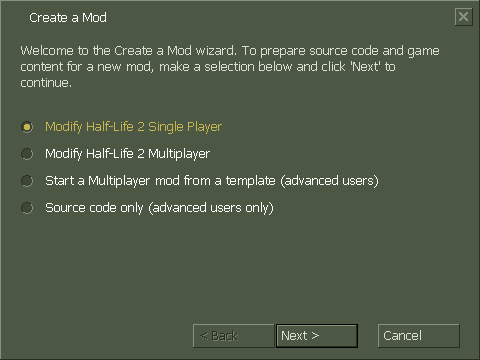
When you start the wizard, you will have to choose which project to work with.
- Half-Life 2 Single Player
- Projects for
 or
or  . If you do not own
  /
/ this option will be greyed out.
 - Half-Life 2 Multiplayer
- Projects for Half-Life 2: Deathmatch. This option is only available if you own Half-Life 2: Deathmatch; otherwise it will be greyed out.
- Multiplayer mod from template
- A specially-created SDK project that allows you to configure settings such as if your mod is team based, or if you have abilities such as sprinting and prone. This option does not require Half-Life 2: Deathmatch.
- Source code only
- Dumps the code without creating an actual mod. This option is handy if you are just creating a server plugin.
Whichever option you choose, you get the same actual source code files (even if you didn't own one or another game). You also get an "everything" solution which includes a collection of development tools.
Mod Information
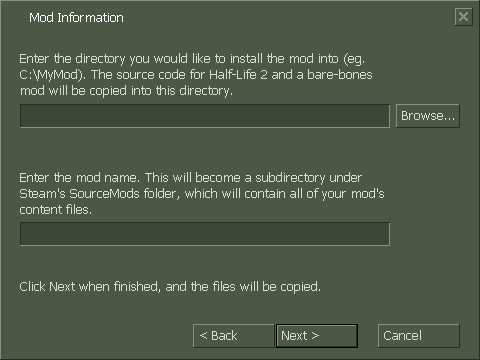
The first option on this page is where you want the source code extracted to. The second is the name you want to use, which also defines the output folder for your compiled content (does not appear if you chose source code only).

