map_edit
map_edit is a console command available in all ![]() Source games.
The
Source games.
The map_edit and hammer_update_entity console commands can be used to update entity data while running a .BSP, then sending the changes to Hammer to commit the changes to the .VMF file. The map_edit command is commonly used to change node positions or to update physics props after they have done their initial settling.
The map_edit <mapname> command is used to load a .BSP for editing. This command creates a connection between the engine and the Hammer editor so that data can be transferred. Before using map_edit, you must compile the map with the current version of the associated .VMF, then load the map in Hammer. The map versions of the .BSP and the .VMF must match exactly. If they do not match, no editing is possible.
Once a map is loaded with map_edit, the hammer_update_entity <entity name> command is used to send the updated position and angles for the named entities back to the Hammer editor. When using hammer_update_entity, you can use the targetname of a single entity to update, or use an entity classname (i.e. prop_physics) to update all entities in the map of that type. Every time hammer_update_entity is invoked, the position and angle of the entities is sent to the editor.
hammer_update_entity. See Introduction to Editing for a description of entity types.hammer_update_entity was named wc_update_entity.Using map_edit to settle physics props
You can use the map_edit command to update your .VMF with the positions of physics props after they've been settled into their final position by the game's physics system. This saves valuable CPU cycles at the start of the map, as well as preventing props from visually "dropping" into place when the map is loaded or a new round begins (in a multiplayer game).
To use map_edit to update the position of prop_physics or prop_physics_multiplayer or entities:
- Load the map in Hammer.
- Compile the map to make sure the contents of the .BSP are identical to the current .VMF you have open. Do not make any changes or even save the map after compiling, or the edit will fail. Remember to turn off auto-saves in Hammer if you have them on.
- Start the game (windowed mode works best).
- At the console, type
map_edit <mapname>and the map will load (i.e.map_edit de_inferno). - After the map loads, wait a few moments for the physics props to settle.
- Open the console and type
hammer_update_entity prop_physicsorhammer_update_entity prop_physics_multiplayer, depending on what type of props you are using. - Switch back over to Hammer. The locations of the physics props should be updated. Save your changes to the map.
- Recompile the map, and the physics props will start in the "settled" positions.
You should now be able to safely mark many of the props with the Start Asleep flag. This will provide additional performance savings because no physics calculation will occur for the prop until it is acted upon by a physics force that would move it.
Editing node graphs in-game
The map_edit command can also be used to edit various AI nodes and node connections in the engine instead of Hammer. When using map_edit in this way, it is not necessary to use hammer_update_entity - any nodes changes are automatically sent to the Hammer editor as the changes are made in the engine.
The basic process is this:
- Load the map in Hammer.
- Compile the map to make sure the contents of the .BSP are identical to the current .VMF you have open. Do not make any changes or even save the map after compiling, or the edit will fail.
- Minimize Hammer.
- Start the game (windowed mode works best).
- At the console, type
map_edit <mapname>and the map will load (i.e.map_edit sdk_d1_trainstation_01). - Use the node editing console commands (see below) to edit the nodes, primarily
wc_createandwc_destroy. Many of these commands are bound to keys by default. See the section about key binding below. - Type
quitto exit the game. - Switch back over to Hammer. Your changes to the nodes should be completed.
- Check the results, then save your changes to the map.
- Recompile the map with the nodes changes in place.
Node display commands
These are the basic commands for displaying various node data.
- ai_show_connect
- Toggle displaying ground node connections.
- ai_show_connect_jump
- Toggle display of jump connections between nodes.
- ai_show_connect_fly
- Toggle display of fly connections between nodes.
- ai_nodes
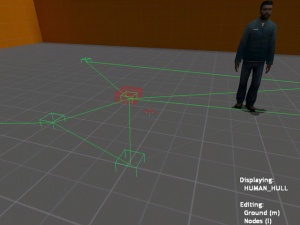
- Display all nodes. Useful for spotting nodes without any connections to them. Entering the command twice will also display the Hammer ID of the node.
- ai_show_hull
- Displays the allowed hulls between each node for the currently selected hull type. Hulls colors are as follows:
- Green: Ground movement connection. Only usable by NPCs that move on the ground.
- Blue: Jump movement connection. Only usable by NPCs that can jump.
- Cyan: Fly movement connection. Only usable by NPCs that can fly.
- Magenta: Climbing movement.
- Displays the allowed hulls between each node for the currently selected hull type. Hulls colors are as follows:
- ai_next_hull
- Display the next NPC Hull size. Cycles through the various hull sizes. Currently selected hull size is written to the screen. Controls which connections are shown when
ai_show_hullorai_show_connectcommands are used.
- Display the next NPC Hull size. Cycles through the various hull sizes. Currently selected hull size is written to the screen. Controls which connections are shown when
Node editing commands
These are commands that are used to actually add and remove nodes.
wc_create- Creates a node where the player is looking if a node is allowed at that location for the currently selected hull size (see NPC Hull)
wc_destroy- Destroys the node that the player is nearest to looking at. The node will be highlighted by a red box.
wc_destroy_undo- Restores the last deleted node.
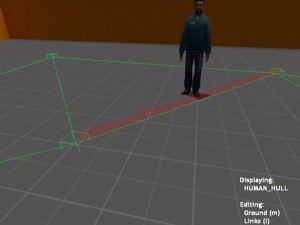
wc_link_edit- Toggles link editing mode, which allows forced disconnection of nodes that are linked.
- A red box highlights node links that can be removed. Use
wc_destroyto remove a highlighted link. - A green box highlights node links that have been previously removed. Use
wc_createto restore a highlighted link. - Enter the
wc_link_editcommand again to disable link editing mode.
- A red box highlights node links that can be removed. Use
- Toggles link editing mode, which allows forced disconnection of nodes that are linked.
wc_air_node_edit- Toggles air node editing mode, which allows add and removed air nodes. Use
wc_createandwc_destroyto add and remove nodes.
- Toggles air node editing mode, which allows add and removed air nodes. Use
wc_air_edit_further- Moves position of air node crosshair and placement location further away from player.
wc_air_edit_nearer- Moves position of air node crosshair and placement location nearer to from player.
Other useful commands
ai_show_grid- Draw a grid on the floor where you are currently looking.
- ai_disable
- Toggles the enabled/disabled state of the AI.
- notarget
- Disables AI ability to see the player. Stops enemy NPCs from shooting you while you're editing.
- god
- Makes you invulnerable while you're editing.
Default key bindings
Here is the contents of the configuration file that contains the key bindings for these commands. The configuration file is found in the source engine.gcf under half-life 2/hl2/cfg/map_edit.cfg). This configuration file is automatically executed when you enter map_edit mode.
// Key bindings
bind z ai_nodes
bind f ai_next_hull
bind h ai_show_hull
bind j ai_show_connect

bind "MOUSE1" wc_create
bind "MOUSE2" wc_destroy
bind "MWHEELUP" wc_air_edit_further
bind "MWHEELDOWN" wc_air_edit_nearer
bind l wc_link_edit
bind m wc_air_node_edit
bind - wc_air_edit_further
bind = wc_air_edit_nearer
bind * ai_show_grid

// These commands are run automatically
ai_disable
ai_nodes
ai_show_connect
notarget
god
You can override these settings (or add your own key bindings) by placing your own configuration file at [mod folder]/cfg/map_edit.cfg.
MOUSE1 and MOUSE2. This means that all weapons will be disabled by default. To use them while in the edit mode, change the keys that wc_create and wc_destroy get bound to or remove the lines entirely.
