Skybox (2D) with Terragen and Skypaint - Advanced
This tutorial explains how to create more advanced skies with Terragen in combination with SkyPaint and Photoshop. It assumes you know how to create a 2D skybox with Terragen.
Script


When you are satisfied with the scene, you will need to render all six images for the skybox. Below is a script that will process all camera angles and output them as skybox images. Save the code in Notepad as a .tgs file, then run it by clicking "Run Script" in Terragen:
initanim "C:\output\sky_testft", 1

;_ft
Zoom 1.0
CamH 0
CamP 0
CamB 0
frend

initanim "C:\output\sky_testlf", 1

;_lf
Zoom 1.0
CamH 90
CamP 0
CamB 0
frend

initanim "C:\output\sky_testup", 1

;_up
Zoom 1.0
CamH 270
CamP 90
CamB 0
frend

initanim "C:\output\sky_testbk", 1

;_bk
Zoom 1.0
CamH 180
CamP 0
CamB 0
frend

initanim "C:\output\sky_testrt", 1

;_rt
Zoom 1.0
CamH 270
CamP 0
CamB 0
frend

initanim "C:\output\sky_testdn", 1

;_dn
Zoom 1.0
CamH 270
CamP -90
CamB 0
frend
SkyPaint

SkyPaint is an old application made for "painting" in 3D environments. Download the program and install it, make sure you also install the Photoshop plugin. When that is done, open Photoshop so it's ready to use.
Open SkyPaint. Go to "File->Open", choose the option "Quake II, Targa", and select the sky that you just exported. You should only see the _ft.tga file of that sky and not the other parts. When it's open, it will be your first chance to preview your sky in 3D. You can hold down the left mouse button and turn around the view. You should do this to see if there are any problems, and if there is, you did something wrong in the previous steps.
After you checked the sky's consistency, turn the view to a part where you feel that you want to add something. Now hit the enter key and see how the exact same view is transferred into Photoshop for editing.
Photoshop
The view in Photoshop now is the sun, and something more interesting like a vortex-storm could be added around it. Go to NASA and enter their Hurricane section, snag a huge satellite image from Katrina and paste a part from it onto the SkyPaint picture.
You need to wrap and distort the flat Katrina image to fit into the sky nicely and tweak the color, contrast and do some erasing before you can make it look good. When you're done, make sure you flatten all layers and enter the SkyPaint plugin. The edited view should now be inside SkyPaint, and you can turn around and view what was made.

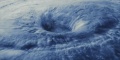
The hurricane Katrina, satellite photo by NASA.
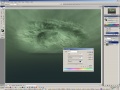
Katrina being distorted in Photoshop
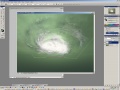
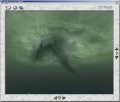
Katrina is now a cool vortex around the sun!
Quick n' Dirty snapshot from the movie Day after Tomorrow
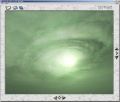
Flipped around, adjusting colors.
After a while - Added a dark tornado inside the 'hole'.
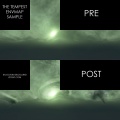
Pre and post comparison of the entire environment map.
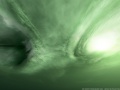
Wallpaper of a part of the sky, 1600x1200.


External links
- Terragen
- SkyPaint (dead link)
- Adobe Photoshop
- Terragen Classic (GameBanana Link)
- SkyPaint (GameBanana Link)
| Environment articles: | |
|---|---|
| Skies and environment maps | |
| Terrain and displacement mapping | Displacements • Creating Holes in Displacements • Digital Elevation Models • Creating custom terrain with Worldmachine |