Configuring Hammer for Half-Life: Source
After the SteamPipe update in 2013, ![]() Half-Life: Source now installs in
Half-Life: Source now installs in ![]() Half-Life 2 directory. However, a Hammer configuration does not ship, nor does an FGD file.
Half-Life Source.fgd is required for this process.
Half-Life 2 directory. However, a Hammer configuration does not ship, nor does an FGD file.
Half-Life Source.fgd is required for this process.
Game Configurations
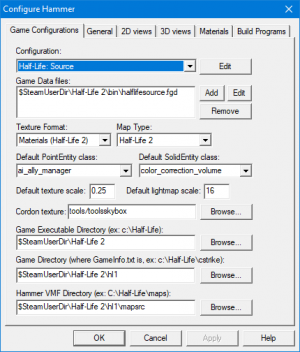
Launch Hammer. Hammer will be installed with Half-Life 2, and can be found at common\Half-Life 2\bin\hammer.exe. Click on Tools, Options... to open the configuration window. Go to the tab labeled Game Configurations.
Configuration
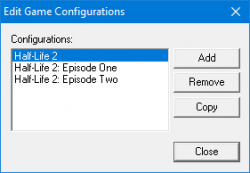
Hammer allows you to setup multiple configurations, so if you want to make maps for more than one game, you can make maps for each on the same editor. This section allows you to add, remove, or edit different configurations.
Click Edit (the wide one at the top, not the smaller one below), Add, and name your configuration whatever you want. Click OK, Close.
Game Data Files
Copy the text from Half-Life Source.fgd into a Notepad document, save it as hls.fgd in common\Half-Life 2\bin.
Click Add. Select the hls.fgd file at common\Half-Life 2\bin. You can select and use extra FGDs, but anything in them not coded to work in Half-Life: Source will not work (For example: HL2 entities).
The Texture Format option should now say Materials (Half-Life 2) and the Map Type option should now say Half-Life 2.
Default PointEntity class
By default, Hammer automatically selects ai_ally_manager from the entity list when using the Entity Tool, because it is alphabetically first. You can change the default to any valid point entity you want. info_player_start or info_player_deathmatch are recommended.
Default SolidEntity class
By default, Hammer automatically selects color_correction_volume from the entity list when you tie a brush to an entity, because it is alphabetically first. You can change the default to any valid brush entity you want. func_detail is recommended.
Cordon texture
Set this to tools\toolsskybox. An alternative is BLACK.
Game Executable Directory
This is the folder containing hl2.exe. Select the folder common\Half-Life 2.
Game Directory
This is the folder holding game-specific files, such as models, animations, textures, etc. For Half-Life: Source, this is at common\Half-Life 2\hl1.
VMF Directory
This is where Hammer will save all files related to your map every time you compile. The engine looks in common\Half-Life 2\[your game folder]\maps for maps, however, Hammer will generate quite a few files related to your map when saving or compiling, so you may find it preferable to have a separate folder to contain them all (usually named mapsrc). Compiled map files can be stored in another folder, which we will get to configuring near the end.
Build Programs
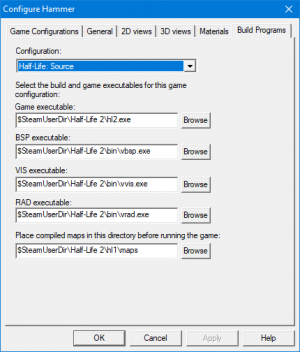
Now go to the tab labeled Build Programs. These are the programs that process your level geometry, determine where to optimize for visibility, and add lighting to your map. Many mappers use fan made modifications of the original tools developed for Source containing many fixes and improvements. If you use those tools, you will have to give filepaths for those instead of the ones talked about below.
Game Executable
A .exe file to open when the map finishes compiling. Unless you have some non-gaming purpose for Hammer, this should probably be common\Half-Life 2\hl2.exe.
For Half-Life Deathmatch: Source, set this to common\Half-Life Deathmatch Source\hl1mp_win64.exe (64-bit) or hl1mp.exe (32-bit). Earlier version of HLDM:S (running on Source 2013 Multiplayer) should set the executable to hl2.exe.
BSP executable
BSP creates the map and then generates visleafs. This is at common\Half-Life 2\bin\vbsp.exe.
VIS executable
VIS determines what is visible from within each visleaf, so it can enforce a maximum visibility distance and hide objects when it's not visible, improving performance. This is at common\Half-Life 2\bin\vvis.exe.
RAD executable
RAD bakes lighting into your map, so it won't look so flat and boring. Dynamic lighting, like the HEV flashlight and env_projectedtexture, is done directly in the game. This is at common\Half-Life 2\bin\vrad.exe.
mat_specular or editing the VTFs to point to a env_cubemap, the many "chrome" model textures which don't have a $basetexture would require adding .hdr.vtf envmaps for each .vtf envmap. If you aren't willing to spend the extra time doing this, just compile in -ldr mode.Compiled Map Directory
This is where the game usually looks for maps. This should be common\Half-Life 2\hl1\maps.


