Choreography Tool reference
The main tool in ![]() Faceposer is the Choreography tool. This tool is used for sequencing expressions and other acting cues and previewing what the scene will look like in the engine. A scene can refer to multiple actors and thus can be used to block out fairly complicated interactions and dialogue between game characters.
Faceposer is the Choreography tool. This tool is used for sequencing expressions and other acting cues and previewing what the scene will look like in the engine. A scene can refer to multiple actors and thus can be used to block out fairly complicated interactions and dialogue between game characters.
Main interface
To access the Choreography scene interface, first load a model and load any expression class files with which you are going to work.
If you didn't have a scene file open previously, you'll see a note that no choreography data file (*.vcd) has been loaded. To create a new .vcd file, choose Choreography | New from the menus. To load an existing file, choose Choreography | Load… from the menus. If you create a new choreography file, you will have to add at least one actor. Just fill in the actor's name to the Create Actor dialog and click OK. If you hit cancel, you can still add a new actor by selecting Choreography | New Actor from the menus.
Once you've loaded a scene or created a new actor, you'll see a timeline at the top of the window and a list of actor(s) along the left. Each actor in the scene has one or more channels that contain one or more events that are triggered at some during playback of the scene. Although channels are mostly for convenience in editing, during playback in the engine, if two events occur at the same starting time, then the event with the lower channel (higher in the view) will be applied first.
To add a channel to an actor, right-click on the actor's name and choose "New Channel…" Fill in the name of the channel and choose which actor to which to add the channel and click OK. You will now see a channel appear under the specified actor's name. There is an expand/collapse button to the left of each actor's name that will show and hide the actor's channels. When the actor's channels are hidden, there is a display stating the number of channels and events being hidden. In addition, you can double click on a channel or an entire actor name to enable or disable the channels from playback preview. Disabling channels only affects the preview playback.
Any channel which contains one or more .WAV events can be made to show close captioning (subtitle) information. This information can be shown/hidden by clicking the black triangle marker at the top left corner of the channel. When the triangle is pointed down, then the additional data is shown. The data includes a language selector (which only works if you have the foreign language versions of the game .dll available [Clarify]). Due to timing issues, some of the dialog of the game was "split" into multiple .wav files. For the foreign versions, these .WAVs are considered "combined" into a single .wav for convenience of playback. Thus, when a .wav is selected, the right mouse menu will contain a few additional options for combining/uncombining the .wav files and disabling captions. If you are not working on a localized single-player mod, you probably won't need to pay attention to these settings.
Actors
An actor is an NPC in your scene (.vcd file) which you will direct using Choreography events. A scene can have multiple actors, and requires at least one actor. Each actor has at least one channel into which any number and type of Choreography events can be added. For info on how to create actors and channels, go here. For info on how to create Events, go here.
An actor's name is significant in that its events will be applied to the entity in your map with the same name. If you name your actor "Bob" in the .vcd, all events you apply to that actor will be assigned to the entity named "Bob" in your map. Alternatively, you can name your actor "!Target#" (where "#" is a number between 1 and 8), and specify the target entity within the Logic_choreographed_scene.
An actor corresponds to an NPC in your map. Actors can be player companions like they can be player enemies; this will not make any difference.
Choreography Events
The choreography system can sequence the following types of events listed below. For how to create and edit events, go here.
Expression
The actor blends into the specified expression at the start time of the event, holds the pose for the duration of the event. Note that an actor can play multiple expressions simultaneously (you should consider putting the overlapped expressions in additional actor channels). The weight of the expression can be varied over time using the Ramp Tool (more later).
Gesture
This makes the actor play a specified gesture animation. A gesture is a special type of sequence that can be scaled and altered using internal tags.
Detailed info about creating and using Gestures can be found here (link forthcoming).
You can re-time gestures in the Choreography view by simply moving the tags of the Gesture event. Alternatively, you can use the Gesture Tool to retime the tags.
You can use the Ramp Tool to change the magnitude of the gesture animation over time.
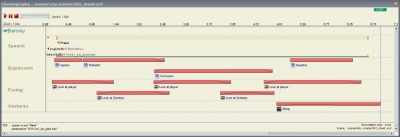
By default, multiple gestures within a channel will crossfade between each other, and so the "end" tag of the first gesture event will be locked to the "apex" tag of the second gesture. To override this behavior, place a "NULL Gesture" event in between the two Gesture events. This is shown in the following illustration:
Sequence
Tells the actor to play a specific animation sequence. Gestures are usually preferred because of their ability to be scaled.
WAV File/Speak event
The actor plays back a soundcsript (it can also refer to raw .wav files, but such usage is discouraged) that contains phonemes (and hence visemes) tags created by the phoneme extractor. Click the "Show all sounds" button to see sounds not marked at CHAN_VOICE in the ![]()
game_sounds_*.txt files, otherwise, the list is restricted to such files. You can also choose a raw .wav file using the Choose File… button or by typing in the relative path into the Speak .WAV combo box text file.
Look at actor
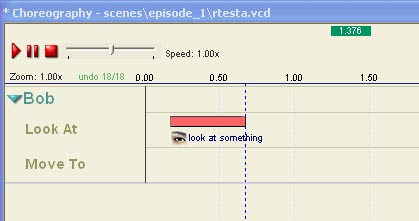
The actor looks at another named actor or entity existing in the map. A "Look At" event will only use the eyes, head and neck.
The Ramp Tool can be used to change the magnitude of the event over time. A magnitude of 0% means that only the eyes will try to look at the target (no head/neck rotation). A magnitude of 100% means the actor will try to turn his entire head towards the target.
If the "Look At" target is behind the actor, or outside a certain angle of view, the actor will not attempt to look at the target.
Specifying the "Look At target" as !self means that the actor will look at nothing specifically, and the actor's idle look behavior will be disabled for as long as the event is active (the AI wont make the actor look at random positions over time, but rather just look straight ahead). This is useful for when the idle look behavior would be inappropriate and you want to specifically suppress it, such as if the actor is sleeping or knocked out for some time in the scene.
Move to actor
The actor moves to a specified target. The target can be just about any named entity (info_target is commonly used), including other NPCs or the player (with !player).
A "Move To" event can specify what navigation sequence or activity to use while en route to the target; the default is Walk, but you can select Run or CrouchWalk from the dropdown menu, or alternatively type in the name of a specific sequence to use.
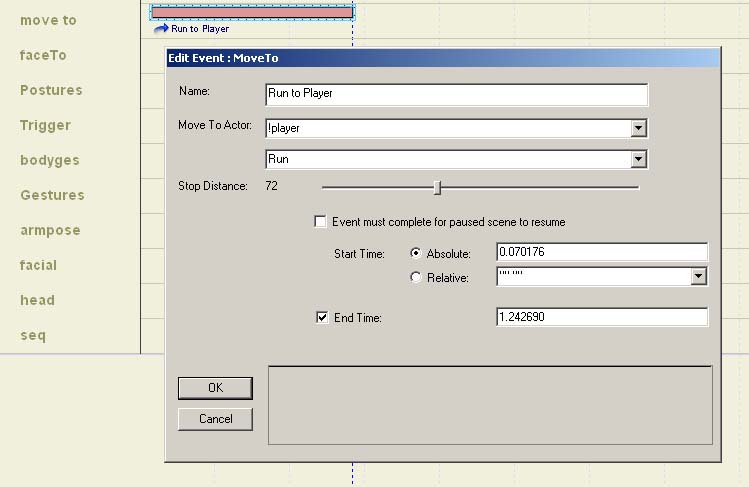
A Stop Distance can be defined for a "Move To" event. The actor will complete his "Move To" when he reaches this distance from the target. The default Stop Distance is 0 units. If the "Move To" target is a player or NPC, you'll want to set the Stop Distance to a large enough value that the Actor doesn't get in the way of the target player/NPC. The following illustrates the "Move To" event's properties:
Note that the actor uses the Source engine AI system to perform the actual move. If the player or obstacles are in the way, then the move can take longer or shorter than originally expected. If the completion of the move is critical to continuing the scene, then you should consider inserting a scene "Pause" point during the move and marking the move as a "Resume Condition". This will cause the scene to automatically resume playing once the actor finally reaches their mark.
param3Face actor
The actor faces one of the other actors in the scene. Unlike for "Look at actor", this will make the actor move its legs (if the "Lock facing" checkbox isn't checked) and its torso to face the target.
Flex animation
Allows for animation of individual flex sliders along splines over the time of the animation. Flex animation events are edited using the Flex Animation Tool.
Fire Trigger
Fires an AI trigger. For more information, see Scene Triggers.
Generic(AI)
This is passed to code in CSceneEntity in the game .dll code for processing.
Sub-scene
A top-level .vcd file can drive simulation of one or more "sub-scenes" which are embedded. Note that these sub-scenes themselves cannot have any additional layers of sub-scenes.
Permit Responses
At certain times during a scene, an actor might not be speaking and if the player is doing something which generates a response from the response system, then if the actor's scene is at a time when a "Permit Responses" event is allowed, then the actor can play the interjected response while continuing to be an actor in the .vcd file.
!player as the target actor name. Other options are !self, !enemy, !friend, and !target# where the targets are defined by the level designer placing an associated logic_choreographed_scene entity in a map.Creating and editing events
To create an event, right-click in any channel area of any actor to whom you want to add an event. Note that the mouse click position is the starting time for any event created (the timing can be changed). Choose New Event | Expression (e.g., from the menu); here you will be able to choose the expression (from the currently opened expression class), set a name, and alter the start and end time (most events have a start and end time, although some are "fire and forget") for the event. Set the values and choose OK to create the event. Note that start times can be relative to any existing timing tags embedded in relation to other events in the scene, such as .WAV events. If you move the .WAV event or the tag within the event, any relatively offset events will be moved along with the .WAV event. Furthermore, depending on the type of event, there are additional parameters that show up in the various Add/Edit event dialogs.
The new event will show up in the channel area of the current actor. Because the above example created an expression, a face icon will show up under the bar showing the duration of the event. You can drag the bar with the left mouse button to move the event. Hovering the mouse or clicking near the left/right edge will show a sizing cursor allowing you to change the start or end time by clicking and dragging with the mouse button at that point.
To delete and event, right-click it and choose Delete from the menu or press the Del key.
You can also edit event properties by right-clicking on the event and choosing Edit | Event <name>. Alternatively, you can press Alt+↵ Enter to edit the selected event[confirm].
Further details about any event under the mouse are shown along the bottom of the Choreography Editor.
Using the timeline
There is some additional information in the time line at the top of the screen. First, (depending on how much of the scene you can see based on your current zoom level) there is a dashed blue line showing the end time of the final event in the scene. In addition, there are typical VCR controls (Play, Pause and Stop) in the top left of the tool window. The Space bar can also be used to play or stop the scene. If you click the play button and have some active events, they will be played back for viewing in the 3d view area. Clicking Play will show a green time scrubber at the top as it moves from left to right. If the current playback time is not within the view, the current time is still printed at the top left.
If you left-click and drag a scrubber, the current scrub position is shown with a vertical bar.
The Choreography view also has a slider for changing the playback rate, so you can watch the preview in faster or slower than normal speed.
If you move the mouse wheel in an active tool (or, in a few cases where the mouse wheel already performs another function, hold Shift and move the mouse wheel) then the tool will zoom in/out based on the movement of the mouse wheel.
Events that don't have an end time (i.e., which are just triggered at the start time) are shown without a "sizing" bar and can only be moved left or right in time by dragging them around. To specify an end time, right-click on the event and edit the end time and check the checkbox next to "End Time". (Note: the End Time must be after the Start Time). A negative end time (generally of -1.0) is the same as specifying "no end time".
Scrubber
Various tools in ![]() Faceposer use a scrubber. The scrubbers all match the current playback time. You can click and drag a scrubber to manually play the scene forward or backward. Or you can click in the horizontal tray where the scrubber is drawn to have the scrubber automatically play until the clicked position. Note that all of the scrubbers across all of the tools in Faceposer are synchronized to each other.
Faceposer use a scrubber. The scrubbers all match the current playback time. You can click and drag a scrubber to manually play the scene forward or backward. Or you can click in the horizontal tray where the scrubber is drawn to have the scrubber automatically play until the clicked position. Note that all of the scrubbers across all of the tools in Faceposer are synchronized to each other.
Global Pauses (Interrupts)
A scene can have "global" Pause events placed. To create a Pause event, right-click anywhere in the channel name or channel tray for any actor and choose New Section Pause… from the menu. You can give the section pause a name, and you can have the section pause optionally perform an automatic action. The need for the section pause events arises out of the need for triggering of certain events that have ambiguous end times. For instance, as noted above, a "move to" event might be triggered which will cause the AI to start the actor moving to their next position. Due to obstacles, movement speed, etc., it is not possible to exactly determine how long it will take the actor to arrive at the location. This is a good location for a Pause event. In general, you can simply institute a section pause just after issuing the "Move To" event to an actor. The AI system will later notify the scene that the "Resume Condition" for the pause has been satisfied (assuming you checked the "Resume condition" checkbox in the event properties for the events overlapping the Pause point).
In other words, you would tag the "Move to" event that you are waiting for as a "Resume Condition". To tag an event as a resume condition, you can right-click on the event in the channel tray and edit its properties and click the check box labeled: "Event must complete for paused scene to resume".
This is the most common use of the Pause event; used in conjunction with a "move to" event to ensure the actor reaches his mark before continuing the scene. Use this technique when there are subsequent scene events that are location specific (e.g. pushing a button, typing on a keyboard, speaking into a microphone, entering a room, etc). During the production of ![]() HL2, this technique was considered one of the "sledgehammer" methods of directing actors because it effectively guarantees the actor will reach their mark.
HL2, this technique was considered one of the "sledgehammer" methods of directing actors because it effectively guarantees the actor will reach their mark.
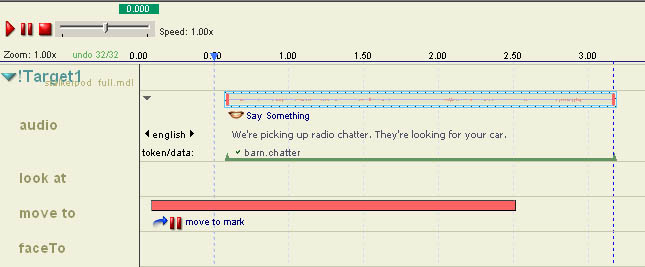
One of the more subtle (and powerful) aspects of Pause events is in being able to control when the scene will resume with respect to the completion of the "resume condition" event. In other words, you can have it so the scene anticipates the event completion by some specified amount of time, and resumes the scene that much time prior to the actual event completion. This is very useful for having paused scenes resume with a certain natural overlap of events. To specify that the scene resumes some time prior to the event completion, you want to have the event extend that much time past the intersecting Pause event. The following image illustrates this technique:
In the case that the designer doesn't want the scene to remain paused past a certain length of time, the scene designer can decide to automatically take one of two actions: 1) resume the scene anyway, or 2) cancel playback of the rest of the scene. To set the automatic resume action, right-click on the blue triangle marker for the "Section Pause" event and choose "Edit" from the menu. In the properties dialog, you'll notice a checkbox next to the word "Automatically". If you check this box, then you can choose what action to automatically perform. The drop-down list allows you to choose to either "Resume" or "Cancel" and the final text entry area allows you to specify how long of a delay to allow before automatically taking action.
During playback of the scene in the engine, if any AI event that is marked as a "resume condition" takes less time than the "automatic" action you've specified, the automatic action is skipped since it was not needed.
Loop point
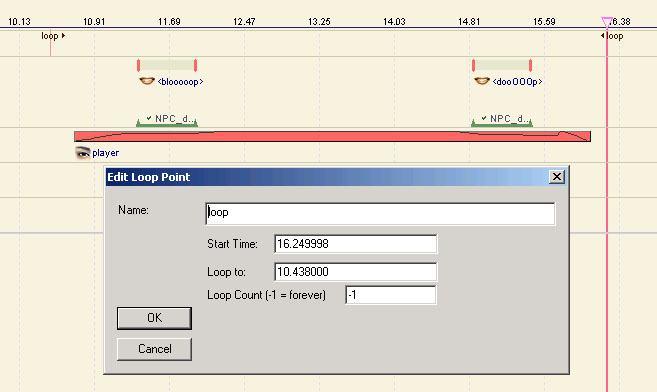
Like the Section Pause event, the "Loop" point event is similarly a global trigger for the scene. Instead of pausing however, the Loop point event allows resetting the .vcd clock backward to the beginning of the .vcd or to a specified time offset. Using this event near the end of your .vcd is useful for making it loop. You can specify that the event should loop a set number of times, maximum, or that it loops forever by editing the Loop point's properties. If you have a Loop Point that loops forever, you can break that loop by Canceling the scene through the logic_choreographed_scene entity in ![]() Hammer.
Hammer.
It is important to note that the loop begins looping at the Loop Point and jumps back to the time you have specified in the properties (by default it is set to 0).
Fire Completion
Fire Completion events define a custom completion time for a scene. By default, a scene is completed when the last event in a .vcd file finishes, and is denoted by a dark blue dotted line. A Fire Completion event will mark off a scene’s completion by shifting the default completion time to the value specified in said event.
In more practical terms, the Fire Completion event is the point in the scene where the logic_choreographed_scene entity fires its OnCompletion output. Hence you can use this event to precisely time when that output is fired with respect to other events in your scene.
Other Choreography Features
- In general you cannot accidentally move events between channels. To drag an event from one channel to another, hold down ⇧ Shift as you are dragging.
- Because multiple events can overlap in a single channel, the right mouse menu on an event has a Move event <name> to back option which can make it easier to see and select underlying events. In addition,
 Faceposer will expand the layout of the channel vertically to accommodate overlapping events.
 - Events can be copied to and pasted from the clipboard from the right mouse menu.
- Events can be exported and imported from simple event text files (also from the right mouse menu).
- You can see the Ramp of all events only by choosing "Ramp only" from the right-click menu.
- You can ask the
 Faceposer to verify that all animation sequences are valid (i.e., non-looping if needed and of correct duration) by choosing "Check sequences"
 - You can turn off sequence processing from the preview (keeping the camera mostly on the actors' faces) by un-checking the "Process sequences" menu option.
- Because
 Faceposer supports multiple actors, you should associate the actor slots with loaded .MDLs. You can do this from the right-click menu or from the models tab in the main window tool area at the bottom right of the application.
 - You can also associate a .BSP with a .vcd, so that the relative positions of targets and the names of other actors/entities can be loaded when browsing in various properties dialogs.
Debugging
developer must be set to 1 for these to work.scene_flush- This will reload all scenes the current map is using. Restarting a map will not automatically reload your changed scenes so if you are actively working in a .vcd with the engine open, be sure to use
scene_flushso your new changes show up. scene_print- Setting to 1 will show debug information in the console about the played events.
scene_showfaceto- Setting to 1 will turn on debugging to visually display where an actor is trying to face when a face-to is active for that actor.
scene_showlook- Setting to 1 will turn on debugging to visually display where an actor is trying to look when a look-at is active for that actor.
scene_showmoveto- Setting to 1 will turn on debugging to visually display where an actor is trying to move to when a move-to is active for that actor. A box will show at their destination with an arrow being displayed between the actor and the destination.
