需要重复放置的地图数据可以方便地作为实例保存和编辑。这与预制文件的工作原理类似。基本上,你要一起工作的实体收集至一个文件中,然后将该文件引用到地图中的任意多个位置。每个实例都有自己的“name fixup”(名称修正),因此当文件被引用到另一个地图中时,所有的逻辑仍然有效。《教区》战役中的警报车停车场就是这样做的。另外,《暴风骤雨》 中的城镇也被引用到地图的前后版本版本中,从而使单个更改都可以反映在这两个版本中。
如果地图的一部分需要成非正交的角度,你可以将其保留在的单独文件的网格上。如果随后你将文件实例化至主地图中,然后旋转该实例,则可以继续享受在网格上为每个文件进行编辑的好处。
如果你要升级一个《求生之路》地图以便与《求生之路2》一起运行,并且同时与《求生之路》保持兼容,则实例是最好的选择。你可以保持一个新版本,但是由于需要在两个地方进行常见的修复或更改,因此该“分支”可能会变得难以支持。或者,你可以简单地将新内容添加到“L4D2”可见组中,但是这种方法的可伸缩性不是很高。这很容易出错,丝毫的复杂性会使它变得笨拙。
相反,你现在可以将公共资产保留在一个与 L4D1 兼容的文件中,将 L4D2 的“增量”保留在另一个文件中。要进行设置,你将需要创建一个新的 L4D2 VMF 文件地图,然后将一个实例实体引用其中的现有 L4D1 地图,从而在每次编译之前自动导入旧地图的内容。只需将新的仅L4D2实体添加到L4D2 的VMF文件,就可以从一组非重复的源数据中为两个游戏提供一个地图版本。这样做的好处是,你在较旧的 L4D1 地图中进行的任何更新都会自动反映在新的 L4D2 VMF 版本中。
让我们使用入门教程之一的实例进行操作。
由于它是一个点实体,因此你可以将 func_instance 放置在任何位置,但是将其放置在世界中心点且没有旋转的情况下,你可以非常精确地在基础地图和实例之间剪切然后粘贴特殊对象。在地图之间进行紧密协调时,这非常方便,你会发现自己在做很多事情。
即使当前打开的 VMF 文件从技术上讲仅包含一个 func_instance 实体,当你编译地图时,所有实例都会被暂时“展平”并包含在地图中。它们出现在最终的 BSP 文件中,就像它们已经在地图本身中一样。
尽管现在你需要两个 VMF 源文件来创建关卡,但是你可以为自己提供更大的编辑灵活性,因为你可以将内容保存在单独的存储桶(separate buckets)中。正如我们将在接下来的几篇教程中看到的那样,当你添加对多种游戏模式的支持或执行其他使你的地图更加复杂的事情时,这将变得非常方便。
但是,出于我们的目的,我们希望“升级”旧版地图,并希望保留新文件中的更改,同时避免尽可能多地编辑实例。我们稍后会再次谈到这一点,尤其是在遍历多个游戏模式支持实体 info_gamemode 时。让我们继续进行 L4D2 特有的武器生成实体。
VMF map instances are a simple yet powerful new tool for map editing. Basically, they let you reference one .VMF into another. Any changes to the file will be reflected in all instances.
Benefits
.VMF Prefabs
Map data that will need to be placed repeatedly in your maps are convenient to save and edit as instances. This is similar to how Prefabs work. Basically, you collect entities that are meant to work together into a file, then reference that file into your map in as many locations as you like. Each instance gets it own "name fixup", so all logic still works when the file is referenced into another map. This is how the alarmed car lot in The Parish is set up. Also the town in Hard Rain is referenced into the forward and back version of map, allowing a single change to be reflected in both.
Sectioning
Instances may also be used to divide a large, unwieldy map into several smaller, easier to manage .VMFs. This also simplifies workflow when multiple authors are working on a single map simultaneously.
Working off grid
If you have a portion of a map that needs to be at a non-orthogonal angle, you can keep it on-grid inside a separate file. If you then instance the file into your main map, then rotate the instance, you can continue to enjoy the benefits of on editing on the grid for each file.
Updating a map for L4D2
If you have a L4D map that you'd like to update to run with L4D2 while maintaining a version that is compatible with L4D1, instances are the best way to go. You could save out a new version, but this "fork" can become a hassle to support, as common fixes or changes need to happen in two places. Alternatively, you could simply add the new content into a "L4D2" visgroup, but that approach isn't very scalable. It's error-prone, and the slightest bit of complexity can make it unwieldy.
Instead, you can now keep the common assets in one file that remains compatible with L4D1, and the "delta" for L4D2 in another file. To set this up, you will need to create a new L4D2 .VMF map, then place an instance entity that will reference the existing L4D1 map into it, thereby automatically importing the contents of the older map before each compile. Simply add your new L4D2-only entities to the L4D2 .VMF, and you can provide a version of your map for both games from a non-duplicated set of source data. The nice thing about this is that any updates you make in the older L4D1 map are automatically reflected in the new L4D2 version of the .VMF.
Let's run through using instances with one of the beginning tutorial levels.
Adding a new Instance
To start, go ahead and create a new level in Hammer from the menu: File > New
Save it as:
sdk_content\mapsrc\Your_First_L4D_Level_Tutorial\tutorial07.vmf
We will be referencing another file in the same folder, so it's important to keep it in the correct place.
Next, we need to place an entity called a func_instance that will represent the map data you wish to reference.
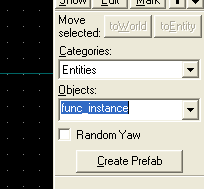
Go into the Entity tool  and select "
func_instance" from the Objects drop-down menu on the right hand side of the Hammer window.
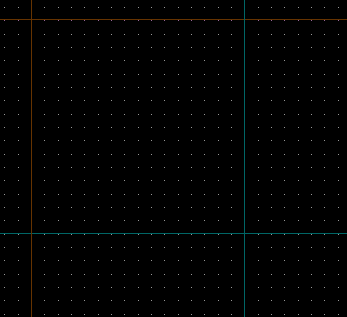
Placing a func_instance at the origin
Place it at the origin (coordinates 0,0,0) by left-clicking where the dark cyan lines intersect in the Top (upper right) viewport. You can verify it's position from the right side of the status bar.
Since it's a point entity, you can place a func_instance anywhere, but placing it at the origin and with no rotation allows you to Cut and then Paste Special objects between the base map and instance very accurately. This is very handy when tightly coordinating between maps, which you'll find yourself doing a lot.
Next, select the func_instance with the arrow selection tool and open its properties by pressing Alt+↵ Enter.
Click on the VMF Filename field and click the Browse... button. Go ahead and select one of the finished tutorial files in the same folder:
sdk_content\mapsrc\Your_First_L4D_Level_Tutorial\tutorial05_complete.vmf
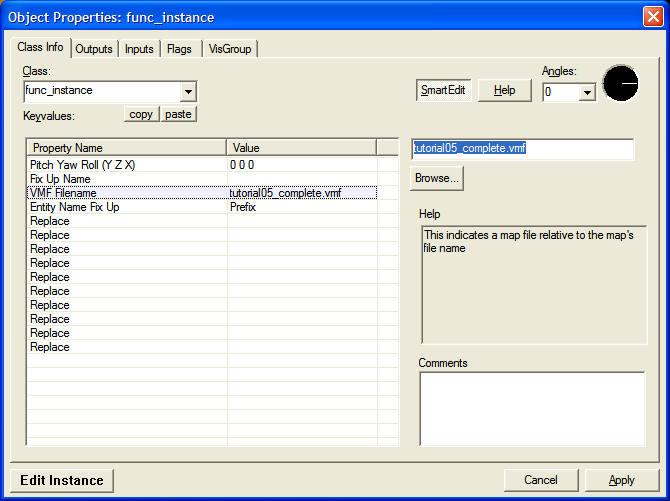
If the name doesn't appear, make sure the .VMF you're editing is saved to the same folder. You can also try typing in the filename manually.
 注意: Instances must refer to VMF files that are either in the same folder as the main file or in a sub-folder. Paths are always relative.
注意: Instances that are used by multiple files are usually placed in a sub-folder named "instance" to avoid confusion.
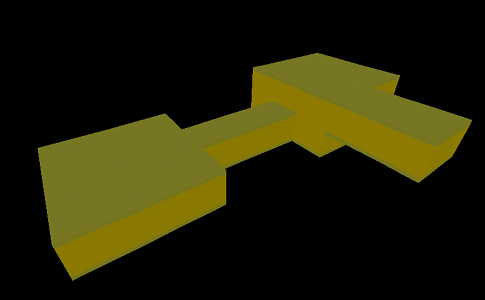
Instance with .VMF content loaded
The contents of tutorial05 are now referenced into your new map, and are tinted in yellowish-orange to distinguish the referenced content from other content that may be in the currently open .VMF.
Even though the currently open .VMF technically only contains one entity, the func_instance, when you compile your map, all instances will be temporarily "flattened" and included in your map. They appear in the final .BSP just as if they had been in the map itself.
Although you now need two VMF source files to create your level, you've provided yourself with much greater editing flexibility, as you can keep content in separate buckets. As we shall see in the next several tutorials, this will become very handy as you add support for multiple gamemodes or do other things that make your maps more complex.
Fixup naming and viewing options
Take a look at the Properties dialog again.
Putting text in the Fix Up Name field allows you to specify a prefix or suffix to nameable entities. This is very handy if you want to have multiple func_instances referencing the same file while targeting the entities separately. In fact, if you do not specify a fixup name, one will be provided automatically, thus allowing you to place multiple instances while still being able to trigger the entities inside individually.
Let's keep the fix up blank for the purposes of this tutorial but a good example can be found in the car alarm lot example in the Deadline2 add-on.
 提示:You can toggle the tint as well as the overall visibility of instances from the Hammer Instancing menu. Let's keep it on the default setting for now since we will soon be mixing instanced and non-instanced objects.
Editing
Edit instance
Go ahead and select the instanced geometry and open the properties window again.
Along the bottom, you'll notice a button titled Edit Instance.
This will open the instance .VMF for editing if it isn't already while maintaining the exact same relative camera coordinates between the two files. Any changes you make will be reflected in the new map as you switch between them.
For our purposes, though, we want to "upgrade" a legacy map, and will want to keep out changes in the new file while avoiding editing the instance as much as possible. We'll touch on this again later, in particular when going over the multiple gamemode support entity
info_gamemode. Let's move on to the L4D2-specific weapon spawning entities.


