Создание собственных табло для тестовых камер
This page either contains information that is only partially or incorrectly translated, or there isn't a translation yet.
If this page cannot be translated for some reason, or is left untranslated for an extended period of time after this notice is posted, the page should be requested to be deleted.
Also, please make sure the article tries to comply with the alternate languages guide.
Introduction
This guide will show you how to create model based signs, texture based signs and how to set them up in your map.
Model Based
This method involves having custom models for your signs. This is the best way to create your signs. You can use any modeling program you'd like but as of right now, the guide will currently only be using blender.
Blender
This tutorial will assume that you only have a very basic understanding of Blender. To start, setup Blender Source Tools if you don't have it installed.
Setting up the model
You will need to decompile all testchamber sign models in models/prop_animsigns, you may not use all sign models, but it's good to be prepared for something you may need.
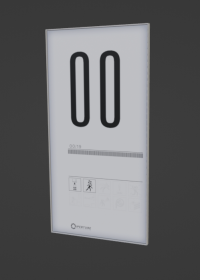
This guide will be modifying signage_num00 to make our own sign.
Setting up textures
Export these textures as a TGA file with the program with your liking, such as VTFEdit
- materials/models/props_animsigns/awe_total.vtf
- materials/models/props_animsigns/awe_total_grey.vtf
- materials/models/props_animsigns/newsignage_back02.vtf
On blender, go to Edit > Preferences > Add-ons
On the search bar, search "plane" and you should see an addon named Import-Export: Import Images as Planes, enable this addon.
Enable Material Preview mode.
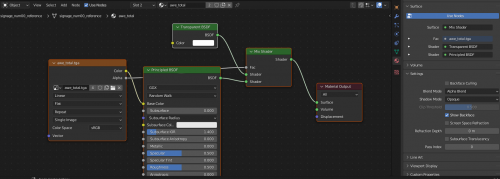
Go to the Shading tab, select the model, then tick the Use Nodes box.
The Test Chamber signs have multiple skins. Skin 0 is a mess of textures and is not supposed to be used, changing the skin will use the proper texture. For instance, for all skin 0's (on any sign model), newsignage_back00 will be replaced with newsignage_back02 and skin 0's newsignage_back02 will be awe_total. We will be looking at the last skin for blender since that's the information we need.
$texturegroup "skinfamilies"
{
	{ "newsignage_back00" "awe_total"      "awe_total_grey" "newsignage_back02" "newsignage_back01" "awe_blank" }
	{ "newsignage_back00" "awe_blank"      "awe_blank"      "awe_blank"         "awe_blank"         "awe_blank" }
	{ "newsignage_back01" "awe_blank"      "awe_blank"      "awe_blank"         "awe_blank"         "awe_blank" }
	{ "newsignage_back01" "awe_total_grey" "awe_total_grey" "awe_total"         "awe_blank"         "awe_total" }
	{ "newsignage_back02" "awe_total_grey" "awe_total_grey" "awe_total"         "awe_blank"         "awe_total" }
	{ "newsignage_back02" "awe_total"      "awe_total_grey" "awe_total"         "awe_blank"         "awe_total" }
	{ "newsignage_back02" "awe_total"      "awe_total_grey" "awe_total"         "awe_total"         "awe_total" }
}
Select the newsignage_back00 texture and replace it with what will be turned into skin 6, for all test signs, this will be newsignage_back02.
On the settings of awe_total, awe_total_grey, awe_blank, newsignage_back01 and newsignage_back02, set the Blend Mode to Alpha Blend.
Hold Shift+A then click Texture > Image Texture and open newsignage_back02.tga
Connect the Color node from the Image Texture box and connect it to the Base Color node.
The following will assume you are using signage_num00:
You will have to retick Use Nodes each time you select a new material to use.
For awe_total, awe_blank and newsignage_back02 add the following:
Image Texture, set its texture to awe_total.tgaTransparent BSDFMix Shader
Connecting Nodes:
- Set the
Image Texture'sColornode to thePrincipled BSDF'sBase Colornode. - Set the
Image Texture'sAlphanode to theMix Shader'sFacnode - Set the
Principled BSDF'sBSDFnode to theMix Shader's bottomShadernode. - Set the
Transparent BSDF'sBSDFnode to theMix Shader's topShadernode. - Set the
Mix Shader'sShadernode with theMaterial Shader'sSurfacenode.
For awe_total_grey, do the same thing, but set its Image Texture to awe_total_grey.tga
Modifying the sign for your Test Chamber
You can leave the Shader Tab and go to the Modeling Tab
Featured Testing Elements
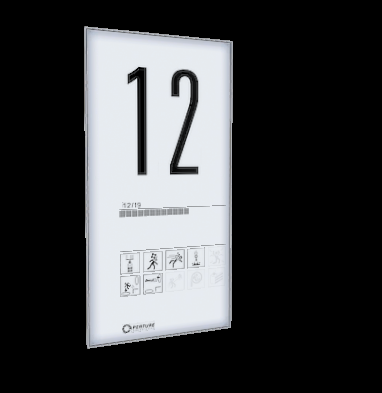
There are icons on the bottom of the sign to indicate what will be available in the test chamber. To change if they are highlighted or grayed out, press Tab to go to Edit Mode then go to Face selection mode.
Each icon has 2 triangle faces, select both of triangles to modify the icon. While the faces are selected, go to Material Properties, select awe_total_grey and click assign to gray out the icon and select awe_total and click assign to set its icon to be highlighted.
Progress Bar
There are 76 bars in total on the sign. Depending on how much test chambers you have, you will have to change how many bars you get per chamber or you can get an extra bar per 4 test chambers for example. Assuming you have 19 test chambers, every 4 bars will represent a test chamber.
Remove a set of bars by selecting the 2 triangles that make up the bar set and create a bar set by copying and pasting the bar set with Shift+D, press X to move it straight and try to position it perfectly next to the other bar set. You can use the -Y preset viewpoint to make it easier to position.
Test Chamber Number
There are 2 test chamber numbers, the big numbers that cover the middle to top portion of the sign and the small numbers just above the Progress Bar.
For the test chamber numbers, you will see a "/19", Portal has 19 test chambers and this number represents what the last test chamber number will be. To change this, you will have to modify the awe_total.tga texture with an image editing software.
To change the numbers on the left which indicators what number you are currently on, go to the "UV Editing" Tab. You may have to re-enable Material Preview mode. Select a Small number with the Edit Tool and on the UV Edit screen, 2 triangles will appear. Select all of their vertices and press G to move them. You can move them straight vertically by press Y and you can move them straight horizontally by pressing X and move them to a different number. Do the same with the other number. Try not to be sloppy with the numbers and position them the best you can.
For the big numbers, do the same thing, however, the Zeros will be flipped 90 degrees. Use the Rotate tool and hold ctrl to have a more snappy rotation. After rotating, move the square to a number you'd like. If you want your test sign to have the number one, you will have to create 3 faces to compensate for its texture, alternatively you can copy and paste a 1 from another sign model, to do this, delete every part of the sign model of your choice except for the 1, select the faces that make up the 1 and do Shift+M then click signage_num00_reference. Move the 1 precisely to where your other number is if necessary.
End Result
You now have a proper test chamber sign. To export it, go to Scene Properties, select the export path, select the Export Format as an SMD, then click Export. You can also change your model name which is recommended. Lastly, compile the model. Another helpful thing you can do is create your own "template" sign to modify it whenever you need to create a new sign.
Texture Based
For an easier method, simply download this file.[1] Either follow the instructions within, or you can use these.
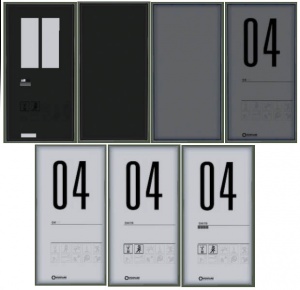
Each sign model has 7 skins
For the purposes of this tutorial only one will be created, after you've done one the others should be pretty simple to figure out.
Making the sign
Setting up the large numbers
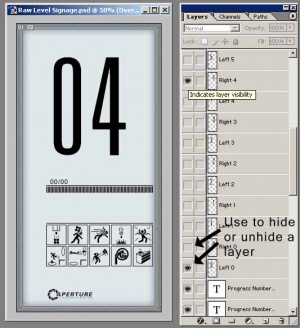
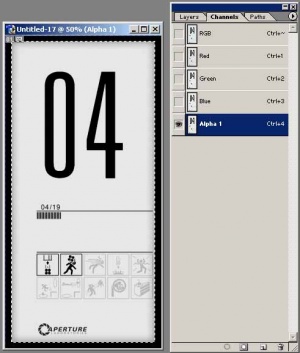
Start by setting up the large numbers you want displayed. In the layers window, hide all the large number layers except Left 0 and Right 4.
Setting up the small numbers
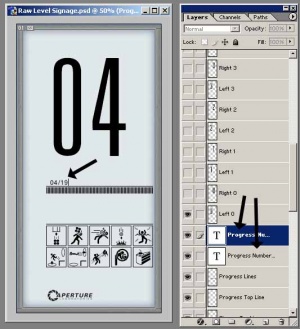
Now set the small numbers to 04 and 19. These numbers are divided in to two layers because on some stages of the lighting up animation for the sign, the first numbers are fully lit, while the / and second set of numbers are grayed. Select the Progress Numbers 1 layer and the text tool to change the first set, the second set is on the Progress Numbers 2 layer. If you're not using photoshop, the font is a size 22.08pt in Microsoft Sans Serif.
Setting up the progress bars
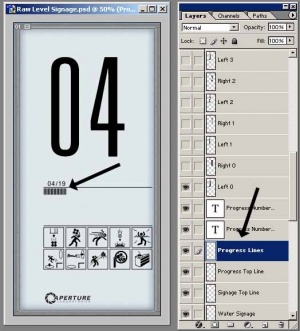
By default the row of progress bars is full, so some will need to be erased to get the right amount for the current sign being built. There are 76 bars on the full row and the example is on the 4th or 19 levels so: (76/19) * 4 = 16. So select the Progress Lines layer and use the erase tool to remove all but the first 16 lines.
Setting up the obstacle signs
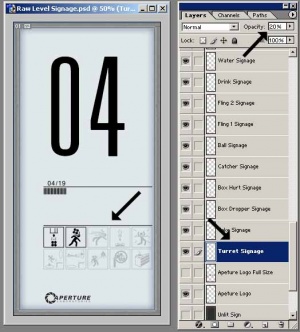
Each obstacle sign is on its own layer so that they can have their opacity changed independently of one another. Change the opacity of signs that should be grayed out to 20%
Copying the sign
Now that the sign is done being adjusted, on the menu bar at the top of the photoshop window go to Layer -> Merge Visble. Next, Select -> All, and Copy. Create a new image 512x1024 in size, Paste in to the image, go to Layer -> Flatten Image. You should now have a new image containing the texture for the sign.
Adding the alpha channel
Next an alpha channel needs to be added to the new image so that the sign can self illuminate. Switch back to our raw level signage image. Hold down Ctrl and left click on the Sign Mask layer. This will select only the area of the sign that we want to be illuminated. Copy this selection. Switch back to the new image. In the Channels window click on the new channel button at the bottom of the window. Paint the new channel completely black if it isn't already. Next Paste the the selection from the raw level sign in to the new alpha channel.
Next go to Image -> Adjustments... -> Brightness/Constast... and reduce the brightness of the alpha channel to -45. You may need to experiment with this brightness value depending on how well lit your map is.
Saving the sign
Save this image as a TGA file. This image is the last (of 7) in the animation so save it as yourfilename007.tga and place it in your sourcesdk_content\portal\materialsrc folder. For the other frames in the animation you should save them as 001, 002, 003 etc.
Creating the rest of the images for the sign
Next go switch back to the raw level signage image and go to Edit -> Step Backwards. Keep stepping backwards until the the visible layers unmerge (you should need to step back two or three time.) Now repeat steps 1-7 for the rest of the sign animation stages (as seen in the image at the start of this tutorial.)
Preparing the sign for your level
Creating the vtf file
Create a text file in your sourcesdk_content\portal\materialsrc folder with the same name as your images (yourfilename.txt). Paste this in to the file:
"startframe" "1" "endframe" "7"
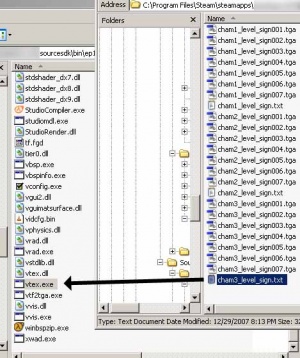
Now go to your sourcesdk\bin\orangebox\bin folder and drag the text file you just created onto vtex.exe.
VTex will build a vtf file from the TGA images you created and display the output directory where it placed the vtf file.
Using your texture
Place the vtf file that VTex created in to your portal\portal\materials folder and create a text file in the materials folder as well. Rename the text file to yourfilename.vmt and paste this in to the file:
"LightmappedGeneric"
{
  "$baseTexture" "yourfilename"
  "$surfaceprop" "glass"
  "$selfillum" 1
  "%keywords" "portal"
  "%noportal" 1
  "Proxies"
  {
     "ToggleTexture"
     {
        "toggleTextureVar" "$baseTexture"
                    "toggleTextureFrameNumVar" "$frame"
                    "toggleTextureShouldWrap" "0"
     }
  }
}
Setting up the sign in game
Creating model signs
Create a prop_dynamic and enter the following properties:
| Property Name | Value |
|---|---|
| Name | sign
|
| World Model | Set this value to your compiled sign model! |
| Skin | 1 |
Create an ambient_generic and enter the following properties:
| Property Name | Value |
|---|---|
| Name | sound_fluorescent_light
|
| Sound Name | Portal.fluorescent_light_hum
|
| Max Audible Distance | 384 |
Remove the Is NOT Looped flag.
Create a logic_relay, set its name to relay_sign and add the following outputs:
| My Output | Target Entity | Target Input | Parameter | Delay | Only Once | |
|---|---|---|---|---|---|---|
| OnTrigger | relay_animate_sign | Trigger | <none> | 0.00 | No | |
| OnTrigger | relay_start_sign_buzz | Trigger | <none> | 0.00 | No |
Create a logic_relay, set its name to relay_start_sign_buzz and add the following outputs:
Create a logic_relay, set its name to relay_animate_sign and add the following outputs:
Create a light and enter the following properties:
| Property Name | Value |
|---|---|
| Brightness | 221 250 255 100
|
| BrightnessHDR | 221 250 255 50
|
Implementation
Trigger the relay_sign entity to start the sign sequence, this is done with a trigger_once.
Extra
- The opacity for the awe_total_grey texture is %15, make use of this if you want a custom icon.
