Box dropper: Difference between revisions
mNo edit summary |
m (tidy (removed Theory: no information) & category) |
||
| Line 2: | Line 2: | ||
In this tutorial, the procedure of creating a box dropping device will be shown. The box dropping device will create a new box whenever the old one is destroyed. | In this tutorial, the procedure of creating a box dropping device will be shown. The box dropping device will create a new box whenever the old one is destroyed. | ||
= Creating the device = | == Creating the device == | ||
In this part, the design, the looks of the dropper will be created. | In this part, the design, the looks of the dropper will be created. | ||
[[Image:Tutbd models.jpg|right|thumb|150px|They should look like this.]] | [[Image:Tutbd models.jpg|right|thumb|150px|They should look like this.]] | ||
== Step 1 == | |||
For creating the tube for the standard box dropper, props will be used, which will eventually form a box transportation tube. | === Step 1 === | ||
Create two '''[[prop_dynamic]]'''s. The first one's world model is < | For creating the tube for the standard box dropper, props will be used, which will eventually form a box transportation tube. | ||
Create two '''[[prop_dynamic]]'''s. The first one's world model is <code>models/props/box_dropper.mdl</code>. Set the second one's name to <code>box_dropper_cover</code> and set its world model to <code>models/props/box_dropper_cover.mdl</code>. Now, move the two models so that the second one is at the bottom of the first one. Refer to the screenshot for placement picture. | |||
{{clr}} | {{clr}} | ||
[[image:Tutbd drop.jpg|right|thumb|150px|A long way down.]] | [[image:Tutbd drop.jpg|right|thumb|150px|A long way down.]] | ||
== Step 2 == | |||
=== Step 2 === | |||
{{note|This step is optional. You may change most of the textures mentioned in this step - they are only used as an example.}} | {{note|This step is optional. You may change most of the textures mentioned in this step - they are only used as an example.}} | ||
First, 8 brushes which form a cube of the size '''128x128x16''' with an about '''88x88x16''' size 8-sided cylinder shaped hole in the middle. These sizes are optimized for the size of the tube prop and the cube. This is going to be a part of the ceiling of your room and where the cube enters the room. | First, 8 brushes which form a cube of the size '''128x128x16''' with an about '''88x88x16''' size 8-sided cylinder shaped hole in the middle. These sizes are optimized for the size of the tube prop and the cube. This is going to be a part of the ceiling of your room and where the cube enters the room. | ||
{{note|Alternatively you may carve an 8-sided, 88x88x16 cylinder from the 128x128x16 brush, but it is advised not to do this. Also, you might have to shrink the grid to the size of 4 to do this step.}} | {{note|Alternatively you may carve an 8-sided, 88x88x16 cylinder from the 128x128x16 brush, but it is advised not to do this. Also, you might have to shrink the grid to the size of 4 to do this step.}} | ||
Create 2 '''128x16x128''' and 2 '''16x128x128''' brushes. This is going to be the bottom part of the long corridor down. Use these four brushes to create a corridor. Put a < | Create 2 '''128x16x128''' and 2 '''16x128x128''' brushes. This is going to be the bottom part of the long corridor down. Use these four brushes to create a corridor. Put a <code>metal/metalwall048c</code> texture on the inner face and <code>tools/nodraw</code> on the outer faces of each brush. | ||
[[image:Tutbd bouncers.jpg|right|thumb|150px|Helping the cube down.]] | [[image:Tutbd bouncers.jpg|right|thumb|150px|Helping the cube down.]] | ||
Create 2 '''128x16x256''' and 2 '''16x128x256''' brushes and place them together on top of the previous brushes. Texture them exactly the same way except that the inner faces should have a the texture < | Create 2 '''128x16x256''' and 2 '''16x128x256''' brushes and place them together on top of the previous brushes. Texture them exactly the same way except that the inner faces should have a the texture <code>metal/metalwall048c_gradient</code>. Shift these textures so that the orange ends are on the top and the black ends are on the bottom of the faces. | ||
To seal this hole, create a '''128x128x16''' brush and place it on top of the corridor. The inner face's texture is < | |||
Additionally, you may want to place extra brushes textured with < | To seal this hole, create a '''128x128x16''' brush and place it on top of the corridor. The inner face's texture is <code>lights/light_orange001</code> and the outer faces' texture is <code>tools/nodraw</code>.<br /> | ||
Additionally, you may want to place extra brushes textured with <code>tools/nodraw</code> on top of the bottom piece to ensure that the box will fall down into the tube. Make sure all these brushes are tied to a '''[[func_detail]]''' entity. Refer to picture 3. | |||
Finally, place the two models which you created in the previous step so that the cube falls through the cylinder right into the tube. | Finally, place the two models which you created in the previous step so that the cube falls through the cylinder right into the tube. | ||
{{clr}} | {{clr}} | ||
= Creating the dropper = | == Creating the dropper == | ||
In this part of the tutorial, the triggers behind the dropper are created. | In this part of the tutorial, the triggers behind the dropper are created. | ||
{{note|This part of the tutorial assumes that you did not skip Step 2 of the last part.}} | {{note|This part of the tutorial assumes that you did not skip Step 2 of the last part.}} | ||
[[Image:Tutbd sealedroom.jpg|right|thumb|150px|The weighted sealed room.]] | [[Image:Tutbd sealedroom.jpg|right|thumb|150px|The weighted sealed room.]] | ||
== Step 1 == | |||
Create a sealed room separately from any other part of the world. This sealed room should be a cube sealed by six brushes with each face of each brush textured with < | === Step 1 === | ||
In this very same sealed room, create a '''[[point_template]]'''. Set the name field to < | Create a sealed room separately from any other part of the world. This sealed room should be a cube sealed by six brushes with each face of each brush textured with <code>tools/nodraw</code>. Inside this sealed room, place a '''[[prop_physics]]''' with the name <code>template_box</code> and the world model <code>models/props/metal_box.mdl</code>. Additionally, you may change the '''Skin''' keyvalue of this prop to 1, in which case the cube will look like a weighted companion cube. | ||
In this very same sealed room, create a '''[[point_template]]'''. Set the name field to <code>template_box_drop</code> and the Template 1 field to <code>template_box</code>. This entity will assist in creating a new box whenever required. | |||
{{note|If you have multiple box droppers in your level, only need to create one [[prop_physics]] and one [[point_template]]. Just create more [[env_entity_maker]]s all spawning the same box.}} | {{note|If you have multiple box droppers in your level, only need to create one [[prop_physics]] and one [[point_template]]. Just create more [[env_entity_maker]]s all spawning the same box.}} | ||
== Step 2 == | |||
Place an '''[[env_entity_maker]]''' entity in the center of the long way down, about 48 units below the top piece. Set its name to < | |||
The final piece of the puzzle which controls the whole mess and forms it into a box dropper. Create a '''[[logic_relay]]''' entity anywhere near the contraption and name it < | === Step 2 === | ||
Place an '''[[env_entity_maker]]''' entity in the center of the long way down, about 48 units below the top piece. Set its name to <code>box_maker</code> and the '''Point_template to spawn''' field to <code>template_box_drop</code>. Hang in there. It's almost done. | |||
The final piece of the puzzle which controls the whole mess and forms it into a box dropper. Create a '''[[logic_relay]]''' entity anywhere near the contraption and name it <code>logic_drop_box</code>. Add three outputs. | |||
{| | {| | ||
!Output named || Target entities || Via this input || Parameter || Delay | !Output named || Target entities || Via this input || Parameter || Delay | ||
| Line 43: | Line 56: | ||
|} | |} | ||
= How it works = | == How it works == | ||
Cubes can be detected by creating a '''[[filter_activator_name]]''' with the '''Filter name''' field set to the same string as your box template - in this tutorial, it is < | Cubes can be detected by creating a '''[[filter_activator_name]]''' with the '''Filter name''' field set to the same string as your box template - in this tutorial, it is <code>template_box</code>. Set it's name to, for example, <code>filter_box</code>. Create a '''[[trigger_multiple]]''' with the filter field set to <code>filter_box</code> to check whether the box is in a place you don't want it to be (for example acid). Add two outputs to this trigger. | ||
{| | {| | ||
!Output named || Target entities || Via this input || Parameter || Delay | !Output named || Target entities || Via this input || Parameter || Delay | ||
| Line 52: | Line 65: | ||
|OnStartTouch || logic_drop_box || Trigger || || 0.00 | |OnStartTouch || logic_drop_box || Trigger || || 0.00 | ||
|} | |} | ||
You might want to spawn a cube when the map is loaded. To do this, create a '''[[logic_auto]]''' entity, and with the '''OnMapSpawn''' output, send a '''Trigger''' input to the < | You might want to spawn a cube when the map is loaded. To do this, create a '''[[logic_auto]]''' entity, and with the '''OnMapSpawn''' output, send a '''Trigger''' input to the <code>logic_drop_box</code> entity. It is advised that if you do this, set the delay to at least 4 seconds to avoid any problems. | ||
Additionally, you can disable the recreation of the box when, for example, you destroy the box permanently. This is done by sending a '''Disable''' input to the <code>logic_drop_box</code> entity. | |||
== See also == | |||
* [[Portal Level Creation]] | |||
[[Category:Level Design Tutorials]] | |||
Revision as of 05:59, 20 February 2008
In this tutorial, the procedure of creating a box dropping device will be shown. The box dropping device will create a new box whenever the old one is destroyed.
Creating the device
In this part, the design, the looks of the dropper will be created.
Step 1
For creating the tube for the standard box dropper, props will be used, which will eventually form a box transportation tube.
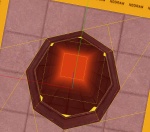
Create two prop_dynamics. The first one's world model is models/props/box_dropper.mdl. Set the second one's name to box_dropper_cover and set its world model to models/props/box_dropper_cover.mdl. Now, move the two models so that the second one is at the bottom of the first one. Refer to the screenshot for placement picture.
Step 2
First, 8 brushes which form a cube of the size 128x128x16 with an about 88x88x16 size 8-sided cylinder shaped hole in the middle. These sizes are optimized for the size of the tube prop and the cube. This is going to be a part of the ceiling of your room and where the cube enters the room.
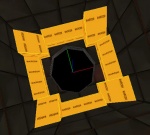
Create 2 128x16x128 and 2 16x128x128 brushes. This is going to be the bottom part of the long corridor down. Use these four brushes to create a corridor. Put a metal/metalwall048c texture on the inner face and tools/nodraw on the outer faces of each brush.
Create 2 128x16x256 and 2 16x128x256 brushes and place them together on top of the previous brushes. Texture them exactly the same way except that the inner faces should have a the texture metal/metalwall048c_gradient. Shift these textures so that the orange ends are on the top and the black ends are on the bottom of the faces.
To seal this hole, create a 128x128x16 brush and place it on top of the corridor. The inner face's texture is lights/light_orange001 and the outer faces' texture is tools/nodraw.
Additionally, you may want to place extra brushes textured with tools/nodraw on top of the bottom piece to ensure that the box will fall down into the tube. Make sure all these brushes are tied to a func_detail entity. Refer to picture 3.
Finally, place the two models which you created in the previous step so that the cube falls through the cylinder right into the tube.
Creating the dropper
In this part of the tutorial, the triggers behind the dropper are created.
Step 1
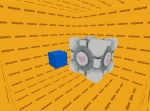
Create a sealed room separately from any other part of the world. This sealed room should be a cube sealed by six brushes with each face of each brush textured with tools/nodraw. Inside this sealed room, place a prop_physics with the name template_box and the world model models/props/metal_box.mdl. Additionally, you may change the Skin keyvalue of this prop to 1, in which case the cube will look like a weighted companion cube.
In this very same sealed room, create a point_template. Set the name field to template_box_drop and the Template 1 field to template_box. This entity will assist in creating a new box whenever required.
Step 2
Place an env_entity_maker entity in the center of the long way down, about 48 units below the top piece. Set its name to box_maker and the Point_template to spawn field to template_box_drop. Hang in there. It's almost done.
The final piece of the puzzle which controls the whole mess and forms it into a box dropper. Create a logic_relay entity anywhere near the contraption and name it logic_drop_box. Add three outputs.
| Output named | Target entities | Via this input | Parameter | Delay |
|---|---|---|---|---|
| OnTrigger | box_dropper_cover | SetAnimation | open | 0.00 |
| OnTrigger | box_dropper_cover | SetAnimation | close | 2.00 |
| OnTrigger | box_maker | ForceSpawn | 2.00 |
How it works
Cubes can be detected by creating a filter_activator_name with the Filter name field set to the same string as your box template - in this tutorial, it is template_box. Set it's name to, for example, filter_box. Create a trigger_multiple with the filter field set to filter_box to check whether the box is in a place you don't want it to be (for example acid). Add two outputs to this trigger.
| Output named | Target entities | Via this input | Parameter | Delay |
|---|---|---|---|---|
| OnStartTouch | !activator | Kill | 0.00 | |
| OnStartTouch | logic_drop_box | Trigger | 0.00 |
You might want to spawn a cube when the map is loaded. To do this, create a logic_auto entity, and with the OnMapSpawn output, send a Trigger input to the logic_drop_box entity. It is advised that if you do this, set the delay to at least 4 seconds to avoid any problems.
Additionally, you can disable the recreation of the box when, for example, you destroy the box permanently. This is done by sending a Disable input to the logic_drop_box entity.


