Looping a sound: Difference between revisions
mNo edit summary |
(Updated the Wavosaur tutorial so it actually works (at least for Source 2007+). Added bug about cue points for ADPCM files. Added TODO for end cues because I really don't know where these come from.) |
||
| Line 12: | Line 12: | ||
{{warning|{{l4d2}} During development: editing the contents of an existing sound file stored in your campaign's ''sound.cache'' will not show any change until the sound cache is rebuilt! See [[L4D2 Campaign Add-on Tutorial#Creating a sound.cache files|Creating a sound.cache file]] or [[L4D2 Custom Sound and Music Tutorial]] for further instructions.}} | {{warning|{{l4d2}} During development: editing the contents of an existing sound file stored in your campaign's ''sound.cache'' will not show any change until the sound cache is rebuilt! See [[L4D2 Campaign Add-on Tutorial#Creating a sound.cache files|Creating a sound.cache file]] or [[L4D2 Custom Sound and Music Tutorial]] for further instructions.}} | ||
{{todo|Should anything regarding the end cues be removed? They don't work in {{src|4}} at all, at least since {{Source 2007}}. The GoldWave tutorial mentions it must be placed at the end but it isn't actually needed. Do they work in {{goldsrc|4}} or in {{Src04}}{{Source 2006}}?}} | |||
== Looping a WAV == | == Looping a WAV == | ||
| Line 31: | Line 33: | ||
=== Wavosaur === | === Wavosaur === | ||
Open Wavosaur | {{warning|{{gldsrc|4.1}} and {{src|4.1}} don't use Wavosaur's loop points. Instead, the start cue is actually the first marker (M0) and the end cue (if it even works) the second marker (M1). However, loop points make it easier to set up the loop.}} | ||
{{warning|{{src|4.1}} doesn't use end cue points. You should trim the file instead.}} | |||
==== Looping from beginning to end ==== | |||
* Open Wavosaur. | |||
* Open the sound you want to loop. | |||
* Go to <code>Tools > Markers > Create marker</code>, or press {{key|M}}. This will add a new M0 marker at the beginning. | |||
** If the marker is not at the beginning, move it there by dragging it with the mouse. | |||
After that, click "Save" or "Save As". | After that, click "Save" or "Save As". | ||
==== Looping from anywhere in the file ==== | |||
# Open Wavosaur. | |||
# Open the sound you want to loop. | |||
# Go to <code>Tools > Loop > Create loop points</code>. It should create loop points. | |||
## You can change their positions by dragging them. | |||
## If you're looping a sound for {{src|bold}}, the end point should be moved at the end of the track, as end cues are not functional (see the [[Talk:Looping_a_Sound|Discussion]] page). You should trim the end instead. | |||
## Double-clicking between the loop points will select the whole region between them and allow you to play it on loop. | |||
Once you have found a satisfying position for the starting point: | |||
# Click outside of the selection to clear it. | |||
# Double-click the area between the loop points to select it. | |||
## Do NOT play it now! Wavosaur uses the "playing position" to create markers. | |||
# Go to <code>Tools > Markers > Create marker</code>, or press {{key|M}}. This will add a new M0 marker at the exact position of the loop's starting point. | |||
# '''''(Not needed for {{src}})''''' If your end point isn't at the end of the file, create a new marker and move it to the end point. You may have to zoom to adjust it correctly. | |||
## Alternatively, you can play the selection with the loop disabled so the "playing position" stops at the exact end point. You can then press {{key|M}} to create the marker. | |||
# '''''(Optional)''''' Go to <code>Tools > Loop > Delete loop points</code> to clean up the unnecessary data. | |||
After that, click "Save" or "Save As". | After that, click "Save" or "Save As". | ||
{{warning|Wavosaur does not support ADPCM-compressed WAV files; attempting to open one will result in the application crashing!}} | {{warning|Wavosaur does not support ADPCM-compressed WAV files; attempting to open one will result in the application crashing!}} | ||
=== With a hex editor === | === With a hex editor === | ||
| Line 103: | Line 127: | ||
{{warning|It seems that the end cue maybe doesn't have any effect at all. See the [[Talk:Looping_a_Sound|Discussion]] page for more details.}} | {{warning|It seems that the end cue maybe doesn't have any effect at all. See the [[Talk:Looping_a_Sound|Discussion]] page for more details.}} | ||
{{warning|ADPCM-compressed WAV files may ignore the location of the start cue when looping, and loop the entire sound instead!}} | {{warning|ADPCM-compressed WAV files may ignore the location of the start cue when looping, and loop the entire sound instead!}} | ||
{{bug|tested=Team Fortress 2|In {{src|4}} games, in order to correctly loop an ADPCM-compressed WAV file from any location other than the beginning, the start cue's location (in samples) must be divided by 2. For instance, if your start cue is positioned at the sample 398060 for a sound in PCM format, it must be changed to 199030 for the same sound in ADPCM format.}} | |||
This can be used to give a sound a "winding up" effect that only plays once (e.g. a motor starting). | This can be used to give a sound a "winding up" effect that only plays once (e.g. a motor starting). | ||
Revision as of 16:09, 16 September 2024
A looped sound will repeat endlessly without any gap between its end and start. It is up to the sound artist to ensure that the end and start of the file match up however, or there will be a "pop" as the waveform jumps from one shape to another.
![]() GoldSrc and
GoldSrc and ![]() Source detect looped sounds ONLY through cue points embedded in the file. This is a WAV-only feature, so MP3s cannot be looped. Microsoft ADPCM compressed WAVs can be looped, but due to the way they are encoded, there may a pop when the sound restarts if the sound is shorter than a few seconds.
Source detect looped sounds ONLY through cue points embedded in the file. This is a WAV-only feature, so MP3s cannot be looped. Microsoft ADPCM compressed WAVs can be looped, but due to the way they are encoded, there may a pop when the sound restarts if the sound is shorter than a few seconds.
Looping a WAV
These free programs can add cue points to a WAV:
- GoldWave (trialware)
- Wavosaur (freeware)
- LoopAuditioneer (free and open source)
- OcenAudio (freeware)
GoldWave
Open Goldwave and open the sound you want to loop. Click the cues icon. (![]() )
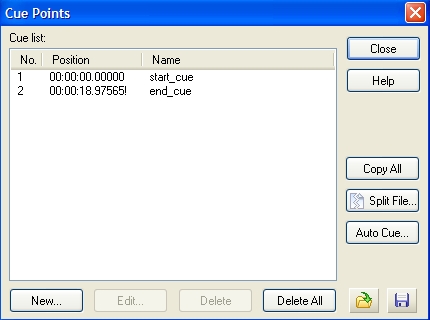
Then in the new window click on the New button and add a cue point At Start. Then click New for another cue point and add a point At End. So it looks similar to this:
)
Then in the new window click on the New button and add a cue point At Start. Then click New for another cue point and add a point At End. So it looks similar to this:
Wavosaur
Looping from beginning to end
- Open Wavosaur.
- Open the sound you want to loop.
- Go to
Tools > Markers > Create marker, or press M. This will add a new M0 marker at the beginning.- If the marker is not at the beginning, move it there by dragging it with the mouse.
After that, click "Save" or "Save As".
Looping from anywhere in the file
- Open Wavosaur.
- Open the sound you want to loop.
- Go to
Tools > Loop > Create loop points. It should create loop points.- You can change their positions by dragging them.
- If you're looping a sound for Source, the end point should be moved at the end of the track, as end cues are not functional (see the Discussion page). You should trim the end instead.
- Double-clicking between the loop points will select the whole region between them and allow you to play it on loop.
Once you have found a satisfying position for the starting point:
- Click outside of the selection to clear it.
- Double-click the area between the loop points to select it.
- Do NOT play it now! Wavosaur uses the "playing position" to create markers.
- Go to
Tools > Markers > Create marker, or press M. This will add a new M0 marker at the exact position of the loop's starting point. - (Not needed for
 ) If your end point isn't at the end of the file, create a new marker and move it to the end point. You may have to zoom to adjust it correctly.
- Alternatively, you can play the selection with the loop disabled so the "playing position" stops at the exact end point. You can then press M to create the marker.
- (Optional) Go to
Tools > Loop > Delete loop pointsto clean up the unnecessary data.
After that, click "Save" or "Save As".
With a hex editor
Appending the following bytes to the end of a non-looping WAV file will make it loop in its entirety:
63 75 65 20 1C 00 00 00 01 00 00 00 01 00 00 00 00 00 00 00 64 61 74 61 00 00 00 00 00 00 00 00 00 00 00 00
cue.bin, then run cat my_nonlooping_sound.wav cue.bin > my_looping_sound.wav.The bash shell script used to generate the above cue chunk is provided below, based upon documentation from recordingblogs.com.
#!/bin/bash

# Wave file cue chunk according to https://www.recordingblogs.com/wiki/cue-chunk-of-a-wave-file
# Original script by SavageX; permission is granted to modify as needed.

ECHO="echo -en"
OUT="cue.bin"

function append_bytes() {
    $ECHO $1 >> $OUT
}

function append_cue() {
    OUT=$1

    # chunk ID, "cue "
    append_bytes "cue\x20"

    # size of the chunk: (12 + 24) - 8 = 28
    # Why -8? ID and size don't count.
    append_bytes "\x1C\x00\x00\x00"

    # number of data points: 1
    append_bytes "\x01\x00\x00\x00"

    # ID of data point: 1
    append_bytes "\x01\x00\x00\x00"

    # position: If there is no playlist chunk, this is zero
    append_bytes "\x00\x00\x00\x00"

    # data chunk ID
    append_bytes "data"

    # chunk start: 0
    append_bytes "\x00\x00\x00\x00"

    # block start: 0
    append_bytes "\x00\x00\x00\x00"

    # sample start: 0
    append_bytes "\x00\x00\x00\x00"
}

rm -f cue.bin
append_cue cue.bin
|
Cue location
Your cues do not have to be at the start and end of the file. If you place them in the middle Source will start playing the sound normally, then when it reaches the end cue will loop back to the start cue. From then on only what's between the cues will play.
This can be used to give a sound a "winding up" effect that only plays once (e.g. a motor starting).
Looping an MP3
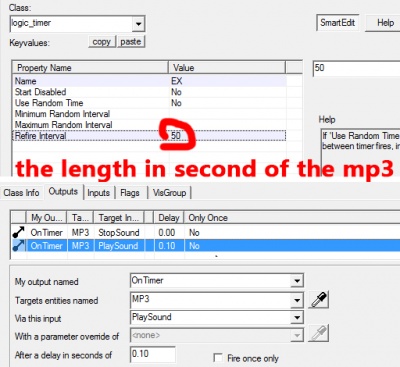
In ![]() Source, MP3 files can't be looped with start/end queues like a WAV. A logic_timer can be a good workaround; have it start playing the sound again after it has fully played (or has played to the point desired).
Source, MP3 files can't be looped with start/end queues like a WAV. A logic_timer can be a good workaround; have it start playing the sound again after it has fully played (or has played to the point desired).
This could also be done using User I/O from the ambient_generic to itself, and an input delay.
See also
External links
- Looping Menu Music - An Interlopers.net Tutorial on Soundlooping

