Parallax obb: Difference between revisions
mNo edit summary |
m (→Creation) |
||
| Line 7: | Line 7: | ||
== Creation == | == Creation == | ||
{{ModernNote|This tutorial uses pictures and methods from a game running the {{stratabranch|3}}, however it should be a similar method for {{mapbase|3}} games. {{ModernConfirm|Is it actually similar?}}}} | {{ModernNote|This tutorial uses pictures and methods from a game running the {{stratabranch|3.1}}, however it should be a similar method for {{mapbase|3.1}} games. {{ModernConfirm|Is it actually similar?}}}} | ||
Creating a parallax cubemap is fairly easy, and can be done with relative swiftness. To start, create a room with 1 or more reflective surfaces. Floors work very well with parallaxed cubemaps. | Creating a parallax cubemap is fairly easy, and can be done with relative swiftness. To start, create a room with 1 or more reflective surfaces. Floors work very well with parallaxed cubemaps. | ||
[[File:Parallax obb showcase2.png|350px]] | [[File:Parallax obb showcase2.png|350px]] | ||
Next, place an {{ent|env_cubemap}} in the ''exact'' center of the room: Halfway up, equadistant between each wall. | Next, place an {{ent|env_cubemap}} in the ''exact'' center of the room: Halfway up, equadistant between each wall. You can set the resolution to anything you want, but higher values are recommended for reflective surfaces. | ||
[[File:Parallax obb showcase3.png|350px]] | [[File:Parallax obb showcase3.png|350px]] | ||
| Line 20: | Line 20: | ||
[[File:Parallax obb showcase4.png|350px]] | [[File:Parallax obb showcase4.png|350px]] | ||
Now, compile and load up the map in your game. Open the [[Developer Console]] and build the cubemaps using the {{ent|buildcubemaps}} command. The game should flash | Now, compile and load up the map in your game. Open the [[Developer Console]] and build the cubemaps using the {{ent|buildcubemaps}} command. The game should flash an image on screen and then reload the map. After this, you will see that your surfaces now reflect your room somewhat more accurately compared to a non-parallaxed cubemap! <br/> | ||
Now, you may notice that when viewed from certain angles, objects may appear to be 2D, similar to what is shown here: | |||
[[File:Parallax_obb_showcase1.png|350px]] | [[File:Parallax_obb_showcase1.png|350px]] | ||
Notice how the reflection in the tile | Notice how the reflection in the tile is a flat image and not 3D. This is because cubemaps are actually similar to skybox textures, being that they are multiple orientations of the same place, combined to give the illusion of one continuous space. Cubemaps cannot accurately give 3D images from all angles. Props can be shown flat and/or smeared.<br/> | ||
<!-- Insert image here lol --> | |||
<!-- This is why less reflective surfaces use cubemaps, while more reflective surfaces like water use a real-time reflective shader. However, while there is a limit of 1 high-quality real-time reflection at any time in the [[PVS]], there is no limit on Cubemaps, because they are a lot more inexpensive to render.-->Keep this in mind when developing your map, and if the smearing is too much of an issue, you can always lower the cubemap resolution to 128x128 or 64x64 to make this less noticable. | |||
== KeyValues == | == KeyValues == | ||
Revision as of 10:49, 22 March 2023
Overview
This brush entity defines the boundaries of Parallax Corrected Cubemaps, which are env_cubemaps that move with the camera, giving a slightly more accurate reflection on brushes. The Cubemap Bounds keyvalue on the desired cubemap must be set to this entity's targetname in order to function as intended. The recommended texture for this brush entity is the tools\toolstrigger texture.
Creation
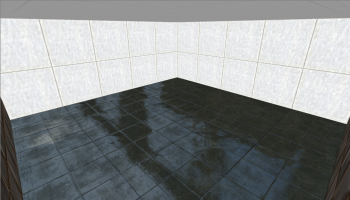
Template:ModernNote Creating a parallax cubemap is fairly easy, and can be done with relative swiftness. To start, create a room with 1 or more reflective surfaces. Floors work very well with parallaxed cubemaps.
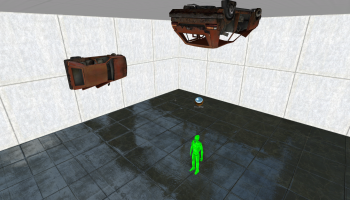
Next, place an env_cubemap in the exact center of the room: Halfway up, equadistant between each wall. You can set the resolution to anything you want, but higher values are recommended for reflective surfaces.
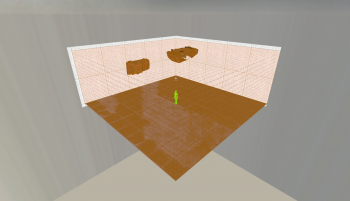
After this, create a brush the size of the room and tie it to a parallax_obb. Name it something similar to "parallax_room1". Finally, go into the env_cubemap's properties and, in the "Cubemap bounds" keyvalue, specify the targetname that you gave your parallax_obb.
Now, compile and load up the map in your game. Open the Developer Console and build the cubemaps using the buildcubemaps command. The game should flash an image on screen and then reload the map. After this, you will see that your surfaces now reflect your room somewhat more accurately compared to a non-parallaxed cubemap!
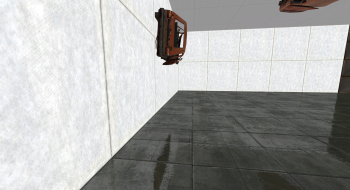
Now, you may notice that when viewed from certain angles, objects may appear to be 2D, similar to what is shown here:
Notice how the reflection in the tile is a flat image and not 3D. This is because cubemaps are actually similar to skybox textures, being that they are multiple orientations of the same place, combined to give the illusion of one continuous space. Cubemaps cannot accurately give 3D images from all angles. Props can be shown flat and/or smeared.
Keep this in mind when developing your map, and if the smearing is too much of an issue, you can always lower the cubemap resolution to 128x128 or 64x64 to make this less noticable.
KeyValues
- Name (targetname) <string>
- The name that other entities refer to this entity by, via Inputs/Outputs or other keyvalues (e.g.
parentnameortarget).
Also displayed in Hammer's 2D views and Entity Report. - See also: Generic Keyvalues, Inputs and Outputs available to all entities
Flags
This entity has no flags


