Ko/Team Fortress 2/Creating a Capture Point: Difference between revisions
(Created page with "__TOC__ {{note|The archive which contains the TF2 FGD file also contains a capture zone prefab, however we're going to create a capture zone without utilizing it.}} == Requi...") |
No edit summary |
||
| Line 1: | Line 1: | ||
__TOC__ | __TOC__ | ||
== | {{note:ko|TF2 [[FGD]]파일을 포함하고있는 기록 보관소들은 또한 점령 지점 조립식 건물들도 포함하고 있습니다, 어쨋거나 우리는 그것을 이용하지않고 점령 지점을 만들어 볼것입니다.}} | ||
== 필요한 엔티티들 == | |||
점령 지점이 제대로 작동하기 위해서는 3개의 엔티티들이 맵속에 필요합니다 : | |||
* [[team_control_point_master]] | * [[team_control_point_master]] | ||
* [[team_control_point]] | * [[team_control_point]] | ||
* [[trigger_capture_area]] | * [[trigger_capture_area]] | ||
== | == 좋은 자리 지정하기 == | ||
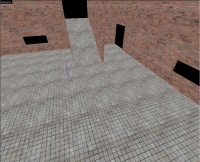
[[image:Tutcapzone1.jpg|right|thumb|200px| | [[image:Tutcapzone1.jpg|right|thumb|200px|점령 지점을 만들기 좋은 방.]] | ||
점령 지점들은 다음 요소를 가지고 있는곳에 배치되어야 합니다 | |||
* | * 10명의 플레이어들을 수용할만큼 넓은 공간을 가지고 있는지. | ||
* | * 점령 지점으로 가기위해 2개 또는 그 이상의 경로가 있는지. | ||
* | * 센트리 건들을 위한 완벽한 장소가 한개 또는 두개정도 있는지. | ||
* | * 센트리 건들을 적절한 위치에서 파괴할수 있는 대체 방법이 있는지. | ||
* | * 센트리 건들을 적절한 장소들로부터 보호 할수있는지. | ||
당신은 [[func_nobuild]] 브러쉬 엔티티들을 이용해 엔지니어들이 그안에 건물을 짓지못하는 구역들을 만들어 센트리건 장소를들 제어할수 있습니다. 이 조건들과 맞지 않는다면, 점령 지점들은 너무 막기가 쉽거나 점령되기 쉽거나 아니면 꽤나 빠르게 사람들로 붐빌것입니다. | |||
{{clr}} | {{clr}} | ||
== | == 기본적 배치 하기 == | ||
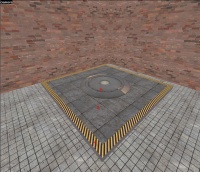
[[image:Tutcapzone2.jpg|right|thumb|200px| | [[image:Tutcapzone2.jpg|right|thumb|200px|점령 지점의 기본 배치.]] | ||
{{note| | {{note:ko|이것은 주로 TF2의 점령 지점 배치로 사용됩니다 - 꼭 따라야할 필요는 없지만, 이 방법을 추천 합니다. 기본이 꼭 필요한것은 아니지만, 적어도 어디부분에 플레이어가 서있어야만 지점을 점령할수 있는지 또는 다른 팀이 그팀의 점령을 막을수 있는지를 보여주는 종류의 지표정도는 있어야 합니다.}} | ||
* | 당신이 당신의 점령 지점을 위한 장소를 고르셧다면, 점령 지점을 지정하는 무언가를 표시할 시간입니다. 당신이 해야 할 일들 : | ||
* | * 점령 지점의 경계 역할을할 4개의 블럭들을 만들어 주세요, 그들을 약 4-16칸의 높이로 만들고 약 16칸 정도의 넓이로 만들어 주세요. 그것의 윗 부분은 <code>props/hazardstrip001a</code> 텍스쳐를 칠해주시고 옆부분들은 <code>metal/ibeam001b</code> 텍스쳐로 칠해주시기 바랍니다. (옆에 사진처럼, 과정 1) | ||
* | * 경계 안쪽에는, 둘러싸고 있는 블럭들과 똑같은 높이로 블럭들을 만들어주세요 텍스쳐는 당신이 원하는것으로 고르시고요. 이 강좌에서는, <code>metal/metalfloor003a</code> 텍스쳐를 사용할 것입니다. (과정 2) | ||
* | * 모든 "경계면" 과 "바닥" 을 선택하시고 그들을 컴파일 시간을 절약하기위해 [[func_detail]] 엔티티로 묶어주시기 바랍니다. | ||
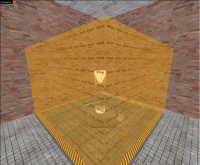
* | * 중앙에 지점을 표시할 [[prop_dynamic]] 을 만들어주세요. 우선, <code>prop_cap_1</code> 이라고 '''이름'''을 지어주시고 이것의 '''World Model''' 설정을 <code>models/props_gameplay/cap_point_base.mdl</code>로 해주세요. (과정 3) | ||
* 당신은 [[info_overlay]]에 <code>signs/capture_zone</code> 텍스쳐를 이용할수도 있습니다. | |||
{{clr}} | {{clr}} | ||
== | == 점령 지점으로 만들기 == | ||
[[image:Tutcapzone3.jpg|right|thumb|200px| | [[image:Tutcapzone3.jpg|right|thumb|200px|이 과정이 모두끝나면, 이렇게 보여야합니다.]] | ||
위에서 말씀드렷듯이, 3개의 엔티티들이 점령 지점을 만드는에 중요한 역할을 하고있습니다. [[trigger_capture_area]], [[team_control_point]], 그리고 [[team_control_point_master]] 말입니다. 이 과정에서, 우리는 그들을 만들고 한번 플레이 해볼겁니다. | |||
첫째로, <code>team_control_point_master</code> 엔티티를 당신의 맵 어딘가에 만드시고 '''이름''' 을 <code>master_control_point</code>로 지어주세요. | |||
다음은, <code>team_control_point</code> 엔티티를 점령 지점 모델의 가운데에 만들오 주세요. 우리는 약간의 설정을 해야합니다, 그래서 제가 그들의 할당된 값들을 제시해 두겟습니다. | |||
* '''Name:''' <code>control_point_1</code> | * '''Name:''' <code>control_point_1</code> | ||
* '''Print name:''' ( | * '''Print name:''' (당신은 이곳의 이름을 설정 할수 있습니다 - 저는 warehouse로 선택하겟습니다) <code>Warehouse</code> | ||
* '''Group index:''' | * '''Group index:''' 당신이 멀티-라운드 맵을 만들지 않는다면, 모든 포인트를 기본값인 <code>0</code> 으로 설정해두세요. | ||
* '''Default owner:''' | * '''Default owner:''' 이것은 라운드가 시작될때 지점의 소유자를 결정합니다. <code>Neither</code>로 설정해두세요. | ||
* '''Index:''' | * '''Index:''' 당신은 점령 지점이 0부터 시작하게 명령해야합니다. 그래서 만약 <code>n</code>번째 지점이 있다면, <code>n-1</code>로 설정하세요. | ||
* '''Warning Type:''' <code>Normal Announcements</code> | * '''Warning Type:''' <code>Normal Announcements</code> | ||
이젠, 모든 점령 지점을 덮을 (경계면도 포함한) 256칸 이상의 높이의 블럭을 만들어 주세요. 이것의 텍스쳐를 <code>tools/toolstrigger</code> 로 칠해주세요. 컨트롤+T를 이용해 이것을 엔티티로 만들어주세요. <code>trigger_capture_area</code>를 골라주시기 바랍니다. 또, 저는 당신이 설정해야할 주요 값들을 제시해두겟습니다. | |||
* '''Name:''' <code>capture_area_1</code> | * '''Name:''' <code>capture_area_1</code> | ||
* '''Control Point:''' <code>control_point_1</code> | * '''Control Point:''' <code>control_point_1</code> | ||
* '''Can *team* cap?:''' | * '''Can *team* cap?:''' 당신이 만약 공격/방어 형식의 맵을 원한다면, 이것의 방어 팀의 값은 <code>No</code>로 설정하시고, 아니라면 양팀의 값들을 모두 <code>Yes</code>라고 내비두시기 바랍니다. | ||
* '''Number of *team* players to cap:''' | * '''Number of *team* players to cap:''' 가장 적절한 값은 2입니다, 그러나 만약 당신이 5개의 점령 지점을 사용해 맵을 만든다면, 이상적으로, 당신의 첫번째 점령 지점들을 1로 설정하고, 두번째들은 2 그리고 중앙의 포인트들은 3으로 설정하세요. | ||
* '''*team* spawn adjust:''' | * '''*team* spawn adjust:''' 당신은 이것들을 너무 높게 하고 싶지 않을것입니다, 하지만 그렇지 않으면 양쪽팀이 아예 스폰되지 않거나 너무 빠르게 스폰될테니까요. 저는 양쪽의 설정을 모두 <code>5</code>로 설정했습니다. | ||
* '''Time to cap:''' | * '''Time to cap:''' <code>5-20</code>초가 가장 적당한 시간입니다. | ||
이 엔티티는 또한 두개의 출력을 가지고 있습니다. | |||
<!--- I chose table layout here, it looks much nicer. The reason I didn't do it for the rest is that the additional information would break the layout. ---> | <!--- I chose table layout here, it looks much nicer. The reason I didn't do it for the rest is that the additional information would break the layout. ---> | ||
:{| border=1 cellpadding="2" cellspacing="1" | :{| border=1 cellpadding="2" cellspacing="1" | ||
| Line 63: | Line 65: | ||
| [[Image:Io11.png]] || OnCapTeam2 || prop_cap_1 || Skin || 2 || 0.00 || No | | [[Image:Io11.png]] || OnCapTeam2 || prop_cap_1 || Skin || 2 || 0.00 || No | ||
|} | |} | ||
기본적인 것들만 포함해 봣습니다. | |||
== | == 추가적으로 가능한 일들 == | ||
{{note| | {{note:ko|이 부분은 현재 청소가 필요합니다.}} | ||
물론, 아무런 조정도 없이 점령 지점을 만든다는건 그냥 혼란만 야기할 뿐입니다 그러니, 당신은 이 점령 지점을 조종할 엔티티들을 추가 해야합니다. 당신의 맵 형태에 따라 좌우되는 엔티티로써(당신이 만약 한 라운드만 있는 맵을 만든다면) [[team_control_point_master]]가 있습니다 혹은 (만약 당신이 ''Hydro'' 나 ''Dustbowl'' 같은 맵을 만든다면) 다수의 [[team_control_point_round]]들을 배치해야 합니다). | |||
{{note:ko|당신은 꾸준히 라운드 기반 게임을 마스터해야 합니다.}} | |||
* 만약 당신이 라운드-기반 체제를 만들고 있다면, 그럼 '''Cap Layout''' 칸을 비워놓으세요. 또한, '''Restrict Team from Winning'''의 <code>team_control_point_master</code>는 적용되지 않습니다. 마지막으로, '''Switch Team on Map Win'''은 단지 승리하거나 패배했을때만 적용이 됩니다 (Dustbowl의 경우). <code>team_control_point_round</code>는 팀들의 문들의 열림과 닫힘을 설정할수 있습니다. (hydro-형식) 라운드가 시작될때 이것의 출력을 이용합니다. '''Priority'''라는 새로운 칸이 있습니다. 높은 우선권은 라운드를 첫번째로 시작하게 합니다, dustbowl을 보시면, 첫번째 맵이 높은 우선권을 가지고 있습니다, 그러므로 항상 첫번째로 플레이 하는것이지요. '''Control Points This Round'''는 '''Cap Layout'''의 대채용 칸입니다, 하지만 이것은 색인이 아닌 점령 지점으로 접속하기위한 하나의 이름을 필요로 합니다. 그리고 마지막으로, '''Restrict Team from Winning''' 은 여기서 보통 설정과 함께 반환됩니다. | |||
* 만약 당신이 Gravel Pit 형식같은 다수의 점령 지점을 원한다면, "RED/BLU Previous Control Point1" 값을 현재 수정하는 지점으로 정하세요. 예를 들면, 만약 당신이 control_point_1을 수정하고있다면, "RED/BLU Previous Control Point1" 값을 control_point_1로 설정하세요. | |||
* | |||
* | |||
== | == 다른 볼것 == | ||
* [[:TF2/Setting_the_cap_point_layout|Setting the cap point layout]] | * [[:TF2/Setting_the_cap_point_layout|Setting the cap point layout]] | ||
* [[Team Fortress 2 Level Creation]] | * [[Team Fortress 2 Level Creation]] | ||
Revision as of 18:50, 7 January 2014
필요한 엔티티들
점령 지점이 제대로 작동하기 위해서는 3개의 엔티티들이 맵속에 필요합니다 :
좋은 자리 지정하기
점령 지점들은 다음 요소를 가지고 있는곳에 배치되어야 합니다
- 10명의 플레이어들을 수용할만큼 넓은 공간을 가지고 있는지.
- 점령 지점으로 가기위해 2개 또는 그 이상의 경로가 있는지.
- 센트리 건들을 위한 완벽한 장소가 한개 또는 두개정도 있는지.
- 센트리 건들을 적절한 위치에서 파괴할수 있는 대체 방법이 있는지.
- 센트리 건들을 적절한 장소들로부터 보호 할수있는지.
당신은 func_nobuild 브러쉬 엔티티들을 이용해 엔지니어들이 그안에 건물을 짓지못하는 구역들을 만들어 센트리건 장소를들 제어할수 있습니다. 이 조건들과 맞지 않는다면, 점령 지점들은 너무 막기가 쉽거나 점령되기 쉽거나 아니면 꽤나 빠르게 사람들로 붐빌것입니다.
기본적 배치 하기
당신이 당신의 점령 지점을 위한 장소를 고르셧다면, 점령 지점을 지정하는 무언가를 표시할 시간입니다. 당신이 해야 할 일들 :
- 점령 지점의 경계 역할을할 4개의 블럭들을 만들어 주세요, 그들을 약 4-16칸의 높이로 만들고 약 16칸 정도의 넓이로 만들어 주세요. 그것의 윗 부분은
props/hazardstrip001a텍스쳐를 칠해주시고 옆부분들은metal/ibeam001b텍스쳐로 칠해주시기 바랍니다. (옆에 사진처럼, 과정 1) - 경계 안쪽에는, 둘러싸고 있는 블럭들과 똑같은 높이로 블럭들을 만들어주세요 텍스쳐는 당신이 원하는것으로 고르시고요. 이 강좌에서는,
metal/metalfloor003a텍스쳐를 사용할 것입니다. (과정 2) - 모든 "경계면" 과 "바닥" 을 선택하시고 그들을 컴파일 시간을 절약하기위해 func_detail 엔티티로 묶어주시기 바랍니다.
- 중앙에 지점을 표시할 prop_dynamic 을 만들어주세요. 우선,
prop_cap_1이라고 이름을 지어주시고 이것의 World Model 설정을models/props_gameplay/cap_point_base.mdl로 해주세요. (과정 3) - 당신은 info_overlay에
signs/capture_zone텍스쳐를 이용할수도 있습니다.
점령 지점으로 만들기
위에서 말씀드렷듯이, 3개의 엔티티들이 점령 지점을 만드는에 중요한 역할을 하고있습니다. trigger_capture_area, team_control_point, 그리고 team_control_point_master 말입니다. 이 과정에서, 우리는 그들을 만들고 한번 플레이 해볼겁니다.
첫째로, team_control_point_master 엔티티를 당신의 맵 어딘가에 만드시고 이름 을 master_control_point로 지어주세요.
다음은, team_control_point 엔티티를 점령 지점 모델의 가운데에 만들오 주세요. 우리는 약간의 설정을 해야합니다, 그래서 제가 그들의 할당된 값들을 제시해 두겟습니다.
- Name:
control_point_1 - Print name: (당신은 이곳의 이름을 설정 할수 있습니다 - 저는 warehouse로 선택하겟습니다)
Warehouse - Group index: 당신이 멀티-라운드 맵을 만들지 않는다면, 모든 포인트를 기본값인
0으로 설정해두세요. - Default owner: 이것은 라운드가 시작될때 지점의 소유자를 결정합니다.
Neither로 설정해두세요. - Index: 당신은 점령 지점이 0부터 시작하게 명령해야합니다. 그래서 만약
n번째 지점이 있다면,n-1로 설정하세요. - Warning Type:
Normal Announcements
이젠, 모든 점령 지점을 덮을 (경계면도 포함한) 256칸 이상의 높이의 블럭을 만들어 주세요. 이것의 텍스쳐를 tools/toolstrigger 로 칠해주세요. 컨트롤+T를 이용해 이것을 엔티티로 만들어주세요. trigger_capture_area를 골라주시기 바랍니다. 또, 저는 당신이 설정해야할 주요 값들을 제시해두겟습니다.
- Name:
capture_area_1 - Control Point:
control_point_1 - Can *team* cap?: 당신이 만약 공격/방어 형식의 맵을 원한다면, 이것의 방어 팀의 값은
No로 설정하시고, 아니라면 양팀의 값들을 모두Yes라고 내비두시기 바랍니다. - Number of *team* players to cap: 가장 적절한 값은 2입니다, 그러나 만약 당신이 5개의 점령 지점을 사용해 맵을 만든다면, 이상적으로, 당신의 첫번째 점령 지점들을 1로 설정하고, 두번째들은 2 그리고 중앙의 포인트들은 3으로 설정하세요.
- *team* spawn adjust: 당신은 이것들을 너무 높게 하고 싶지 않을것입니다, 하지만 그렇지 않으면 양쪽팀이 아예 스폰되지 않거나 너무 빠르게 스폰될테니까요. 저는 양쪽의 설정을 모두
5로 설정했습니다. - Time to cap:
5-20초가 가장 적당한 시간입니다.
이 엔티티는 또한 두개의 출력을 가지고 있습니다.
My Output > Target Entity Target Input Parameter Delay Only Once 
OnCapTeam1 prop_cap_1 Skin 1 0.00 No 
OnCapTeam2 prop_cap_1 Skin 2 0.00 No
기본적인 것들만 포함해 봣습니다.
추가적으로 가능한 일들
Template:Note:ko 물론, 아무런 조정도 없이 점령 지점을 만든다는건 그냥 혼란만 야기할 뿐입니다 그러니, 당신은 이 점령 지점을 조종할 엔티티들을 추가 해야합니다. 당신의 맵 형태에 따라 좌우되는 엔티티로써(당신이 만약 한 라운드만 있는 맵을 만든다면) team_control_point_master가 있습니다 혹은 (만약 당신이 Hydro 나 Dustbowl 같은 맵을 만든다면) 다수의 team_control_point_round들을 배치해야 합니다). Template:Note:ko
- 만약 당신이 라운드-기반 체제를 만들고 있다면, 그럼 Cap Layout 칸을 비워놓으세요. 또한, Restrict Team from Winning의
team_control_point_master는 적용되지 않습니다. 마지막으로, Switch Team on Map Win은 단지 승리하거나 패배했을때만 적용이 됩니다 (Dustbowl의 경우).team_control_point_round는 팀들의 문들의 열림과 닫힘을 설정할수 있습니다. (hydro-형식) 라운드가 시작될때 이것의 출력을 이용합니다. Priority라는 새로운 칸이 있습니다. 높은 우선권은 라운드를 첫번째로 시작하게 합니다, dustbowl을 보시면, 첫번째 맵이 높은 우선권을 가지고 있습니다, 그러므로 항상 첫번째로 플레이 하는것이지요. Control Points This Round는 Cap Layout의 대채용 칸입니다, 하지만 이것은 색인이 아닌 점령 지점으로 접속하기위한 하나의 이름을 필요로 합니다. 그리고 마지막으로, Restrict Team from Winning 은 여기서 보통 설정과 함께 반환됩니다. - 만약 당신이 Gravel Pit 형식같은 다수의 점령 지점을 원한다면, "RED/BLU Previous Control Point1" 값을 현재 수정하는 지점으로 정하세요. 예를 들면, 만약 당신이 control_point_1을 수정하고있다면, "RED/BLU Previous Control Point1" 값을 control_point_1로 설정하세요.


