Applying Textures: Difference between revisions
TomEdwards (talk | contribs) (cleanup) |
|||
| Line 4: | Line 4: | ||
| zh-cn = Applying Textures:zh-cn | | zh-cn = Applying Textures:zh-cn | ||
}} {{first room menu}} | }} {{first room menu}} | ||
In this section we will select textures for the walls, floor, and ceiling. | In this section we will select textures for the walls, floor, and ceiling. | ||
== The Texture Browser == | |||
The '''[[Hammer_Texture_Browser|Texture Browser]]''' is used to view and select textures (or more accurately [[materials]]) that you want to apply to [[brush]]es in your map. The active texture is displayed in a box on the right side of the Hammer interface. | |||
To open the texture browser, click the '''Browse...''' button in the Texture group on the right side of the Hammer interface: | |||
''' | [[Image:hammer_texturebrowser1.jpg|thumb|none|Click the '''Browse...''' button to open the Texture Browser.]] | ||
; Thumbnail size | |||
: To ease the browsing of textures, you may wish to adjust the textures' preview size: in the lower left corner of the texture browser window, select "128x128" from the "Size" drop-down menu. This will reduce the size of the texture samples, so that we can see more at once. | |||
: [[File:Hammer texturebrowserSize.png|frame|none|Changing thumbnail size]] | |||
; Filtering the gallery | |||
: In most games the texture browser hosts thousands of items. Navigating to the exact texture you want to use would be problematic were it not for [[Hammer Texture Browser#Filter|filtering]]. This feature allows you to search for parts of file names. You can use spaces to split your filter in multiple terms, such as "concrete wall", "plaster ceiling", or "metal door" (don't include the quote marks). | |||
: To show the entire list of textures again, open the Texture Browser, select the text in the filter field and press {{key|Backspace}} or {{key|Delete}} to delete it. | |||
; Dev Textures | |||
: Source comes with a number of textures specifically designed to help you create brushes in proportion to the player. They are called "dev textures", for "development", and can be found by filtering for "dev". | |||
: {{todo|Picture of dev textures in use.}} | |||
Find and double-click <code>dev/dev_measurewall01a</code>. | |||
== Applying textures == | |||
With a texture selected, it now has to be a applied to a brush. | |||
# Activate the {{hammer select}}. | |||
# Highlight the wall you wish to texture by clicking on it in the Camera view. If you select one of the walls and it selects the whole room, either change the upper-right "Select" setting from "Groups" to "Objects", or [[Hammer Tools Menu#Group and Ungroup .3CCtrl.2BG.3E and .3CCtrl.2BU.3E|Ungroup]] the brushes. | |||
# Click the '''[[Hammer Map Tools Toolbar#Apply Current Texture|Apply Current Texture]]''' button [[Image:Hammer_applycurrenttextureicon.jpg|28px]] from the left panel to apply the active texture to the selected brush. | |||
[[File:Hammer appliedTextureExample.png|thumb|none|<code>dev_measurewall01a</code> in action.]] | |||
[[ | |||
== Adjusting textures == | |||
A newly-applied texture may not fit properly on a brush. Using the [[Hammer Map Tools Toolbar#Toggle Texture Application|Toggle Texture Application]] tool [[File:Hammer toggletextureapplicationicon.jpg|28px]], you can adjust it so that it does. | |||
Because our wall is 1024x512, any texture will fit it evenly because the dimensions of the wall and the textures are all powers of two. However, we can still see some changes by altering the settings in the Face Edit Sheet that has appeared: | |||
[[File:Hammer faceeditdialog.png|250px|right|The Face Edit Sheet]] | |||
; Texture Scale | |||
: Adjusts the size of the texture. A value of '1' maps one texture pixel onto one [[unit]]. Negative numbers mirror the texture. | |||
; Texture Shift | |||
: Moves the texture along the X or Y axis. Positive numbers move the texture left (X axis) and down (Y axis). Negative numbers move the texture right (X axis) and up (Y axis). | |||
; Current Texture | |||
: Changes the applied texture on the surface. | |||
; Lightmap Scale | |||
: Affects how light effects apply to the surface. Smaller numbers are higher resolution and produce more expensive lighting effects. Larger numbers are lower resolution and produce cheaper lighting effects. See also [[Lightmap]]. | |||
; Rotation | |||
: Rotates the texture on the brush face. | |||
; Justify | |||
: Snaps the texture's position to a specified position on the wall. '''L'''eft, '''R'''ight, '''T'''op, '''B'''ottom and '''C'''enter. Finally, '''Fit''' squashes the entire texture onto the surface. | |||
; Align | |||
: Specifies how the texture is projected onto the face. [[Texture alignment#World Alignment|World alignment]] applies textures along the global x, y, or z axis. [[Texture alignment#Face Alignment|Face alignment]] applies the texture directly onto the face no matter which way it faces. | |||
; Mode | |||
: Allows you to select what will happen when you click on a brush face with the left mouse button. | |||
Apply the same texture to the remaining three walls, and using the same process apply a dev texture to the ceiling and the floor. | |||
{{Navbar|Creating a Room|Your First Map|Adding Point Entities}} | {{Navbar|Creating a Room|Your First Map|Adding Point Entities}} | ||
[[Category:Level Design Tutorials]] | [[Category:Level Design Tutorials]] | ||
Revision as of 05:57, 2 January 2010
In this section we will select textures for the walls, floor, and ceiling.
The Texture Browser
The Texture Browser is used to view and select textures (or more accurately materials) that you want to apply to brushes in your map. The active texture is displayed in a box on the right side of the Hammer interface.
To open the texture browser, click the Browse... button in the Texture group on the right side of the Hammer interface:

- Thumbnail size
- To ease the browsing of textures, you may wish to adjust the textures' preview size: in the lower left corner of the texture browser window, select "128x128" from the "Size" drop-down menu. This will reduce the size of the texture samples, so that we can see more at once.
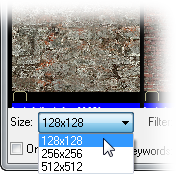 Changing thumbnail size
- Filtering the gallery
- In most games the texture browser hosts thousands of items. Navigating to the exact texture you want to use would be problematic were it not for filtering. This feature allows you to search for parts of file names. You can use spaces to split your filter in multiple terms, such as "concrete wall", "plaster ceiling", or "metal door" (don't include the quote marks).
- To show the entire list of textures again, open the Texture Browser, select the text in the filter field and press ← Backspace or Delete to delete it.
- Dev Textures
- Source comes with a number of textures specifically designed to help you create brushes in proportion to the player. They are called "dev textures", for "development", and can be found by filtering for "dev".
- Todo: Picture of dev textures in use.

Find and double-click dev/dev_measurewall01a.
Applying textures
With a texture selected, it now has to be a applied to a brush.
- Activate the Selection tool
 .
. - Highlight the wall you wish to texture by clicking on it in the Camera view. If you select one of the walls and it selects the whole room, either change the upper-right "Select" setting from "Groups" to "Objects", or Ungroup the brushes.
- Click the Apply Current Texture button File:Hammer applycurrenttextureicon.jpg from the left panel to apply the active texture to the selected brush.

Adjusting textures
A newly-applied texture may not fit properly on a brush. Using the Toggle Texture Application tool File:Hammer toggletextureapplicationicon.jpg, you can adjust it so that it does.
Because our wall is 1024x512, any texture will fit it evenly because the dimensions of the wall and the textures are all powers of two. However, we can still see some changes by altering the settings in the Face Edit Sheet that has appeared:

- Texture Scale
- Adjusts the size of the texture. A value of '1' maps one texture pixel onto one unit. Negative numbers mirror the texture.
- Texture Shift
- Moves the texture along the X or Y axis. Positive numbers move the texture left (X axis) and down (Y axis). Negative numbers move the texture right (X axis) and up (Y axis).
- Current Texture
- Changes the applied texture on the surface.
- Lightmap Scale
- Affects how light effects apply to the surface. Smaller numbers are higher resolution and produce more expensive lighting effects. Larger numbers are lower resolution and produce cheaper lighting effects. See also Lightmap.
- Rotation
- Rotates the texture on the brush face.
- Justify
- Snaps the texture's position to a specified position on the wall. Left, Right, Top, Bottom and Center. Finally, Fit squashes the entire texture onto the surface.
- Align
- Specifies how the texture is projected onto the face. World alignment applies textures along the global x, y, or z axis. Face alignment applies the texture directly onto the face no matter which way it faces.
- Mode
- Allows you to select what will happen when you click on a brush face with the left mouse button.
Apply the same texture to the remaining three walls, and using the same process apply a dev texture to the ceiling and the floor.