Ricochet Level Creation/Jump arrow: Difference between revisions
Jump to navigation
Jump to search
")

")
No edit summary |
(badly moved multipage) |
||
| (13 intermediate revisions by 5 users not shown) | |||
| Line 1: | Line 1: | ||
{{ | {{LanguageBar|title = Ricochet Level Creation/Jump arrow}} | ||
Players in Ricochet can only jump using jump arrows and jump pads. | Players in Ricochet can only jump using jump arrows and jump pads. | ||
== Jump arrow == | == Jump arrow == | ||
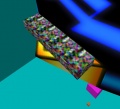
# Cut the area where you what to attach jump arrow at off pad using the Clipping Tool | # Cut the area where you what to attach jump arrow at off pad using the Clipping Tool. Paint the clipped face with <code>SKY</code> texture. | ||
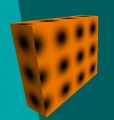
# Create | # Create 80x36 16 units tall block and make it <code>[[func_wall]]</code>. Cover it in <code>NULL</code> texture. | ||
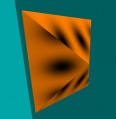
# Make pyramid off new block using the Vertex Tool | # Make pyramid off new block using the Vertex Tool, as shown in the Stage 3. | ||
# Remove top half of pyramid using Clipping Tool. | # Remove the top half of the pyramid using the Clipping Tool. | ||
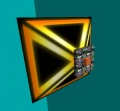
# Paint top and bottom sides with < | # Paint top and bottom sides with <code>+0ARROW1</code> texture. Rotate texture to same direction as brush and press Fit and C on texture application window. Paint left and right sides with <code>+0SQUARE1</code> texture with 180° rotation and Fit button pressed. | ||
# Place < | # Place <code>trigger_jump</code> brush entity above jump arrow. Set <code>[[info_target]]</code> of the target pad or jump pad as Target keyvalue, and Height to the height difference between two pads, usually 128. | ||
# Rotate the arrow and trigger and attach them to pad. | # Rotate the arrow and trigger and attach them to pad. | ||
<gallery> | <gallery> | ||
File:JumpArrow1.png|Stage 1 | |||
File:JumpArrow2.jpg|Stage 2 | |||
File:JumpArrow4.jpg|Stage 3 | |||
File:JumpArrow5.jpg|Stage 4 | |||
File:JumpArrow6.jpg|Stage 5 | |||
</gallery> | </gallery> | ||
| Line 21: | Line 21: | ||
# Create 112x32x96 block. Place it 96" above platform. | # Create 112x32x96 block. Place it 96" above platform. | ||
# Make a pyramid off the block. | # Make a pyramid off the block. | ||
# Paint pyramid sides with <tt>+0ARROW1</tt> texture, back side with <tt>BLACK</tt> texture. | # Paint pyramid sides with <tt>+0ARROW1</tt> texture, back side with <tt>BLACK</tt> texture. Make it <code>[[func_wall]]</code>. | ||
# Put <tt>info_target</tt> and | # Put <tt>info_target</tt> and {{ent|trigger_jump_(GoldSrc)|alt=trigger_jump}} at the spike. Set <tt>info_target</tt> from target pad as <tt>trigger_jump</tt>'s Target keyvalue. | ||
# Rotate the arrow and trigger. | # Rotate the arrow and trigger. | ||
<gallery> | <gallery> | ||
| Line 30: | Line 30: | ||
Image:PyramidArrow4.jpg|Stage 4 | Image:PyramidArrow4.jpg|Stage 4 | ||
</gallery> | </gallery> | ||
[[Category:Level Design | [[Category:Level Design]] | ||
[[Category:Ricochet]] | [[Category:Ricochet]] | ||
Latest revision as of 09:43, 12 July 2024
Players in Ricochet can only jump using jump arrows and jump pads.
Jump arrow
- Cut the area where you what to attach jump arrow at off pad using the Clipping Tool. Paint the clipped face with
SKYtexture. - Create 80x36 16 units tall block and make it
func_wall. Cover it inNULLtexture. - Make pyramid off new block using the Vertex Tool, as shown in the Stage 3.
- Remove the top half of the pyramid using the Clipping Tool.
- Paint top and bottom sides with
+0ARROW1texture. Rotate texture to same direction as brush and press Fit and C on texture application window. Paint left and right sides with+0SQUARE1texture with 180° rotation and Fit button pressed. - Place
trigger_jumpbrush entity above jump arrow. Setinfo_targetof the target pad or jump pad as Target keyvalue, and Height to the height difference between two pads, usually 128. - Rotate the arrow and trigger and attach them to pad.
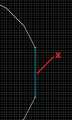
Stage 1
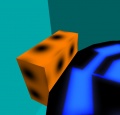
Stage 2
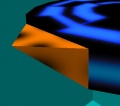
Stage 3
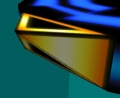
Stage 4
Stage 5


Jump pad
- Create 112x32x96 block. Place it 96" above platform.
- Make a pyramid off the block.
- Paint pyramid sides with +0ARROW1 texture, back side with BLACK texture. Make it
func_wall. - Put info_target and trigger_jump at the spike. Set info_target from target pad as trigger_jump's Target keyvalue.
- Rotate the arrow and trigger.
Stage 1
Stage 2

Stage 3
Stage 4


