Fr/Switch: Difference between revisions
No edit summary |
(Rewrite Template:Lang to Template:LanguageBar. This action was performed by a bot.) |
||
| (10 intermediate revisions by 4 users not shown) | |||
| Line 1: | Line 1: | ||
{{ | {{LanguageBar|Switch|title=Switch}} | ||
| | |||
| | |||
{{Back|Portal | {{Back|:Category:Portal level design/fr}} | ||
Ce guide va vous montrer comment créer un bouton ''switch''. Quand il est pressé, il déclenche un compte à rebours, puis revient à l'état initial. | Ce guide va vous montrer comment créer un bouton ''switch''. Quand il est pressé, il déclenche un compte à rebours, puis revient à l'état initial. | ||
== Création de l'entité == | == Création de l'entité == | ||
1. Sélectionnez l' | 1. Sélectionnez l'{{L|Entity Tool}}, placez une {{L|prop_dynamic}} où vous voulez voir le model de votre bouton switch. Mettre les paramètres suivants: | ||
:{| class=standard-table | :{| class=standard-table | ||
! Property Name || Value | ! Property Name || Value | ||
| Line 17: | Line 14: | ||
| Name || switch_model | | Name || switch_model | ||
|} | |} | ||
[[ | [[File:Switch1.jpg|right|thumb|Comment aligner le ''func_button''.]] | ||
2. Créer un block de 16x16x16 avec la | 2. Créer un block de 16x16x16 avec la {{L|brush}} et appliquez sur toutes les faces la texture '''tools/toolsinvisible'''. Appliquez-lui la fonction {{L|func_button}} avec ''Tie to entity''. Dans l'onglet '''Flags''', cochez bien'''Don't move''' et '''Use Activates'''. Dans l'onglet ''Class info'' modifiez '''Delay before Reset''' sur le nombre de secondes que vous voulez pour empêcher de réactiver trop rapidement le bouton. | ||
{{note|Pour les portes, assurez-vous de mettre assez de temps pour que la porte s'ouvre, reste ouverte et se ferme.}} | {{note|Pour les portes, assurez-vous de mettre assez de temps pour que la porte s'ouvre, reste ouverte et se ferme.}} | ||
3. Créer 3 entités | 3. Créer 3 entités {{L|ambient_generic}} à côté du bouton switch. Elles vont définir quels sons seront joués quand le bouton sera pressé, relaché, le clic du compte à rebours. Donnez leurs les propriétés suivantes : | ||
:{| class=standard-table | :{| class=standard-table | ||
! Property Name || Value | ! Property Name || Value | ||
| Line 53: | Line 50: | ||
Pour l'entité '''switch_sound_tick''', décochez dans l'onglet Flags, le paramètres '''Starts Silent''' (seul '''Is NOT Looped''' est coché). | Pour l'entité '''switch_sound_tick''', décochez dans l'onglet Flags, le paramètres '''Starts Silent''' (seul '''Is NOT Looped''' est coché). | ||
4. Ensuite, créez une entité | 4. Ensuite, créez une entité {{L|logic_timer}} à côté du bouton switch. Mettez les paramètres suivants: | ||
:{| class=standard-table | :{| class=standard-table | ||
! Property Name || Value | ! Property Name || Value | ||
| Line 67: | Line 64: | ||
! || My Output || Target Entity || Target Input || Parameter || Delay || Only Once | ! || My Output || Target Entity || Target Input || Parameter || Delay || Only Once | ||
|- | |- | ||
| [[ | | [[File:Io11.png]] || OnTimer || switch_sound_tick || PlaySound || <none> || 0.00 || No | ||
|} | |} | ||
[[ | [[File:Switch2.jpg|right|thumb|Dans le jeu]] | ||
5. Sélectionnez l'entité | 5. Sélectionnez l'entité {{L|func_button}} et allez dans l'onglet Output: | ||
:{| class=standard-table | :{| class=standard-table | ||
! || My Output || Target Entity || Target Input || Parameter || Delay || Only Once | ! || My Output || Target Entity || Target Input || Parameter || Delay || Only Once | ||
|- | |- | ||
| [[ | | [[File:Io11.png]] || OnOut || switch_model || SetAnimation || up || 0.00 || No | ||
|- | |- | ||
| [[ | | [[File:Io11.png]] || OnOut || switch_sound_tickloop || Disable || <none> || 0.00 || No | ||
|- | |- | ||
| [[ | | [[File:Io11.png]] || OnOut || switch_sound_up || PlaySound || <none> || 0.00 || No | ||
|- | |- | ||
| [[ | | [[File:Io11.png]] || OnPressed || switch_model || SetAnimation || down || 0.00 || No | ||
|- | |- | ||
| [[ | | [[File:Io11.png]] || OnPressed || switch_sound_tickloop || Enable || <none> || 0.00 || No | ||
|- | |- | ||
| [[ | | [[File:Io11.png]] || OnPressed || switch_sound_down || PlaySound || <none> || 0.00 || No | ||
|} | |} | ||
{{note|The time you have for '''Delay before Reset''' will be how long it takes for the OnOut outputs to trigger. Make sure you have it timed accordingly!}} | {{note|The time you have for '''Delay before Reset''' will be how long it takes for the OnOut outputs to trigger. Make sure you have it timed accordingly!}} | ||
Reliez à votre bouton invisible votre porte (dans Flags, une entrée OnPressed pour le Trigger ouvert, et OnOut pour le trigger fermé). Vous pouvez aussi rajouter des | Reliez à votre bouton invisible votre porte (dans Flags, une entrée OnPressed pour le Trigger ouvert, et OnOut pour le trigger fermé). Vous pouvez aussi rajouter des {{L|Creating indicator lights|indicator lights}}. | ||
== Voir aussi == | == Voir aussi == | ||
* | * {{LCategory|Portal level design}} | ||
| Line 98: | Line 95: | ||
[[Category:French]] | [[Category:French]] | ||
{{ACategory|Level Design}} | |||
{{ACategory|Tutorials}} | |||
{{ACategory|Level Design Tutorials}} | |||
{{ACategory|Portal}} | |||
Latest revision as of 16:54, 18 July 2025
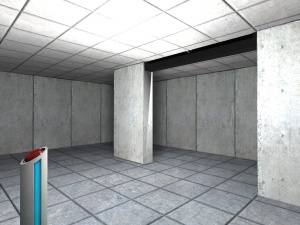
Ce guide va vous montrer comment créer un bouton switch. Quand il est pressé, il déclenche un compte à rebours, puis revient à l'état initial.
Création de l'entité
1. Sélectionnez l'Entity Tool, placez une prop_dynamic où vous voulez voir le model de votre bouton switch. Mettre les paramètres suivants:
Property Name Value World Model models/props/switch001.mdl Name switch_model
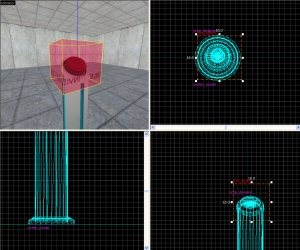
2. Créer un block de 16x16x16 avec la brush et appliquez sur toutes les faces la texture tools/toolsinvisible. Appliquez-lui la fonction func_button avec Tie to entity. Dans l'onglet Flags, cochez bienDon't move et Use Activates. Dans l'onglet Class info modifiez Delay before Reset sur le nombre de secondes que vous voulez pour empêcher de réactiver trop rapidement le bouton.
3. Créer 3 entités ambient_generic à côté du bouton switch. Elles vont définir quels sons seront joués quand le bouton sera pressé, relaché, le clic du compte à rebours. Donnez leurs les propriétés suivantes :
Property Name Value Name switch_sound_up Sound Name Portal.button_up SourceEntityName switch_model
Property Name Value Name switch_sound_down Sound Name Portal.button_down SourceEntityName switch_model
Property Name Value Name switch_sound_tick Sound Name Portal.room1_TickTock SourceEntityName switch_model
Pour l'entité switch_sound_tick, décochez dans l'onglet Flags, le paramètres Starts Silent (seul Is NOT Looped est coché).
4. Ensuite, créez une entité logic_timer à côté du bouton switch. Mettez les paramètres suivants:
Property Name Value Name switch_sound_tickloop Starts Disabled Yes Refire Interval 1
Et dans l'onget Output:
My Output Target Entity Target Input Parameter Delay Only Once 
OnTimer switch_sound_tick PlaySound <none> 0.00 No
5. Sélectionnez l'entité func_button et allez dans l'onglet Output:
Reliez à votre bouton invisible votre porte (dans Flags, une entrée OnPressed pour le Trigger ouvert, et OnOut pour le trigger fermé). Vous pouvez aussi rajouter des indicator lights.
Voir aussi
|}

