Clean (Portal 2): Difference between revisions
mNo edit summary |
(→Walls) |
||
| (34 intermediate revisions by 17 users not shown) | |||
| Line 1: | Line 1: | ||
This [[Portal 2]] aesthetic theme is shown in the later stages of the single player campaign, in deeper Aperture Laboratories chambers. It is characterized by cleanliness and order. The lighting is mostly cold, thanks to [[Glass Light (Portal 2)| glass lights]]. | {{lang|Clean (Portal 2)}} | ||
{{Portal 2 theme menu}} | |||
This [[Portal 2]] aesthetic theme is shown in the later stages of the single player campaign, in deeper Aperture Laboratories chambers. It is characterized by cleanliness and order. The lighting is mostly cold, thanks to [[Glass Light (Portal 2)| glass lights]], although some warm light strips may be present. This theme is usually considered to be the easiest to work with in Hammer, since Clean chambers are generally [[Portal 2 Puzzle Maker|easy to prototype]] and require little advanced features. | |||
Level transitions are placed in pristine [[ | This theme is also used throughout most of co-op, in particular Courses 1 and 2. However, this theme is also used throughout the single-player campaign, mostly during Chapter 4 and the first few test chambers of Chapter 8 (the rest of them are [[Wheatley (Portal 2)|Wheatley-themed]]). | ||
Level transitions are placed in pristine [[Elevator (Portal 2)|elevator rooms]]. | |||
==Elements== | ==Elements== | ||
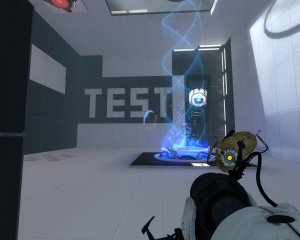
*[[Glass Light (Portal 2)| | [[File:Clean example.jpg|thumb|An example of a chamber that combines elements of the Wheatley theme and Clean theme, from [[Portal 2]] Singleplayer mode]] | ||
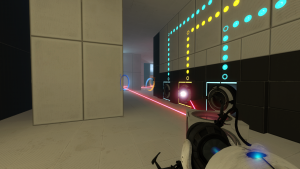
[[File:1080p-Clean example.png|thumb|Another example of a clean test chamber, from [[Portal 2]] Singleplayer mode.]] | |||
*[[Glass Light (Portal 2)|Light Strips]], not broken nor flickering | |||
*[[Elevator (Portal 2)|Turbine Entrance and Exit Elevators]] | |||
*[[Test Door (Portal 2)|Test Chamber Doors]], not malfunctioning | |||
*[[Observation Room|Observation Rooms]] with lights on, not flickering | |||
*[[Test Sign|Test Chamber Sign]], not flashing | |||
*[[Panels]] | *[[Panels]] | ||
*[[ | *Any other testing elements | ||
*[ | |||
*[ | ==Portalable Textures== | ||
*[ | ===Walls=== | ||
*[ | *[https://developer.valvesoftware.com/wiki/File:White_wall_tile003a.jpg#/media/File:White_wall_tile003a.jpg <code>white_wall_tile003a</code>] for normal (2x1) walls | ||
*[https://developer.valvesoftware.com/wiki/File:White_wall_tile003c.jpg#/media/File:White_wall_tile003c.jpg <code>white_wall_tile003c</code>] for square (2x2) walls | |||
*[https://developer.valvesoftware.com/wiki/File:White_wall_tile003f.jpg#/media/File:White_wall_tile003f.jpg <code>white_wall_tile003f</code>] for small square (4x4) walls | |||
*[https://developer.valvesoftware.com/wiki/File:White_wall_tile003h.jpg#/media/File:White_wall_tile003h.jpg <code>white_wall_tile003h</code>] for big square (1x1) walls | |||
===Floors=== | |||
*[https://developer.valvesoftware.com/wiki/File:white_floor_tile004a.jpg#/media/File:white_floor_tile004a.jpg <code>white_floor_tile004a</code>] for normal floors | |||
*[https://developer.valvesoftware.com/wiki/File:white_floor_tile004b.jpg#/media/File:white_floor_tile004b.jpg <code>white_floor_tile004b</code>] for checker floors | |||
*[https://developer.valvesoftware.com/wiki/File:white_floor_tile004c.jpg#/media/File:white_floor_tile004c.jpg <code>white_floor_tile004c</code>] for darker floors | |||
===Ceilings=== | |||
*<code>white_ceiling_tile002a</code> | |||
==Non Portalable Textures== | |||
===Walls=== | |||
*<code>black_wall_metal_002b</code> Small | |||
*<code>black_wall_metal_002a</code> Medium | |||
*<code>black_wall_metal_002c</code> Large | |||
*<code>black_wall_metal_002d</code> Extra Large | |||
For some reason, "black_wall_metal_002b" is larger than "black_wall_metal_002a" | |||
{{navbar2|Reconstructing (Portal 2)|Reconstructing|The Aesthetics of Portal 2|The Aesthetics of Portal 2|Behind the Scenes (Portal 2)|Behind the Scenes}} | |||
[[Category: Portal 2 Level Design]] | [[Category:Portal 2 Level Design]] | ||
[[Category:Portal 2 Tutorials]] | |||
Latest revision as of 18:51, 26 April 2025
This Portal 2 aesthetic theme is shown in the later stages of the single player campaign, in deeper Aperture Laboratories chambers. It is characterized by cleanliness and order. The lighting is mostly cold, thanks to glass lights, although some warm light strips may be present. This theme is usually considered to be the easiest to work with in Hammer, since Clean chambers are generally easy to prototype and require little advanced features.
This theme is also used throughout most of co-op, in particular Courses 1 and 2. However, this theme is also used throughout the single-player campaign, mostly during Chapter 4 and the first few test chambers of Chapter 8 (the rest of them are Wheatley-themed).
Level transitions are placed in pristine elevator rooms.
Elements


- Light Strips, not broken nor flickering
- Turbine Entrance and Exit Elevators
- Test Chamber Doors, not malfunctioning
- Observation Rooms with lights on, not flickering
- Test Chamber Sign, not flashing
- Panels
- Any other testing elements
Portalable Textures
Walls
white_wall_tile003afor normal (2x1) wallswhite_wall_tile003cfor square (2x2) wallswhite_wall_tile003ffor small square (4x4) wallswhite_wall_tile003hfor big square (1x1) walls
Floors
white_floor_tile004afor normal floorswhite_floor_tile004bfor checker floorswhite_floor_tile004cfor darker floors
Ceilings
white_ceiling_tile002a
Non Portalable Textures
Walls
black_wall_metal_002bSmallblack_wall_metal_002aMediumblack_wall_metal_002cLargeblack_wall_metal_002dExtra Large
For some reason, "black_wall_metal_002b" is larger than "black_wall_metal_002a"