Test Chamber Door: Difference between revisions
Rockn-Roll (talk | contribs) (Portal tutorial on how to use the clipping tool...initial page.) |
No edit summary |
||
| (36 intermediate revisions by 12 users not shown) | |||
| Line 1: | Line 1: | ||
{{Portal topicon}} | |||
{{Lang}}__NOTOC__ | |||
[[Category:Portal]] | |||
[[Category:Level Design]] | |||
[[Category:Tutorials]] | |||
{{Subpage|[[Portal Level Creation]]}} | |||
This tutorial will show step-by-step how to create the '''test chamber doors''' seen throughout the {{portal|1}} test chambers. Test chamber doors are often used to gate the player until they have completed a puzzle, but can also be used as a puzzle element themselves. | |||
[[ | == Construction == | ||
=== Step 1 === | |||
Create a <code>32w*128l*128h</code> brush. Next use the [[Hammer Clipping Tool|clipping tool]] to create three horizontal clips at 24, 48 and 84 units from the top, respectively. | |||
After that, select the second brush from the top and create a diagonal clip 48 units from the side of the brush at the top to 16 units in from the side at the bottom. Do the same thing on the other side of the brush and delete the wedge that remains in the middle. | |||
Next, select the brush below the previous brush and create a diagonal clip from 16 units in from the side at the top to the bottom side corner of the brush. Do the same on the other side and delete the remaining wedge. | |||
Now, select the bottommost brush and create a diagonal clip from the top side corner to 20 units in from the side at the bottom. Do the same thing on the other side of the brush, then delete the remaining wedge. | |||
Finally, select all of the brushes and tie them to a {{Ent|func_detail}} entity. After that, texture the front and back sides with the same texture of the wall that the door is set into. Texture all of the remaining faces with <code>tools/toolsnodraw</code>. | |||
==== Gallery (These photos have 4 unit grid snap) ==== | |||
<gallery> | |||
Image:Test door frame1.png|The starting brush | |||
Image:Test door frame2.png|First horizontal clip | |||
Image:Test door frame3.png|Second horizontal clip | |||
Image:Test door frame4.png|Third horizontal clip | |||
Image:Test door frame5.png|Diagonal clip | |||
Image:Test door frame6.png|Ditto | |||
Image:Test door frame7.png|Ditto | |||
Image:Test door frame8.png|The brushes tied to a <code>func_detail</code> entity | |||
Image:Test door frame9.png|The frame clipped and textured | |||
</gallery> | |||
=== Step 2 === | |||
[[File:Test door prop frame.png|200px|thumb|right|The door frame prop]] | |||
Create a {{Ent|prop_static}} entity and set its ''World Model'' to <code>models/props/door_01_frame_wide_reference.mdl</code>. Align the door frame model within the frame brushes. | |||
{{clr}} | |||
== | === Step 3 === | ||
[[File:Test door door left.png|200px|thumb|right|The left door]] | |||
[[File:Test door door right.png|200px|thumb|right|The right door]] | |||
Create a <code>8w*56l*104h</code> brush textured with <code>tools/toolsnodraw</code>. Align it to the left of the center of the door frame, and tie this brush to a {{Ent|func_door}} entity. Make sure that all of its flags are unchecked and set the following keyvalues on it: | |||
{| class="standard-table sortable" | |||
|- | |||
! Property Name !! Value | |||
|- | |||
| Name || door_left | |||
|- | |||
| Speed || 250 | |||
|- | |||
| Stop Sound || Doors.FullClose8 | |||
|- | |||
| Delay Before Reset || -1 | |||
|- | |||
| Lip || 12 | |||
|- | |||
| Move Direction || 0 270 0 | |||
|} | |||
Next create an identical <code>8w*56l*104h</code> nodraw textured brush, but align it to the right of the center of the door. Tie this brush to a <code>func_door</code> entity, make sure all of its flags are unchecked, and set the following keyvalues: | |||
{| class="standard-table sortable" | |||
|- | |||
! Property Name !! Value | |||
|- | |||
| Name || door_right | |||
|- | |||
| Speed || 250 | |||
|- | |||
| Stop Sound || Doors.FullClose8 | |||
|- | |||
| Delay Before Reset || -1 | |||
|- | |||
| Lip || 12 | |||
|- | |||
| Move Direction || 0 90 0 | |||
|} | |||
{{clr}} | |||
=== Step 4 === | |||
[[File:Test door prop door left.png|200px|thumb|right|The left door model]] | |||
[[File:Test door prop door right.png|200px|thumb|right|The right door model]] | |||
Create a {{Ent|prop_dynamic}} entity and set the following keyvalues on it: | |||
{| class="standard-table sortable" | |||
|- | |||
! Property Name !! Value | |||
|- | |||
| Parent || door_right | |||
|- | |||
| World Model || models/props/door_01_rtdoor_reference.mdl | |||
|- | |||
| Name || model_door_right | |||
|} | |||
Align it so it covers <code>door_right</code>. | |||
Next, create another <code>prop_dynamic</code> entity and set the following keyvalues on it: | |||
{| class="standard-table sortable" | |||
|- | |||
! Property Name !! Value | |||
|- | |||
| Parent || door_left | |||
|- | |||
| World Model || models/props/door_01_lftdoor_reference.mdl | |||
|- | |||
| Name || model_door_left | |||
|} | |||
Align this model so it covers <code>door_left</code> | |||
{{clr}} | |||
=== Step 5 === | |||
[[File:Test door lighting relative.png|200px|thumb|right|The <code>info_lighting_relative</code> entity]] | |||
Create an {{Ent|info_lighting_relative}} entity in front of the door, about 56 units above the ground. Name this entity <code>lighting_relative</code>. Now set the ''Lighting Origin'' keyvalue of both <code>model_door_right</code> and <code>model_door_left</code> to <code>lighting_relative</code>. | |||
The test chamber door is now finished and is ready to be implemented in a map. | |||
{{clr}} | |||
[[ | == Implementation == | ||
[[File:Test door ingame.jpg|300px|thumb|right|The test chamber door in-game]] | |||
=== Step 1 === | |||
Place the door within the wall the door should be in so that the sides of the frame brushes are flush with the wall. If the door is rotated, the ''Pitch Yaw Roll'' keyvalues of the doors must be altered so that the door opens in the right direction. | |||
=== Step 2 === | |||
Set up the item that should open the door so that it sends the <code>Open</code> input to both <code>door_left</code> and <code>door_right</code> when the door should open, and the <code>Close</code> input when the door shoul close. | |||
== See also == | |||
* [[Portal Level Creation]] | |||
== | |||
[[ | |||
Latest revision as of 04:23, 6 January 2024
This tutorial will show step-by-step how to create the test chamber doors seen throughout the Portal test chambers. Test chamber doors are often used to gate the player until they have completed a puzzle, but can also be used as a puzzle element themselves.
Construction
Step 1
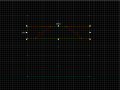
Create a 32w*128l*128h brush. Next use the clipping tool to create three horizontal clips at 24, 48 and 84 units from the top, respectively.
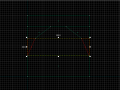
After that, select the second brush from the top and create a diagonal clip 48 units from the side of the brush at the top to 16 units in from the side at the bottom. Do the same thing on the other side of the brush and delete the wedge that remains in the middle.
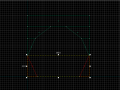
Next, select the brush below the previous brush and create a diagonal clip from 16 units in from the side at the top to the bottom side corner of the brush. Do the same on the other side and delete the remaining wedge.
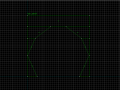
Now, select the bottommost brush and create a diagonal clip from the top side corner to 20 units in from the side at the bottom. Do the same thing on the other side of the brush, then delete the remaining wedge.
Finally, select all of the brushes and tie them to a func_detail entity. After that, texture the front and back sides with the same texture of the wall that the door is set into. Texture all of the remaining faces with tools/toolsnodraw.
Gallery (These photos have 4 unit grid snap)
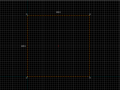
The starting brush
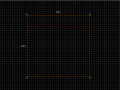
First horizontal clip
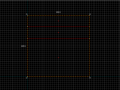
Second horizontal clip
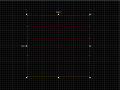
Third horizontal clip
Diagonal clip
Ditto
Ditto
The brushes tied to a
func_detailentity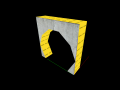
The frame clipped and textured


Step 2

Create a prop_static entity and set its World Model to models/props/door_01_frame_wide_reference.mdl. Align the door frame model within the frame brushes.
Step 3


Create a 8w*56l*104h brush textured with tools/toolsnodraw. Align it to the left of the center of the door frame, and tie this brush to a func_door entity. Make sure that all of its flags are unchecked and set the following keyvalues on it:
| Property Name | Value |
|---|---|
| Name | door_left |
| Speed | 250 |
| Stop Sound | Doors.FullClose8 |
| Delay Before Reset | -1 |
| Lip | 12 |
| Move Direction | 0 270 0 |
Next create an identical 8w*56l*104h nodraw textured brush, but align it to the right of the center of the door. Tie this brush to a func_door entity, make sure all of its flags are unchecked, and set the following keyvalues:
| Property Name | Value |
|---|---|
| Name | door_right |
| Speed | 250 |
| Stop Sound | Doors.FullClose8 |
| Delay Before Reset | -1 |
| Lip | 12 |
| Move Direction | 0 90 0 |
Step 4


Create a prop_dynamic entity and set the following keyvalues on it:
| Property Name | Value |
|---|---|
| Parent | door_right |
| World Model | models/props/door_01_rtdoor_reference.mdl |
| Name | model_door_right |
Align it so it covers door_right.
Next, create another prop_dynamic entity and set the following keyvalues on it:
| Property Name | Value |
|---|---|
| Parent | door_left |
| World Model | models/props/door_01_lftdoor_reference.mdl |
| Name | model_door_left |
Align this model so it covers door_left
Step 5

Create an info_lighting_relative entity in front of the door, about 56 units above the ground. Name this entity lighting_relative. Now set the Lighting Origin keyvalue of both model_door_right and model_door_left to lighting_relative.
The test chamber door is now finished and is ready to be implemented in a map.
Implementation

Step 1
Place the door within the wall the door should be in so that the sides of the frame brushes are flush with the wall. If the door is rotated, the Pitch Yaw Roll keyvalues of the doors must be altered so that the door opens in the right direction.
Step 2
Set up the item that should open the door so that it sends the Open input to both door_left and door_right when the door should open, and the Close input when the door shoul close.