使用Source SDK时对源代码托管
You can help by updating the translation.
Also, please make sure the article complies with the alternate languages guide.
This article describes how to use source control with the Source SDK. You will want to use source control even if you're working alone, as it largely automates the process of merging code updates released on Steam – without it, you'll be in a world of hurt every time!
This document discusses Perforce, the source control system used internally by Valve. It's free for up to 20 users. Other alternatives include Subversion or CVS. Since all version control systems work with the same high-level processes, this article should still be useful. (Nevertheless, there are specific articles for Subversion and Git.)
在开始之前
If you have started programming without source control, STOP! Source control needs to be set up at the earliest opportunity, especially since every time a Steam update is released older versions of the base SDK code are lost.
If you're reading this as you try to apply an update that's already out to your unversioned code, it is too late, and you must merge the changes the hard way. Tools like Beyond Compare can make this process easier, and if you follow this tutorial after finishing it should be the last time you ever have to endure it.
获取Perforce
With that out of the way, it's time to get Perforce. You want both the visual client (which includes the command-line client anyway) and the server. Take care when installing to leave the network server configuration alone unless you are actually going to connect somewhere remote.
If you are using Visual Studio (as opposed to Visual C++ Express) you should also consider downloading the SCC plugin, which integrates Perforce into the IDE.
p4 obliterate –y //depot/.... DON'T do this on a database that's already up and running!概述
We will make a fresh install of Valve's SDK code and submit it to the Perforce server. We will then 'branch' that submitted code to a second location, which allows you to work with the code as you see fit while retaining the ability to easily 'integrate' future SDK updates from Valve into your project.
This means that you will have two 'codelines' on your Perforce server. Valve's, which will only change with SDK updates, and your own, which will change both whenever you decide to submit your work to it, and whenever you decide to integrate SDK updates from Valve.
设置源代码托管
Valve's base SDK code will form the 'trunk' of your codebase, from which your mod code will 'branch'. Get Valve's code with the Create a Mod wizard, choosing the "source code only" option and installing to a location in your user dir like C:\Users\You\Mods\valvesrc. Making a \Mods folder is important, as you will discover later.
创建工作区
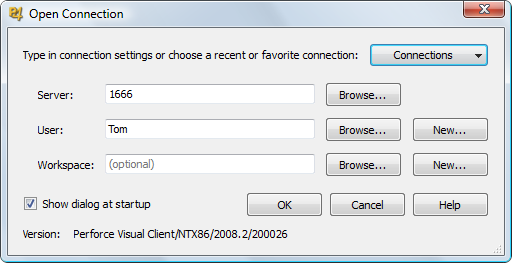
Now we'll start using Perforce. Start P4V, the visual client. You will be greeted by the "Open Connection" dialogue.
Unless you are actually connecting to a network server you can ignore all of the options it gives you except Workspace. Click 'new', to the right, and name the workspace 'mods' (or whatever you please - but the rest of this guide assumes it's called mods).
Workspaces link folders containing your files with the location(s) on the Perforce server where they are archived. Earlier versions of this guide suggested that one workspace be created per codeline, but this is unnecessary. We're going to create just one that will encompass all of the SDK projects on your computer, which is why creating a \Mods folder was recommended above.
Most of the fields in the New Workspace dialogue should be self-explanatory, and you only need to worry about two anyway:
- Root should point to your Source projects folder -
C:\Users\You\Mods\if you followed the instructions above precisely. - View contains two locations, separated by whitespace:
- A location on the Perforce server
- The location that it should correspond to in the workspace
Unless you've deviated from this tutorial, the running Perforce server is called 'depot' and your workspace is called 'mods'. We aren't doing anything complex, so View should tie the depot root to the workspace root:
//depot/sourcemods/... //mods/...
The /sourcemods subfolder will keep your mod projects separate from any other workspaces you create in the future. If you're absolutely sure that this server will only be used with one workspace you can use the root //depot/... path instead.
提交主分支代码
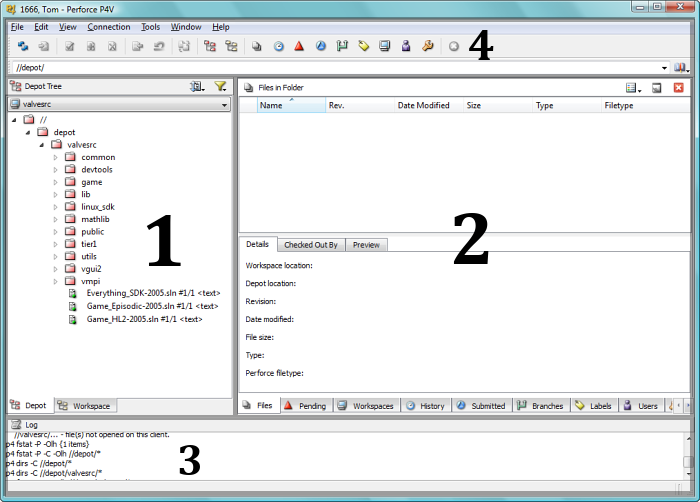
We now have a workspace filled with Valve's base SDK code, but the Perforce server is still empty. We need to get our files up there. To do that we'll be using the main P4V interface, which having created a workspace should currently be in front of you.
Help > Getting Started with P4V.- Workspace/depot view (left pane). Click on the tabs at the bottom to change between the two. Workspace is your local copy, depot is the server's master copy.
- Task tabs (right pane). The tabs along the bottom of this pane allow you to switch between different tasks. They are opened as needed from the main menu buttons. We will be using Pending, Workspaces and Branches.
- Log. Errors will appear in bold text.
- Main menu. Most of the options here are available elsewhere in the interface, but it's useful to have them in one place too.
Bring up the workspace view and we'll submit the code. It's a two-step process:
- Mark the files for addition. We want to add everything, so select the whole \valvesrc folder and click 'Mark for Add'. You can find the Add button on the main menu or in the context menu; it's the file icon with a plus over it. There are a lot of files in the SDK, so it might take a while for the operation to complete. When it's finished, all of the files in the workspace view will have changed appearance to reflect that they are now being version controlled.
- Submit the changelist. Move to the 'Pending' tab (the red, upwards arrow) and you'll see that there's an item called 'default' that contains all of the files you just added. Submit it with a double-click (or Ctrl+S). You'll need to enter a brief description of what the changes are.
Once the process has finished, you'll be able to browse to the newly-populated depot view. Congratulations! You can now safely delete the \valvesrc folder.
创建并执行分支
Choose File > New > Branch Specification... to create a new 'branch'. A branch operation tells Perforce to copy code to a separate location while remembering where it came from, and when — vital information when it comes to integrating SDK updates.
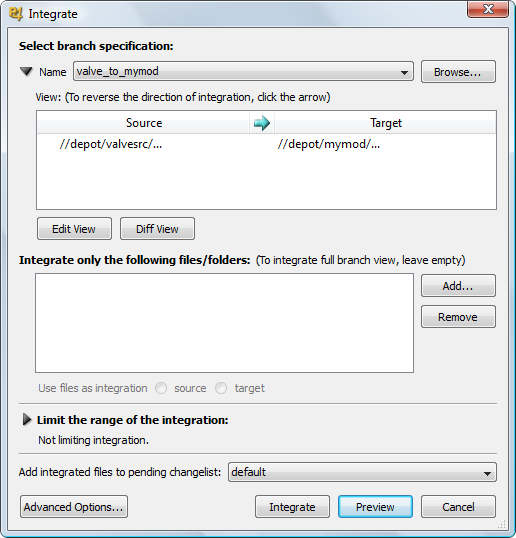
The view field of a branch is slightly different to that of a workspace: both halves refer to locations on the server. Yours should read something like this:
//depot/valvesrc/... //depot/mymod/...
Although we've just specified a destination on the server, the new branch will actually be created in the workspace. This is so that you can examine how the integration turned out before committing to anything: polite behaviour that isn't terribly useful at this point, since we are "integrating" with an empty folder!
A good name for the branch is valve_to_mymod. Hit OK and it will be created: now we just need to execute it. Right-click on your new branch and select the 'Integrate Using' option. You should be able to start the process without changing anything.
You now have the 'mymod' branch of valvesrc registered on the server, and its files sitting in your workspace. Submit them in the same way as you did the trunk code.
检查
All version-controlled files in your workspace are read-only unless you have them 'checked out' of the server. This is useful when you're working with a team of programmers, as it makes developers aware of which files they are each working on, but can still help to keep things organised when you are working alone.
To check a file or folder out, select it and hit Ctrl+E or use the context menu.
If you are working alone you might think it logical to check out the entire workspace, and this is a perfectly valid option. However, it will help you keep track of your changes between submissions if you only check out those files that you need to modify.
整合SDK更新
We've now got source control up and running for your mod. It might have seemed complex, but the steps above only need to be performed once and this stuff will soon become grist for the mill anyway.
You can use source control as an ongoing backup, to compare code with what came before or after it, to revert changes, share code with others and contribute collaboratively, and, of course, to integrate trunk updates, which is what we'll be doing in this section.
提交待处理的分支修改
You already know how to submit, but this is an appropriate time to remind you that newly-created files aren't automatically added to version control.
P4V only supports adding files individually, which is fiddly, or by folder, which will pick up all the huge binary files generated by Visual Studio that you definitely don't want on the server. To add files with a wildcard search, we must turn to the command line.
Open CMD and execute these commands ('client' is another word for workspace):
set p4client mods
p4 add //mods/game/....cpp
p4 add //mods/game/....h
Of course, if you've added files outside the \game folder and/or that aren't .cpp or .h, you'll need to perform extra commands to pick them up.
Right-click on your branch root and hit the "Revert Unchanged Files" option, then submit the changelist and we'll move on.
-y switch):
p4 obliterate //....ncb
p4 obliterate //....sdf
p4 obliterate //....ipch
p4 obliterate //....obj
p4 obliterate //....pdb
p4 obliterate //....pch
提交主分支更新
The 'trunk' contains Valve's unmodified SDK code, which now needs updating too. Delete any workspace files from your \valvesrc folder then install the new code there with the Create a Mod wizard's 'Source code only' option.
Now switch to workspace view in P4V and right-click on the \valvesrc folder. Choose 'Reconcile Offline Work', which is in the same section as Submit and Revert. Leave all the checkboxes in the window that opens active and click 'Reconcile'. Then submit the changes.
整合
We've got the latest code for both projects in the depot, so it's time to integrate them. To do this, execute your valve_to_mymod branch again.
The difference this time is that you'll need to resolve files that have changed between the versions. Since Perforce knows the point at which your mod code branched it can make a very good guess as to what version of a file should take precedence in most cases. You'll only have to manually inspect changes if there's a conflict that can't be resolved automatically.
Remember that a) you don't have to submit the integrated code until you're happy and b) you can always revert to the earlier, unmerged version of a file if the process later turns out to have gone wrong.
For more details on merging, open P4Merge's help tool.
测试新代码
At this point, you should do a pass of the code to fix any compile errors that may have been introduced by the code merge. You could also do this pass before submitting the merged code changelist, but it tends to be easier to make changes starting with an empty changelist rather than one full of code merges.
And you're done!
结论
Working with a source control introduces some concepts that take getting used to, but it pays dividends. It saves time, helps teams work together on the same product, and provides access to the whole history of a project.
Keep in mind that, while this document has a lot of steps, this stuff is all trivial once you're familiar with Perforce. Once you know how this all works, all these integrations and merges can be done in a matter of minutes. Valve recommend that you jump back to the "overview" section of this document to review the high-level process that is involved, and see how all the detailed steps fit into that simple high-level process.
Internally, Valve uses source control in a similar fashion to that described in this document. The main difference is that ALL files for Valve games go in Perforce, including content source .TGA artwork, .VMT files, executables, scripts, documents, etc. They recommend doing this while developing a mod as well, bandwidth limits and disc space allowing, because you can instantly restore any version of the mod that ever existed.
Valve also uses a multitude of codelines (whereas there are just two in this document). For example, they have a main codeline that about 20 programmers submit code into. Often programmers need to stay sheltered from other people's changes (which may happen as many as 19 times per day!), so each programmer has their own set of personal codelines that are branched off the main codeline. This way, the programmers can choose when they want to integrate their colleague's changes into their personal codeline (just like you now have the choice about when you want to integrate Valve's SDK updates into your own codeline).
拓展阅读
- 使用 Subversion 对 Source SDK进行源代码托管
- Perforce 官方文档
- Perforce 新手常见问题
- 在 Visual Studio 中集成 Perforce (不支持Visual C++ Express)
- 备份与恢复你的服务器


