Uso de Source Control con el Source SDK
Este artículo describe como usar el Control de versiones con el Source SDK. Querrás usar el Control de versiones incluso si estas trabajando solo, ya que en gran medida automatiza el proceso de fusion de código de las actualizaciones lanzadas en Steam - ¡sin él, viviras en un mundo de dolor todo el tiempo!.
Este documento analiza Perforce, el sistema de control de versiones usado internamente por Valve. It’s free for up to two users. Larger teams can use completely free alternatives like Subversion without rendering this page useless: version control systems all work with the same high-level processes. There is also a separate tutorial for Subversion users.
Before you begin
If you have started programming without source control, STOP! Source control needs to be set up at the earliest opportunity, especially since every time a Steam update is released older versions of the base SDK code are lost.
If you’re reading this as you try to apply an update that’s already out to your unversioned code, you’re screwed and will just have to merge the changes the hard way. Tools like Beyond Compare can make this process easier, and if you follow this tutorial after finishing it should be the last time you ever have to endure it.
Get Perforce
With that out of the way, you’re going to need to download Perforce. Get the first two downloads from this page:
- Perforce Server Windows Installer
- P4V Installer
Ignore the ‘P4Win Installer’ further down the page, it’s legacy software now. Take care when installing to leave the network server configuration alone unless you are actually connecting over a LAN or the internet.
Perforce provide documentation of their own which you may want to consult before using or instead of this article. It isn’t as specific as this page, however.
p4 obliterate –y //depot/.... DON’T do this on a database that's already up and running!Overview
We will install a fresh instance of the SDK code with the Create a Mod wizard and submit it to Perforce, which will file it away. We will then ‘branch’ the submitted code to a second instance at another location.
It is this branched code with which you will create your mod, occasionally updating Perforce’s filed copy when you need to make a backup. The first instance will remain untouched until a code update is released, at which point you will install the updated code to it before ‘integrating’ it into your branched mod code. Because Perforce knows when the two codelines separated, it will be of great assistance during this process.
Setting up source control
Valve’s base SDK code will form the ‘trunk’ of your codebase, from which your mod code will ‘branch’. Create it with the Create a Mod wizard. Your user folder is the best place to store it, especially if you’re using Windows Vista, but put it in a subfolder especially for the base SDK code - the one specifically for your mod's code will be created later.
Create the workspace
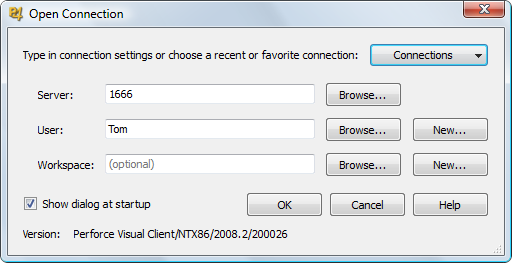
Now we’ll start using Perforce. Start P4V, the visual client. You will be greeted by the “Open Connection” dialogue.
Unless you are actually connecting to a network server you can ignore all of the options it gives you except step 3, which defines the ‘workspace’ you’ll connect to. Click ‘new’, to the right, and name the workspace valvesrc, or words to that effect.
Workspaces are local copies of files on the Perforce server. You’ll have one for Valve’s trunk code and one for your branch code by the time you’re finished, and anyone else working with you will have their own workspace on their machine as well.
Most of the fields in the workspace dialogue should be self-explanatory, and you only need to worry about two anyway: Root and View. Root should point to the folder to which you just installed the unmodified SDK code, while View is the location at which the code will be stored on the Perforce server (the ‘depot’).
There’s a special syntax for Views. The section before the space defines the virtual drive that the workspace will be linked to, while the section after it defines a subfolder on that drive. In this way you can create workspaces with files that are either independent or pooled together.
For our purposes, we want one that’s independent. Use the following value for View:
//depot/valvesrc/... //valvesrc/...
//depot/... and then a subfolder?Then click OK.
Submit the trunk source code
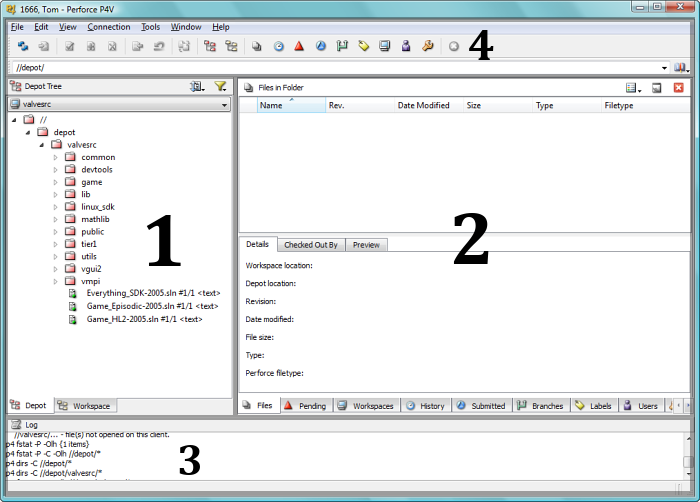
We now have a workspace filled with Valve’s base SDK code, but the Perforce server is still empty. We need to get our files up there. To do that we’ll be using the main P4V interface, which should currently be in front of you.
Help > Getting Started with P4V.- Workspace/depot view (left pane). Click on the tabs at the bottom to change between the two. Workspace is your local copy, depot is the server’s master copy.
- Task tabs (right pane). The tabs along the bottom of this pane allow you to carry out every operation you’ll ever need to with the Perforce client. We will be using Pending, Workspaces and Branches.
- Log. Errors will appear in bold text.
- Main menu. Most of the options here are available elsewhere in the interface, but it’s useful to have them in one place too.
Bring up the workspace view and we’ll see about uploading the source code. It’s a two-step process:
- Mark the files for addition. We want to add everything, so select the workspace root, right at the top, the click ‘Mark for Add’. You can find it on the main menu or on the context menu; it’s the file icon with a plus over it. There are a lot of files in the SDK, so it might take a while for the operation to complete. When it’s finished, all of the files in the workspace view will have changed appearance to reflect that they are now being version controlled.
- Submit the changelist. Move to the ‘Pending’ tab (the red, upwards arrow) and you’ll see that there’s an item called ‘default’ that contains all of the files you just added. Submit it with a double-click (or Ctrl+S). You’ll need to enter a brief description of what the changes are.
Once the process has finished, you’ll be able to browse to the newly-populated depot view. Congratulations!
Create and execute the branch
The branched workspace is what you will be working from. It starts off as any other workspace, but this time you can call it after your mod and point its Root to the place where you’d like to store the files as you work on them. The View should be on its own virtual server, so use something like this:
//depot/mymod/... //mymod/...
If you’ve already made some changes that you want to keep, and don’t want to change folders, move your existing code somewhere else until the branch operating is complete. You can’t properly create a workspace in a folder that’s already populated.
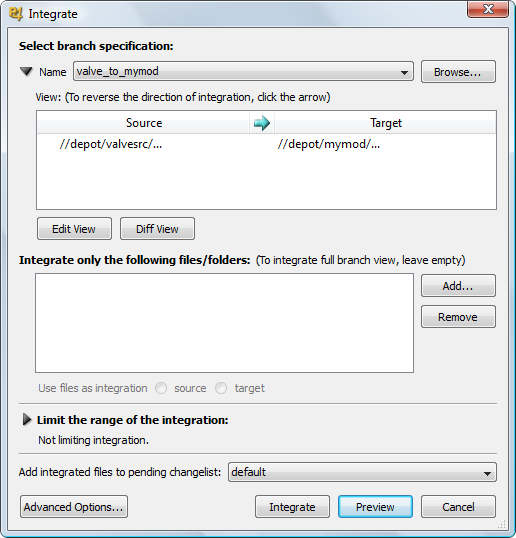
Choose File > New > Branch Specification... and you’ll create a new branch. Give it a suitable name, like valve_to_<mymod>, then configure View to read:
//depot/valvesrc/... //depot/mymod/...
Hit OK and it will be created: now we just need to execute it. Active to your mod’s workspace (use the drop-down list just above the left pane, which will currently read valvesrc), and with its root selected go to the Branches task tab and choose the ‘Integrate Using’ context menu option from your new branch. Either uncheck ‘Limit integration to’ option or change the View it’s using to be the ‘target’, then click Integrate.
We have now created a branch of //depot/valvesrc/ in the mod workspace. It still needs submitting it to the Perforce server, remember! Do it in the same way as we did the trunk code earlier.
Check out
This is a complication that is only useful when you’re working with a team of programmers. Unfortunately you’re going to have to put up with it even if you’re alone! The logic is this: all version-controlled files are locked (i.e. read-only) unless they are ‘checked out’ of the server. This stops people from unintentionally working on the same code at the same time, since that usually leads to duplicated work and confusion.
Luckily, it’s easy to check out. If you’re working on your own you can head up to the very top level of your mod workspace and check out the whole workspace in one go. You perform the command from the main menu (left of Add, with a tick), from the context menu, or with Ctrl+E.
If you’re working with a team you’ll need to agree on what code you each check out, or else prepare to face the consequences...
Using source control to integrate SDK updates
We’ve now got source control up and running for your mod. It might have seemed complex, but this stuff will soon become grist for the mill. You can use source control as an ongoing backup, to compare code with what came before or after it, to revert changes, share code with others and contribute collaboratively, and, of course, to integrate trunk updates, which is what we'll be doing in this section.
Submit pending branch changes
This process only changes from our previous submits in that you will need to add any new files created since them to the depot. If you know precisely what's been created you can find each file manually and mark them for addition, but if you’ve got loads or aren’t sure (both will be the case if you’re importing the existing code you moved out earlier back into the workspace) it’s best to add the whole workspace.
You’ll need to do two extra things if you add the entire workspace:
- Right-click on the new pending changelist and select the “Revert Unchanged Files” option, for obvious reasons.
- Find and revert
bin/,release_hl2/anddebug_hl2/folders fromgame/server/andgame/client/, then do the same for any.ncbfiles (you can use Ctrl+F). These all contain very large amounts of auto-generated binary data that you don’t need or want version controlled. If you accidentally do submit any of these files, you can delete them from the database with a few console commands (these given without the confirming-yswitch):p4 obliterate //....ncbp4 obliterate //depot/mymod/server/<folders>
Submit the changelist and we’ll move on.
Submit trunk update
The trunk code is that stuff that Valve’s update applies to. Before you open the SDK Launcher and install the new release however, remember that you need to check out the files to make them writeable. Just go to the workspace’s root and hit Ctrl+E.
Now you can install the new code; use the wizard's ‘Source code only’ option. After the installation mark all files in the valvesrc workspace for add to pick up anything new, then revert all unchanged files. Deleted files will have to be removed manually (if you think you’ve still got some lying around, search the valvesrc/ folder for files older than those from the SDK launcher install you just performed). Once that’s done submit, and we can move on to the fun part.
Integrate
We’ve now got fully updated code in both depots, so it’s time to integrate. You do this in the same manner as you populated the branch workspace: go to its root, then integrate with your valve_to_mymod branch.
The difference here is that you’ll need to resolve files that have changed between the versions. Since Perforce knows the point at which your mod code branched it can make a very good guess as to what version of a file should take precedence in most cases. You’ll usually only have to manually inspect the differences if you’ve made extensive changes to something, or if there’s a conflict that can’t be resolved automatically.
Otherwise you can accept the automatic result. Remember that you can always revert to the earlier, unmerged version of a file if the process later turns out to have gone wrong.
Manual merges
Test the new code
At this point, you should do a pass of the code to fix any compile errors that may have been introduced by the code merge. You could also do this pass before submitting the merged code changelist, but it tends to be easier to make changes starting with an empty changelist rather than one full of code merges.
And you're done!
Conclusion
Working with a source control introduces some concepts that take getting used to, but it pays dividends. It saves time, helps teams work together on the same product, and provides access to the whole history of a project.
Keep in mind that, while this document has a lot of steps, this stuff is all trivial once you're familiar with Perforce. Once you know how this all works, all these integrations and merges can be done in a matter of minutes. We recommend that you jump back to the "overview" section of this document to review the high-level process that is involved, and see how all the detailed steps fit into that simple high-level process.
Internally, Valve uses source control in a similar fashion to that described in this document. The main difference is that ALL files for Valve games go in Perforce, including content source .TGA artwork, .VMT files, executables, scripts, documents, etc. We recommend doing this while developing a mod as well, bandwidth limits and disc space allowing, because you can instantly restore any version of the mod that ever existed.
Valve also uses a multitude of codelines (whereas there are just two in this document). For example, we have a main codeline that about 20 programmers submit code into. Often programmers need to stay sheltered from other people's changes (which may happen as many as 19 times per day!), so each programmer has their own set of personal codelines that are branched off the main codeline. This way, they can choose when they want to integrate all the changes from other programmers into their personal codeline (just like you now have the choice about when you want to integrate Valve's source code into your mod's source code).


