Prefabs and Instances
Prefabs and instances are two ways you can organize various map assets into reusable pieces of content. Both can contain geometry, models, and entities, but both have slightly different uses when creating custom maps.
Prefabs
A prefab is a collection of models, entities, or both organized into a single object that is saved out into a separate VMAP file. It's similar to a group in that it can be moved around as one but different as it is treated as a single object in the map.
Prefabs can be edited either inside a custom map where it is placed or on its own since it is a separate VMAP file. If the prefab is altered it should be saved to its current prefab VMAP file. All other maps using this prefab will be updated (they will require recompiling as the change is not populated until the map with the updated prefab is loaded). This can be useful to update objects across multiple maps without having to repeat the same edits over and over again.
Creating Prefabs
- Select a number of objects and/or meshes
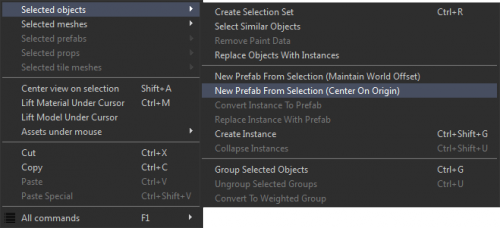
- Right click to bring up the context menu and Selected Objects -> New Prefab From Selection
- This will create the prefab and ask to save a new VMAP
- Choose an appropriate name and save the VMAP
- The prefab is now live in the world
Maintain World Offset: Creates a prefab setting the origin to the current world origin.
Center On Origin: Creates a prefab setting the origin to the current pivot location.
Editing Prefabs
Double-click on a prefab in your 3D viewport to start editing it. This will edit the prefab at its current location. Saving the map will prompt the changes to save to the prefab VMAP.
Collapsing Prefabs
To collapse a prefab select it, right click to bring up the context menu Selected Prefabs -> Collapse.
When a prefab is collapsed all the objects are left in the world and can be edited on their own as if they were placed individually.
Customizing Prefabs
To allow for customization without collapsing or saving a new prefab, you can go inside the prefab and click on the entity you want to be able to customize. Next, create a Map Variable Link by clicking the chainlink icon in-between the Property Name and the Property Value fields. Give the variable link a name and it will appear as an editable field from outside the prefab. If you have something like a lamp that has a Illuminated and a default skin, you can use this to change between the two skins without having a prefab for both cases or collapsing the prefab.
You can also create custom input/output fields for your prefab. To do this, go to Map > Map Relays and then create a new relay. Give it a name, description if you'd like. From there go to the Outputs tab of your World and create a new output. For OutputName, put your new Map Relay's name and then fill out the rest with whatever you want to happen when you call this output. So if you want a lamp that turns off or on, "INPUT_TurnOff > Light_Name > Disable" will turn off the light when called from outside the Prefab. The Drop-down menus in the Outputs tab will list map relays in the order they were created.
Instances
Instances are slightly different than prefabs and have their own merits. It's worth noting that it too can contain both models, geometry, and/or entities. The biggest difference is that it cannot be referenced from any other map but the one it is created within. It is local to the current VMAP.
One of the benefits to instances is rendering. Much like models, where if the same model is repeated over and over again it will be batched up into a single rendering pass, instances are handled the same way. Geometric detail that is instanced and repeated is batched together for rendering purposes.
Another benefit is that when editing instances the changes can be seen immediately to all the surrounding same instances. If a house is an instance and a window is added that change is instantly duplicated to all the other instances.
Creating Instances
- Select a number of objects and/or meshes
- Right click to bring up the context menu and Selected Objects -> Create Instance
Editing Instances
Double click on an instance to edit it. Any changes to the instance will be reflected live to all other instances inside the map.
Collapsing Instances
Right click on an instance Selected Objects -> Collapse Instances. Similar to collapsing a prefab the collapsed instance will leave behind all the individual objects and meshes.
