Making loading screens for Black Mesa multiplayer maps
| Skill Level
This tutorial expects you to have this amount of knowledge within the topic to follow along smoothly. | |||||
|---|---|---|---|---|---|
| Novice | Familiar | Competent | Proficient | Expert | |
This article will discuss the creation of loading screen system for your Black Mesa multiplayer map.
What Is The Loading Screen System ?
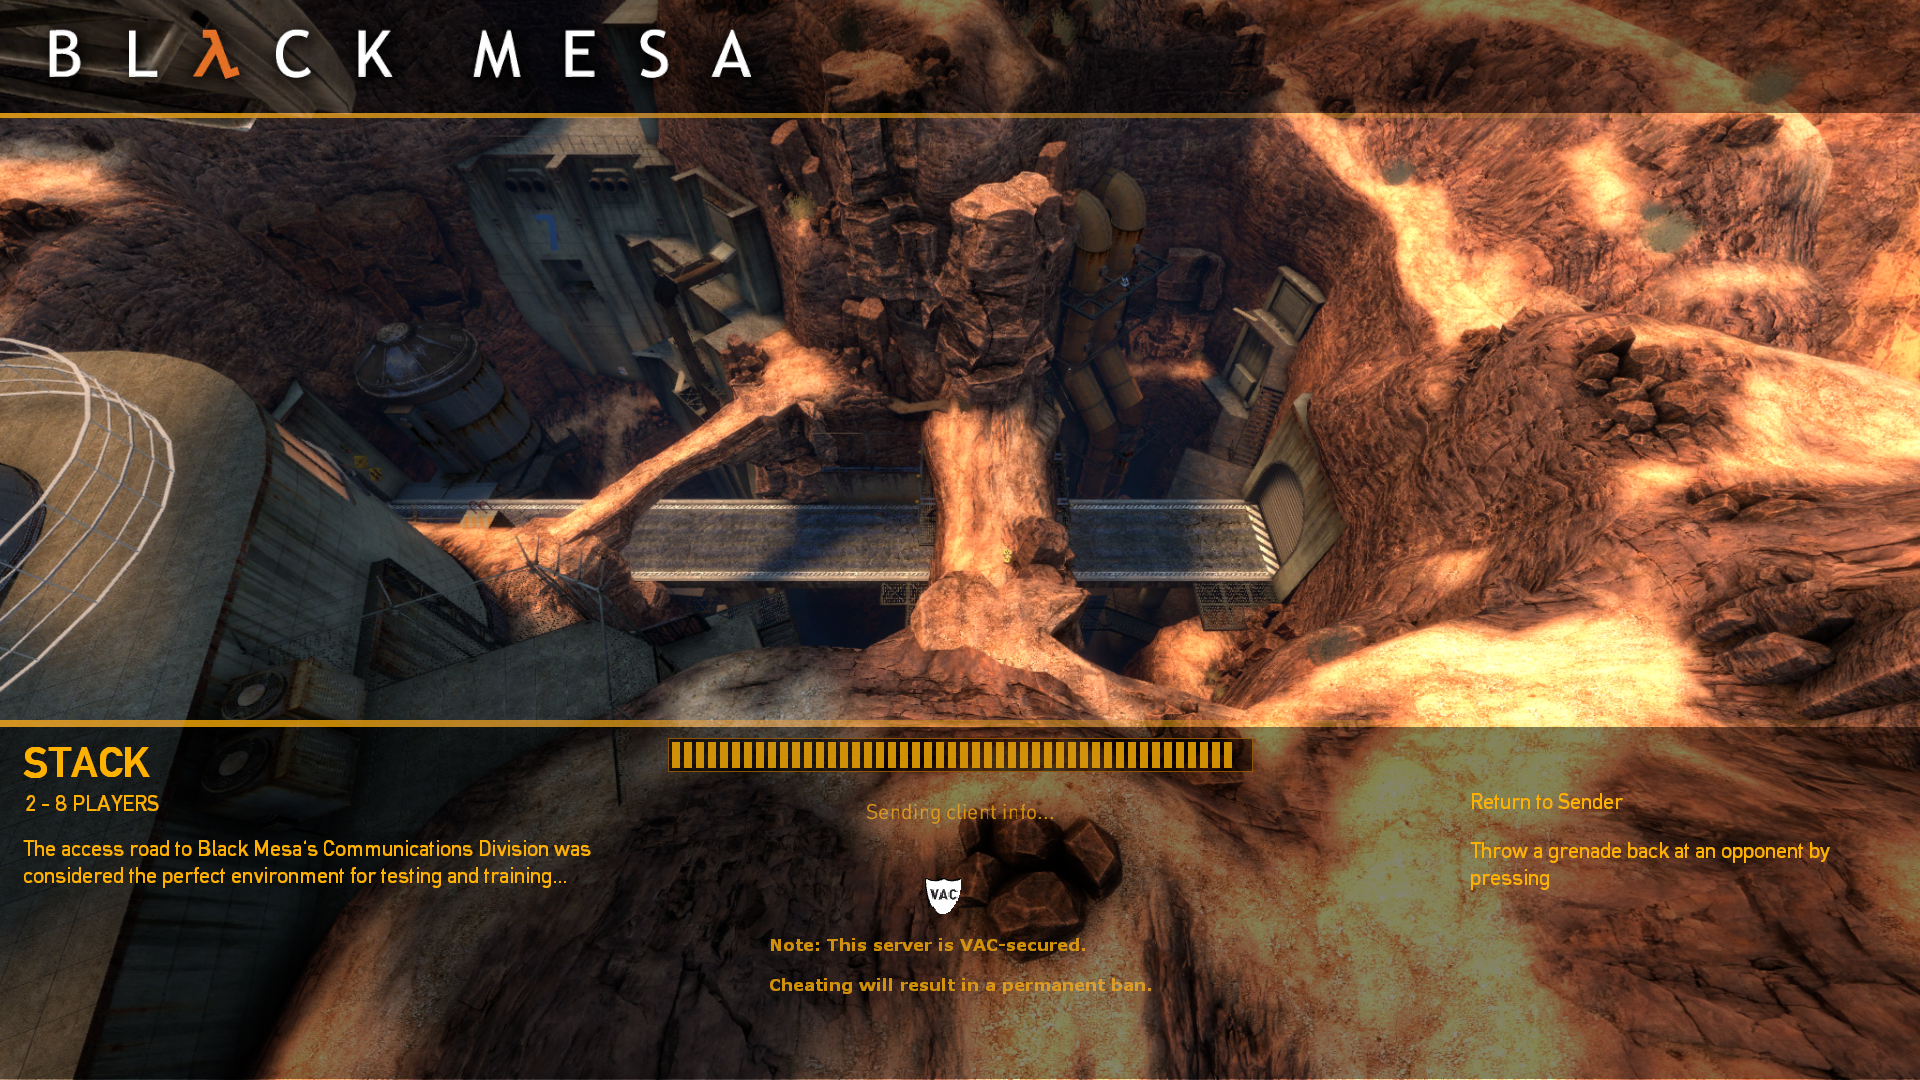
![]() Black Mesa has a nice little loading screen system, where during loading, the game UI displays a randomly selected screenshot of the map, and once loading is complete, the screen will seamlessly fade into the actual map, at the same location, creating a very nice transitional effect. The loading screen also displays some set information, like number of recommended players, a description of the map, etc. This system is extensible and flexible, allowing mappers and modders to generate their own loading screens and bundle them with their maps. The system for producing these loading screens is relatively simple and elegant.
Black Mesa has a nice little loading screen system, where during loading, the game UI displays a randomly selected screenshot of the map, and once loading is complete, the screen will seamlessly fade into the actual map, at the same location, creating a very nice transitional effect. The loading screen also displays some set information, like number of recommended players, a description of the map, etc. This system is extensible and flexible, allowing mappers and modders to generate their own loading screens and bundle them with their maps. The system for producing these loading screens is relatively simple and elegant.
Currently it is available only with enabled VGUI via -oldgameui launch parameter. Qt UI doesn't display this feature. Can be restored with Qt UI changes.
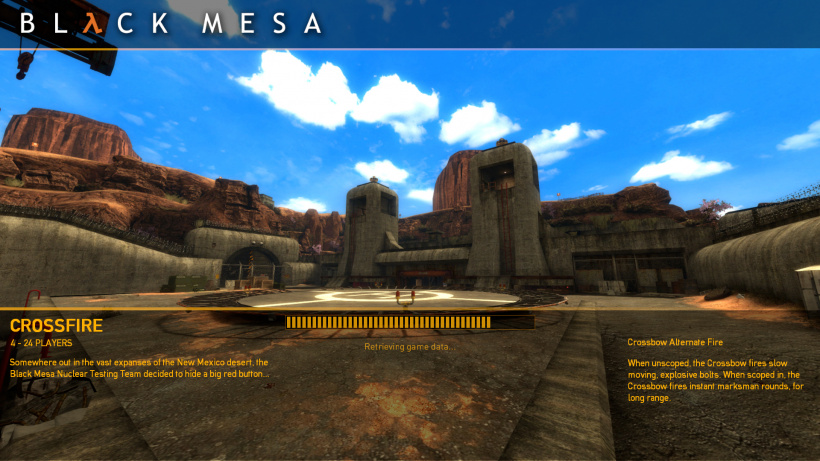
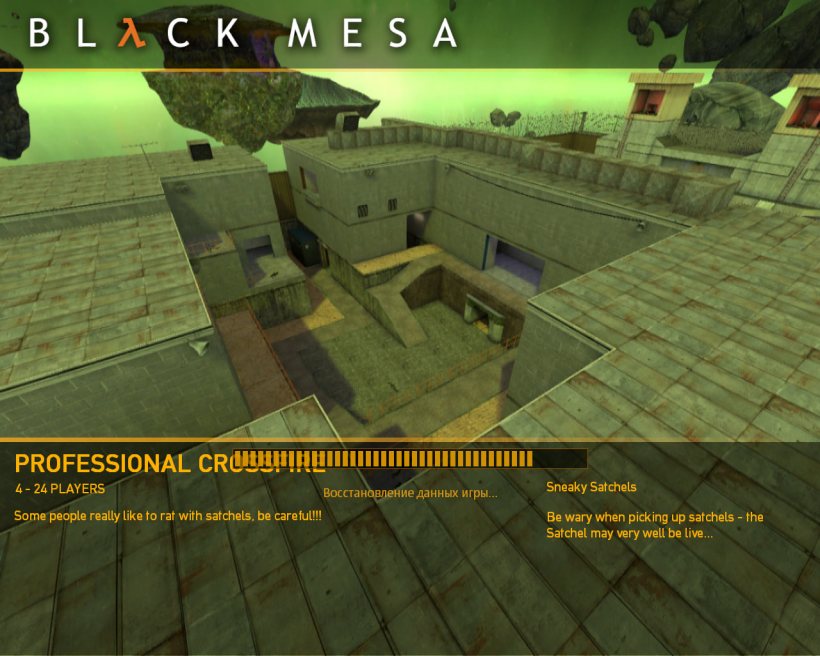
dm_crossfire example.

Making Loading Screens For Your Own Level
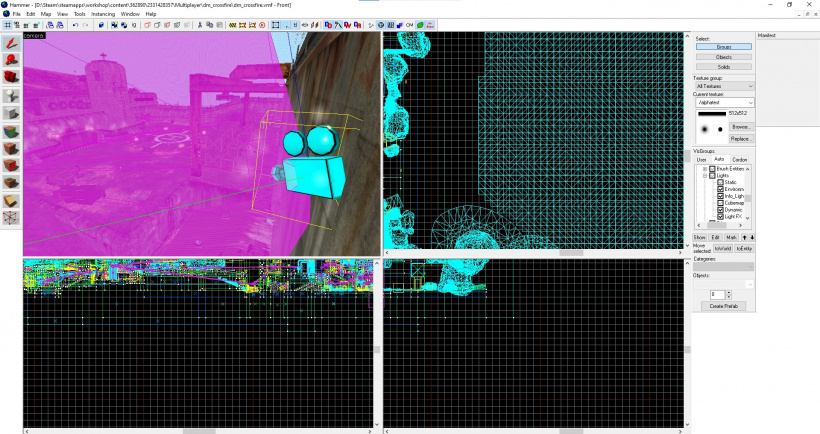
This entity indicates the position and facing direction at which the spectators will spawn and generate the images.
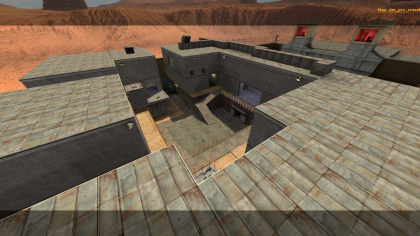
dm_crossfire example. Using Enhanced-Black-Mesa-FGD.

These cameras should be places somewhere nice that has a good view of important parts of the map - stuff you'd want to show off in the loading. This may require tweaking and playing around with.
After placing such camera, assign it an ID. The ID should never be repeated to avoid conflicts.
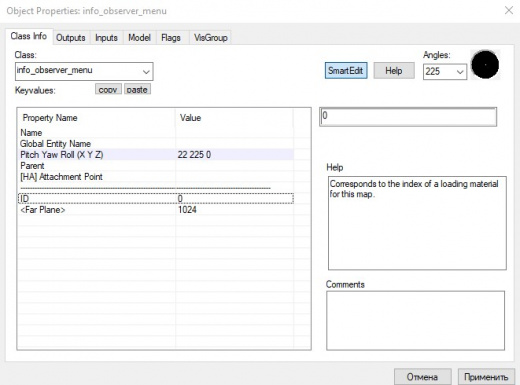
The ID property.

The ID also should be consistent (0, 1, 2, 3...), counting starts from 0. This is important because otherwise the game will not be able to choose the right spawn for the right image.
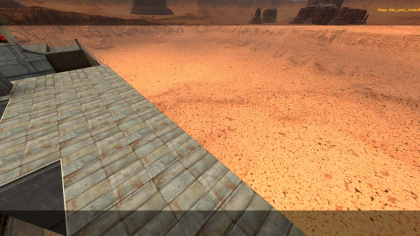
This is what will happen if you will not follow the sequence. As you can see, loading screen shows the towers, but the spectator spawns in other place.
Finalizing Level
Clean up your level and make it ready for publishing. Test it on bugs and other issues, compile it with all required parameters for VRAD, build cubemaps, etc.
Generate Images
The next step is to generate the images from the cameras, which is a simple process.
We need to open level in multiplayer game. With VGUI (which can be used with -oldgameui game launch parameter) you can use HOST AN ONLINE GAME button and choose your map name.

With Qt UI you can't choose your own, you need to press MULTIPLAYER button, then press HOST, then press LAUNCH, then open the developer console.

After this, enter in the console map YOURMAPNAME.

After map load, disable motion blur. You can disable it in graphics options, or just enter mat_motion_blur_enabled 0 (this is even better, because you will not need to wait save reload). This is not required, but then your pictures will look something like this.

The bug example. Thanks to SΛLO POWEЯ for bug cause found.

Now turn cheats on via sv_cheats 1 and then enter in the console bm_generate_menu_images. The last command will start images generating process. Your perspective will then jump between the cameras,
and generate the images. Do not touch computer mouse, do not close the console, do not do any other actions with the keyboard after the last command entering, this will break the generating process (for example, entities in some images may disappear).
One image generating takes 6-9 seconds, so the total duration of the process directly depends on the number of cameras.
You may note that camera shows wrong direction, don't worry, this is a visual bug, this does not affect the final result in any way.
The bug example.
The what right camera direction.


While images is generating - you can see some messages in the console. The first one is Moving to info_observer_menu (id = INTEGER), this means that the game switched to info_observer_menu with this ID and generating image from this camera. The next what you will see is Generating MYMAPNAME.tga, in fact the game does not create any .tga files on your computer, this is misprint, or the game creates and removes such file while generating .vtf file. You also can see
Unable to remove DISK:WAVE\steam\steamapps\common\black mesa\bms\materials\vgui\multiplayer\map_backgrounds\MYMAPNAME_INTEGER_widescreen.vmt!, this means that the game hadn't found the .vmt and created a new one.
After the end of the generating process you will see the next message in the console:
Done!
This server instance is now crippled. Restart the server to continue gameplay.
Only menu images for the current aspect ratio have been generated. Select a different aspect ratio, restart the engine and run "bm_generate_menu_images" again to complete the menu image set.
This means that you will need to do this process 3 times, ![]() Black Mesa supports aspect ratio 4:3, 16:9 and 16:10. You will have to change resolution to do it. The recommended resolutions for the screens are:
Black Mesa supports aspect ratio 4:3, 16:9 and 16:10. You will have to change resolution to do it. The recommended resolutions for the screens are: 1280 x 1024 for aspect ratio 4:3, 1920 x 1080 for aspect ratio 16:9, 1650 x 1050 for aspect ratio 16:10 (or 1920x1200 if your monitor supports it).
If you are lazy - you just can create copy the .vmt files and rename them. However, then your images in load screen will be distorted.
Example of how the distort looks.
All the .vtf and .vmt files are placed in materials\vgui\multiplayer\map_backgrounds folder, so, you can change them, if you need. For one image you will have 6 files, standard .vtf and .vmt, .vtf and .vmt with e the suffix _widescreen, and .vtf and .vmt with the suffix _widescreen_16_10.
Hook Images Up To Be Used By Source Engine
Now you have your images, you just have to hook them up to be used and understood by the engine. This process is simple - it's done via a text file located in the maps folder. Go to maps folder and create a .txt file, then rename file, it should use your map name. Open the it and paste this code. This is example of required code to make it properly working. The comments explain what each line does.
"MYMAPNAME" //Your .bsp file name.
{
"name" "My Cool Map Name" //The 'non mapper' name of the level.

"players" "INTEGER - INTEGER PLAYERS" //The number of recommended players. Depends on performance test results. Original Black Mesa Deathmatch maps uses '6 - 16 PLAYERS' or '4 - 24 PLAYERS'.

"Images" //Image materials to draw. Randomly chosen. Path relative to materials. Must point to a .vmt. Numbers must follow the sequence (counting starts from 0).
{
"0" "multiplayer/map_backgrounds/MYMAPNAME_0" //Camera ID and image here. Indicate only standard version, the engine itself will determine the required image for the required aspect ratio.
"1" "multiplayer/map_backgrounds/MYMAPNAME_1" //The same thing, but with camera 1 and image 1.
"2" "multiplayer/map_backgrounds/MYMAPNAME_2" //The same thing, but for camera 2 and image 2. You can have more than 3 images.
}

"Descriptions" //Map specific descriptions. Also randomly chosen.
{
"0" "This is my cool map description." //First description here.
"1" "Do you really read this ?" //Second description here.
"2" "42. We NEED Black Mesa SDK!!! Did you smell something ? Just a randomly descriptive description. Don't read this!" //Third description. You can have more than 3.
}
}
Important to note, it is not recommended to use long name (or description) for your level. The text may not overlap correctly with some part of the UI.
Example with aspect ratio 4:3.

How This File Works
The top line is the map's filename. This is needed so the engine knows what map to associate the information with. The text file itself should also have the same name as the map's filename. The "name" field is the "proper" name of the map, which will be displayed on the loading screen. The "players" field displays underneath the map's name, and is the recommended playercount for the map, for a good experience - not the min/max number of supported players. This is just an estimate from the mapper. For example, Gasworks can theoretically support up to 32 players (it has 24 spawns), but would not play well above 16 players, in the mapper's opinion. The next 2 fields, for "images" and "descriptions" are randomly selected by the game. You can have as many as you want and the game will randomly pick one. So let's say the game picks image "1", it will also pick description "1" to go with it. This functionality is not used by default in Black Mesa, but modders/mappers could take advantage of this to tailor descriptions for each unique image. The Black Mesa standard is to use 3 mages for each map (and 1 description), but the game can theoretically support as many as you want. We recommend 3, to stop filesize bloat from having too many images, while keeping variety by having a few images. Notice how each image/description has an ID number before it. This is how the game knows which info_observer_menu ID to fade the image to. The "0" "1" and "2" fields correspond to the number of the info_observer_menu entity you placed in the map earlier. So in this example, when the menu decides randomly to display the image "dm_gasworks_2", it knows to fade to the camera ID "2" when it has finished loading.
Chessboard Texture
If you added the .txt file while the game was open, you may note this chessboard texture, instead of your image.
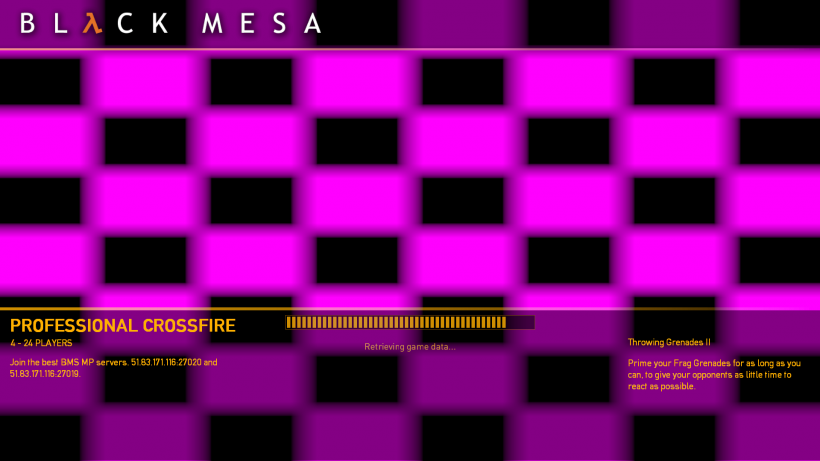
An example.

If you are sure that the .vmt files was specified correctly - quit your game and launch it again. This bug most often appears because the game did not load some of the files. If the bug appears, make sure all the necessary files are in the folder, if no, you may have to repeat the process.
Packing Files
Voila! You have created a nice flashy loading screen effect.
If you are general user and going to just publish your level to the workshop, you can just push all files in one folder, create VPK files and publish it.
If you are owner of your server(s) - you need to pack the images and the .txt file into BSP. This is necessary so that users, when connecting into your server, download only one file, without wasting time on the rest.
Use BSPZIP for this, or use GUI tools such as Compile Pal, Pakrat, VIDE.
Here is a guide how to pack files, using VIDE.
Now, your level is ready! You can now add your level into your server(s), don't forget to add it in mapcycle.txt.
External links
- This guide is an expanded version of the original (created by the developers) guide.