Half-Life Model Viewer (Source)
Valve ship their own version of ![]() Half-Life Model Viewer (HLMV) with the Source SDK specifically for viewing models created for the
Half-Life Model Viewer (HLMV) with the Source SDK specifically for viewing models created for the ![]() Source engine. It appears to be based on the original HLMV 1.22 codebase but re-worked to use Source's own 3D viewport and material system.
Source engine. It appears to be based on the original HLMV 1.22 codebase but re-worked to use Source's own 3D viewport and material system.
It's unclear under what license it is used/distributed but Source HLMV still provides a credit and link to chUmbaLum sOft in its About menu. Several features of the Source HLMV have been copied from JHLMV.
Each iteration of the Source engine has a slightly updated version of the model viewer giving access to newer or enhanced features of the respective engine.
For the Source HLMV settings such as rendering options and background color is saved in the Windows registry and stored on a per model basis (![]()
HKEY_CURRENT_USER\Software\Valve\hlmv). Unfortunately, there doesn't appear to be a way to set the standard options.
To launch HLMV, go to ...\common\game-name\bin, and run HLMV.bat. On some games (such as Left 4 Dead and later), you need to install and launch the Authoring Tools/SDK, then click "Model Viewer".
Source HLMV Features
- Normal mapping
- Specular mapping
- Generating QC code for Hitboxes, Physics, Attachments, IKRule, Event
- Visually displaying vertex weighting.
- Animation blending
- Pose parameters
- LOD models
- Games that have LOD are:
 Portal,
  Portal 2,
  Portal: Revolution,
  Half-Life 2,
  Half-Life 2: Episode One,
  Half-Life 2: Episode Two,
  Half-Life 2: Lost Coast,
  Half-Life 2: Deathmatch
- Flex animations
Keybinds
 drag in the center of the viewport will orbit the camera.
 drag on the edge of the viewport will roll the camera.
- Ctrl+
 drag will orbit the light source.
  drag will dolly the camera back/forward.
- ⇧ Shift+
 drag with pan the camera left/right up/down.
 - F5 will refresh the textures if they have been recompiled.
- U will toggle UV chart view
- T will toggle textured view.
 Note:Normal mapping for textures is not checked on by default.
Launch Options
| Argument | Description |
|---|---|
| -screenshot | Takes a screenshot of the given model and writes it to a TGA file, requires the path of the model to be given |
| -dump | Writes to the console (stdout) specifying if the model is translucent or has material proxies |
| -noSteamdDialog [sic] | Removes the old File Explorer browser when trying to open a file from the 'File' menu. |
| -tempcontent | Attempts to add modname_tempcontent as a search path (e.g. hl2_tempcontent) |
| -olddialogs | Adds the file explorer browser back to the 'File' menu, only works on versions that have it disabled by default. |
| -basedir | Sets where to search for the dlls, only for Xbox 360 |
| -novconfig | Don't launch vconfig if no game was found |
Usage
If you are starting from scratch, you can use HLMV to create a base set of hitboxes, and then modify them to fit your models needs. This page will take you step by step through the process.
Auto Generating hitboxes
The first thing we'll do is get HLMV to create a set of hitboxes for us. When it does this it will create a hitbox for every bone that has geometry skinned to it, and will fit the hitbox around that geometry.
- Open HLMV and load your model. From the Render tab press
CTRL+Hor select theHit Boxescheckbox to view the hitboxes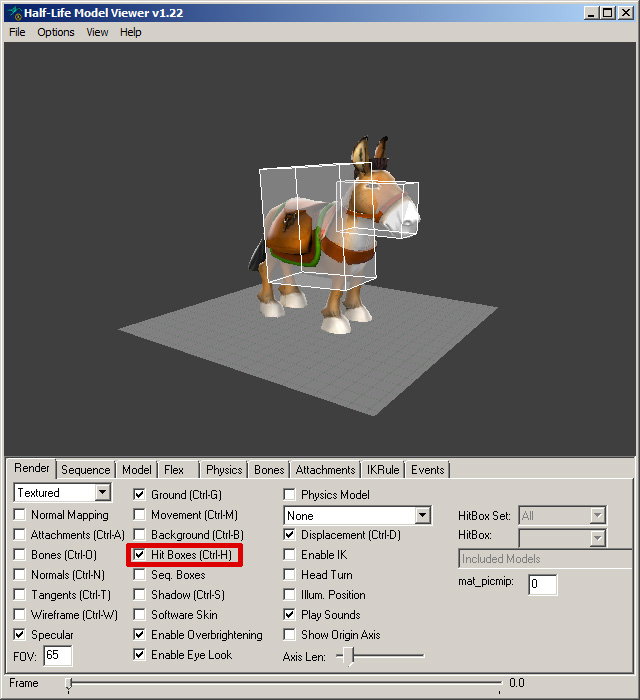
- Select the
Bonestab. If you did not create hitboxes in your.qc/.qcifile(s) then theAuto-Generate Hitboxescheckbox should be ON. If you have specified some hitboxes, turning on the auto-generation will do nothing.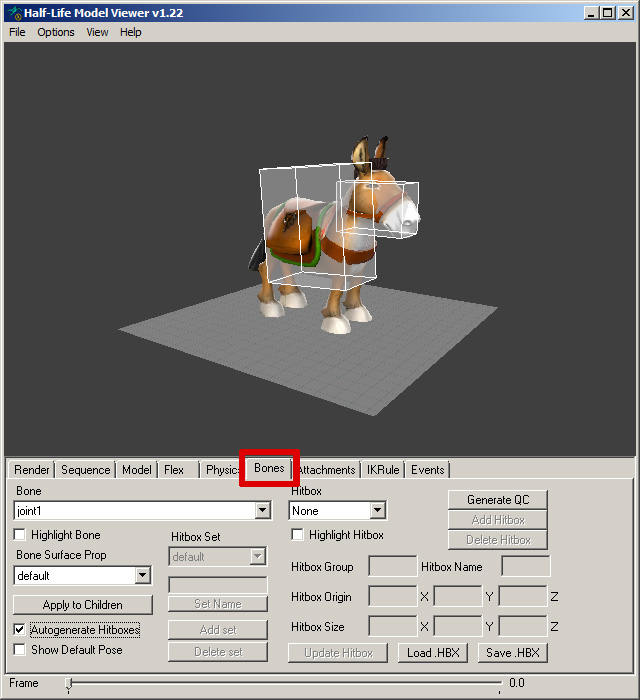
- With the auto-generated hitboxes visible, click
Generate QCbutton. This will copy the .qc commands needed to create the auto-generated hitboxes into your clipboard.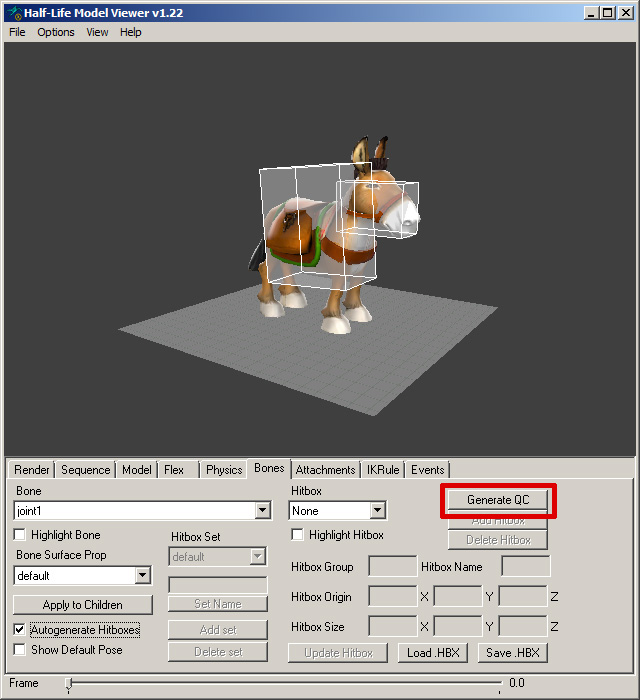
- Open your model's
.qcor create a newhitbox.qcifile with your favorite text editor.CTRL+Vto paste the autogenerated .qc lines into the file, save it, and recompile your model. It's a good idea to format the pasted commands into something more legible, especially if you plan on modifying the hitboxes. It should look something like this:
// .qc block generated by HLMV begins.
$surfaceprop "default"
$hboxset "default"
$hbox 0 "head"	   -14.83  -11.24  -23.58    32.59   11.24    9.46 "head"
$hbox 0 "spine1"	   -33.32  -20.38  -40.78    33.32   20.38   40.78 "spine1"
// .qc block generated by HLMV ends.
Creating new hitboxes and hitbox sets
The easiest way to create new hitboxes or hitbox sets is to simply cut/copy & paste the lines in the .qc that refer to a hitbox on the bone you'd like to add the hitbox to.
You can create a new hitbox set by adding $hboxset "your_set_name_here" and then cut/copy & pasting the .qc commands for an existing hitbox below.
Once you've finished adding the all the hitboxes and sets you need, save the file and recompile the model.
Modifying your hitboxes with HLMV
Once you have all of your hitboxes and sets added, it's much faster to use HLMV to edit the scale and position of them. You can do it directly in the .qc file, but it will require recompiling the model many times to review your changes and thus is a much more inefficient way of accomplishing the same thing.
- Open your model in HLMV, turn the hitboxes on, flip over to the
Bonestab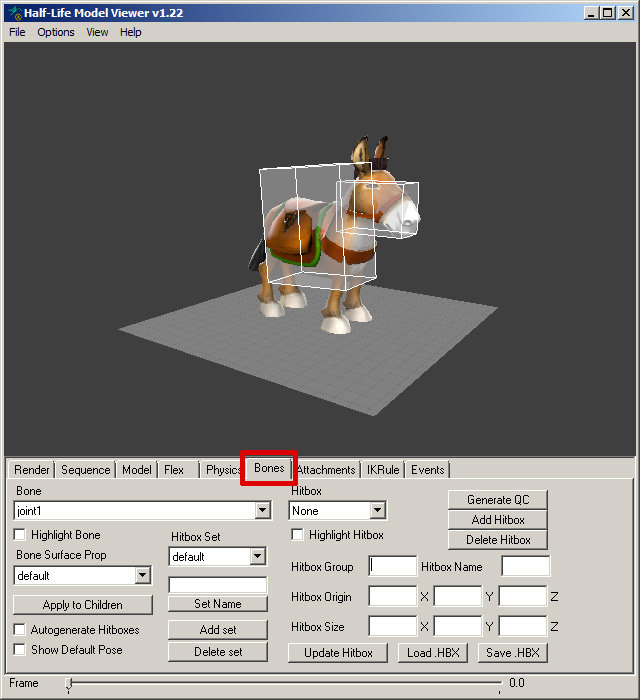
- Select the set that contains the hitbox you would like to edit, and then the joint it is attached to. You'll see the boxes describing the hitboxes' position and size fill out.
 Note:While this info represents what is defined in the .qc, it is presented differently. The .qc script defines the 2 opposite corners of the hitbox in relation to the bones pivot. HLMV converts that info into a more user friendly
 sizeandorigin, or offset if you will, in relation to the bone's pivot.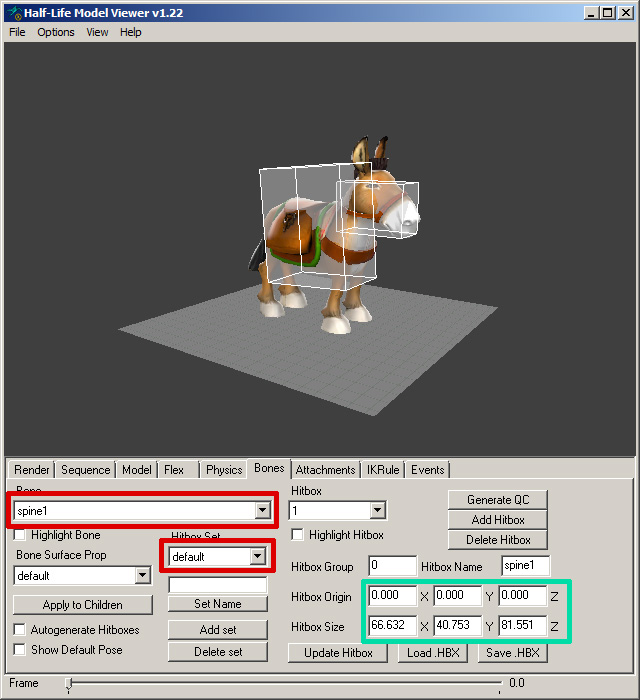
- Edit the
OriginandSizeblocks and press theUpdate Hitboxbutton to see your changes.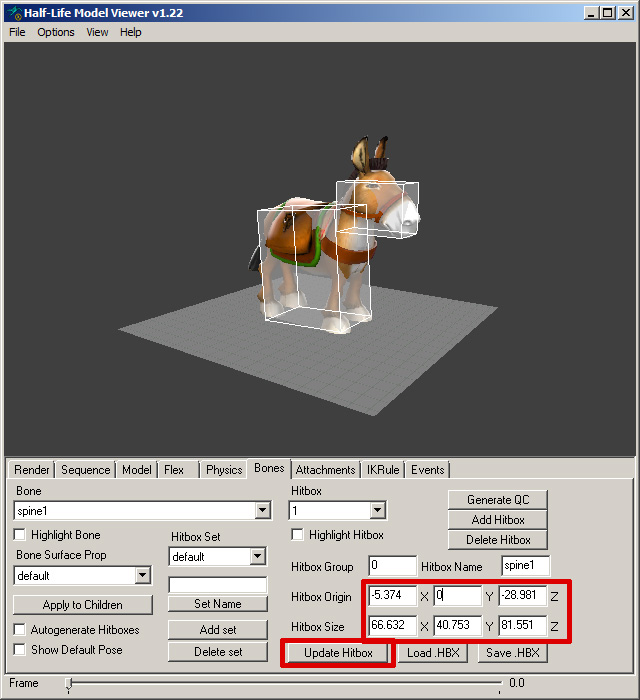
- Repeat until all of the hitboxes in all of your sets are looking good.
- Click
Generate QCto copy these new settings into your clipboard again and then replace your old hitbox info with it. Recompile your model. High-five someone.
Issues
- If you find that HLMV is missing textures, such as floor, background, and cubemap, extract a set from a working SDK. Find them at
materials/hlmv/(e.g., in hl2_misc_dir.vpk for example). - HLMV has had a very wobbly history. Without warning it sometimes no longer works because of changes/updates done to the Source SDK.
- Any
.jpgmodel thumbnail made using Photoshop or ImageReady will crash HLMV. JPGs must use progressive encoding. - The normal map flag can be tricky to switch on depending on your graphic card.
- Wireframe mode was broken shortly since after the release of the Source SDK, rendering the default texture (purple/black squares) over the model. To add injury to the insult, the flat shaded mode that provided some of the same functionality, was removed between Episodes One and Two. In later engine builds, the issues with wireframe mode has been resolved.
- When selecting a submodel category, the second submodel is displayed in the 3D view, but the name of the first submodel is still being displayed as the selected in the dropdown menu (also present in Goldsrc versions).
- When moving from folder to folder the scroll bar doesn't reset.
- Texture resolution on models may be displayed at 1/4 of its actual resolution (Mipmap 1) on NVIDIA graphics cards.
- When viewing models using materials that use "$cloakPassEnabled" "1" the triangle count will double what it actually is due to a calculation bug.
- Using Options > Make Screenshot... doesn't seem to produce effective screenshots.
- Since the Steampipe update, opening folders with the
File -> (Steam) Load model...browser will give an error if the corresponding folder does not exist in the game's mod directory. A workaround for this is create the same folders in your game directory with the same structure as the game's VPK files. - Solution to above problem PowerShell script to create missing folders
See also
- Prop Gallery
- Modeling
 HLMV++ - an alternative to HLMV for several Source games. It also adds a number of brand new quality of life fixes and features.