Installation for Other Games
![]() Hammer++ Це дуже потужний інструмент для мапотворців, який вирішує цілу дюжину проблем стандартного Valve Hammer Editor та додає ті фішки та інструменти, які важливі, але яка Valve до 2013ого року не додала в жодну з ванільних версій. Однак самі розробники Гамер ++ зробили офіційні випуски тільки для Counter-Strike: Source, Source 2013 Singleplayer, Source 2013 Multiplayer, Team Fortress 2 та Counter-Strike: Global Offensive. Слава богу, що ви можете своїми руцями налаштувати сам Гамер ++ під такі ігри, без жодних проблем(можливо) Portal 2, Left 4 Dead 2, Black Mesa, І не тільки! Майже все можна налаштувати під ігри, використовуючи різні випуски Гамер++ для різних гілок, а саме:
Hammer++ Це дуже потужний інструмент для мапотворців, який вирішує цілу дюжину проблем стандартного Valve Hammer Editor та додає ті фішки та інструменти, які важливі, але яка Valve до 2013ого року не додала в жодну з ванільних версій. Однак самі розробники Гамер ++ зробили офіційні випуски тільки для Counter-Strike: Source, Source 2013 Singleplayer, Source 2013 Multiplayer, Team Fortress 2 та Counter-Strike: Global Offensive. Слава богу, що ви можете своїми руцями налаштувати сам Гамер ++ під такі ігри, без жодних проблем(можливо) Portal 2, Left 4 Dead 2, Black Mesa, І не тільки! Майже все можна налаштувати під ігри, використовуючи різні випуски Гамер++ для різних гілок, а саме:
csgo_legacy beta branch installed for | Гра | Engine branch (game) | Hammer++ Version | Notes |
|---|---|---|---|
| Alien Swarm engine branch | Garry's Mod | Errors about reading particles, use mount.cfg to mount Alien Swarm data.structure_seal, use a normal brush to close your maps.If compiled it forces the map to be fullbright even if there are lights. | |
| Source 2013 Singleplayer | Source 2013 Singleplayer | Configure Hammer for Half-Life: Source, then install to game's bin folder normally.
| |
| Team Fortress 2 branch | Team Fortress 2 | Configure Hammer for Half-Life: Source, then install to game's bin/x64 folder normally.
| |
| Team Fortress 2 branch | Team Fortress 2 | Install to game's bin/x64 folder normally.
| |
| Left 4 Dead engine branch | L4D2 | L4D2 Hammer++ appears fine on Left 4 Dead, except when compiling the map. Once compiled and joining the map, an error will appear and display: STEAM validation rejected and unable to interact with the menu after pressing ok. | |
| L4D2 | Identical to | ||
| Strata Source | Garry's Mod | Need retest using GMOD version. [Template:Dictionary/Confirm/uk] | |
| Alien Swarm engine branch | Garry's Mod & Portal 2 | Need retest using GMOD version. Portal 2's compile tools also work. Hammer++ shouldn't be installed in SFM's bin folder, but works when pointed to from another game.
| |
| Source 2013 Multiplayer | Source 2013 Multiplayer | Setting up Hammer | |
| Xengine | Garry's Mod | Follow this guide to make it working. Check out issues in relevant subpage. A separate version for Black Mesa is not planned. | |
| Source 2007 | Source 2013 Singleplayer | Install to bin folder and add a game configuration pointing to the mod; the | |
| Source 2013 Singleplayer | Source 2013 Singleplayer | Install to game's bin folder normally.
Check out the issues below in the relevant subpage. | |
| Source 2013 Multiplayer | Source 2013 Multiplayer & Team Fortress 2 | Hammer++ shouldn't be installed in PVKII's bin folder, but works when pointed to from another game.
| |
| Source 2009 | Source 2013 Singleplayer | Requires modification to Postal 3's FGD file(s); Recommended to use Postal 3's compilers instead; Some Hammer features from Postal 3's are missing like 'prefabs' (not to be confused with Prefab on Hammer);
Requires Source SDK Base 2013 MP/SP to be installed; Requires folder linking inside SDK Base's | |
| Source 2013 Singleplayer | Source 2013 Singleplayer | Install to game's bin folder normally.
| |
| Strata Source | Garry's Mod? | Check out the issues on the relevant subpage. Support by developers is not planned, and usage is strongly discouraged; some Hammer++ features will be added to | |
| Team Fortress 2 branch | Team Fortress 2 | Install to game's bin/x64 folder normally.
| |
(including Counter-Strike: Source v34, Half-Life 2 Old Engine, etc...) |
Source 2006 | Source 2013 Singleplayer | See Installation for Source 2006 games. Don't forget that Source 2006 games will have less textures (including tools textures such as 2D Skybox), differences in LDR + HDR lighting compared to Source 2007 and later (including Hammer++ lighting preview). So remember to run both Source 2006's Hammer and Hammer++ and check see if the same texture exists in Texture Browser on Source 2006's Hammer before adding it to the map. |
| Source 2013 Singleplayer | Source 2013 Singleplayer | Install to game's bin folder normally.[Template:Dictionary/Confirm/uk]
| |
| Source 2013 Multiplayer | Source 2013 Multiplayer | Install to game's bin folder normally.[Template:Dictionary/Confirm/uk]
This build uses | |
| Counter-Strike: Global Offensive | Counter-Strike: Global Offensive | Install to game's bin/win32 folder normally.[Template:Dictionary/Confirm/uk]FGD must be modified to replace soundscape and sky KVs with string.As CSGO version of Hammer++ is frozen on an older version, it may be desirable to use |
Ці вирішення задачі з встановлення, а також фотографії були взяти з Туть: this steam guide Зроблено цією людиною Erin-Rose-Webs.
Встановлення Гамеру ++
Template:ModernNote Template:ModernWarning
Список Завантажуємого
- - https://ficool2.github.io/HammerPlusPlus-Website/download.html
- - https://schinagl.priv.at/nt/hardlinkshellext/linkshellextension.html#download (Це не обов’язково, але значно спростить процес)
- - версія Hammer++ для гри (Дивіться вище, Portal 2 використовує CS:GO)
Встановлення Hammer++ у підтримуваній грі
Наступним кроком є встановлення Hammer++ у файли. Розпакуйте папку <директорія>bin</директорія> з архіву в папку Counter Strike: Global Offensive у папці <директорія>steamapps/common</директорія>. Тепер перейдіть до папки <директорія>bin</директорія> і запустіть Hammer++. Тепер ми створимо нову конфігурацію, спрямовану на ресурси Portal 2. Ось тут все може ускладнитися. Тепер ви запустите виконуваний файл <директорія>hammerplusplus.exe</директорія>. Ви отримаєте спливаюче вікно з повідомленням про відсутність конфігурацій. Обов’язково натисніть «Ні», інакше ви будете перенаправлені до іншої статті на цій вікі. Після натискання «Ні» ви побачите екран, схожий на той, який показано нижче, але повністю порожній:
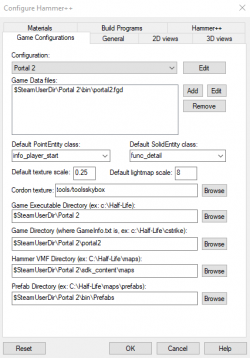
Потім скопіюйте інформацію, яку бачите вище, у відповідні поля. Якщо ваша гра знаходиться в окремій папці, ніж звичайний каталог Steam, вам доведеться замінити <директорія>$SteamUserDir</директорія> на повний каталог файлів. Тепер натисніть «ОК», щоб закрити та зберегти цю інформацію. Ви отримаєте два спливаючі вікна з повідомленням про те, що ця інформація не оновлюватиметься до перезапуску Hammer++, але вони не важливі, тому просто натисніть «Ok» на обох. Після цього ви наполовину закінчили налаштування Hammer++.
Тепер для компіляції карти нам потрібно визначити програми збірки. Перейдіть до Інструменти>Параметри>Створення програм і скопіюйте інформацію нижче:
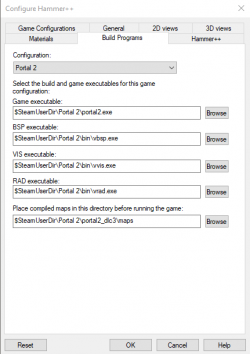
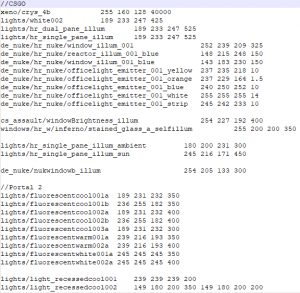
Після цього натисніть «Застосувати», а потім натисніть «ОК», щоб зберегти зміни. Потім закрийте Hammer++. Тепер нам потрібно буде перенести дані про освітлення Portal 2 у CS:GO. Оскільки підсвічування порталу 2 відрізнялося від підсвічування CS:GO, нам потрібно визначити підсвічування порталу 2 у каталозі CS:GO l. Відкрийте lights.rad Portal 2, розташований у Portal 2/portal2, за допомогою будь-якого текстового редактора та скопіюйте весь його вміст. Потім перейдіть до файлу вогнів CS:GO і вставте вміст Portal 2 внизу файлу. Це має виглядати приблизно так (без коментарів):
Ви завершили налаштування Hammer++! Однак якщо ви завантажите нову карту, ви побачите, що багато ваших власних моделей і текстур відсутні. Це тому, що програма шукає в каталозі CS:GO необхідні файли, а потім не знаходить їх і представляє вам відсутню модель/текстуру. Щоб виправити це, нам потрібно буде вказати в gameinfo game <директорія гри>/portal/<назва архіву vpk без 00,dir,_ просто назва>.vpk game <Директорія гри>/portal.
Adding custom content
This is where things can get complicating. You can copy-paste all your custom files, but that can bloat your hard drive more than it needs to. Instead, it can be more space effective to create symbolic links. This is where the Link Shell Extension can help, but it is possible to use command prompt.
First, navigate to Portal 2\portal2\Gameinfo.txt and add all the Portal_dlcx folders as well as all your custom folders following the format seen below:
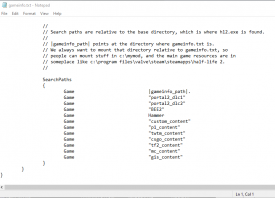
We do this because CS:GO's engine, and in turn Hammer++'s engine, do not search automatically for the dlcs folders, so we have to manually list them.
Link Shell Extension
Go to your base Portal 2 directory and Ctrl+Left click all your custom folders and dlcs folders and right click. Select "Choose link source" to start creating links. Then, go to your CS:GO directory and right click an empty space. Hover over "Drop link as" and select "Symbolic Links".
Command Prompt Method
Press the Windows key on your keyboard and type "cmd". Right click "Command Prompt" and click "Run as Administrator." A User Account Control prompt should pop up, press "Ok".
Template:ModernNote
Now, type something similar to this:
mklink /j "C:\Program Files (x86)\Steam\steamapps\common\Counter-Stike Global Offensive\portal2_dlc1" "C:\Program Files (x86)\Steam\steamapps\common\Portal 2\portal2_dlc1"
Template:ModernTip
The first directory is the name of the folder the link will be named. The second directory is the name of the folder you are linking to. To simplify, by running this command you are creating a folder in your CS:GO directory called portal2_dlc1 that, when you open it, will show all the contents of the same folder, but in your Portal 2 directory. By creating this link you are not actually copying the files in those folders, you are essentially tricking Hammer++ into thinking that it is accessing a folder in CS:GO's directory when it is actually seeing files located in Portal 2's directory. This also works across drives, so you can have symbolic links on your D: drive that point to folders in your C: drive.
You will now repeat this process for every custom folder you use, including the dlc folders.
Final Result
After you make links to all the folders, your CS:GO folder should look similar to this, just with all your custom folders instead:
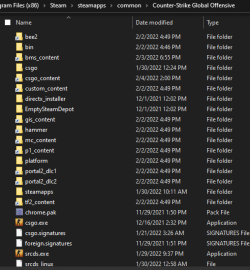
Now to fix the Hammer models, open the Counter-Stike Global Offensive\platform folder and delete the materials and Models folder and replace them with Symbolic Links to their respective folders in the Portal 2\platform folder. It should look similar to this:
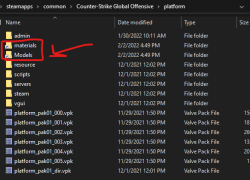
Template:ModernNote
After you do this, open Hammer++ again. Now, you should be set! To get a list of all new features, try checking out the Hammer++ website and its page on this wiki. For general Hammer assistance, check out this article.
External Links
Installing Hammer++ For Portal 2 (original guide)
Hammer++ Website
Link Shell Extension Website
