Hammer++/Docs/Installation for Other Games
![]() Hammer++ is a powerful mapping tool that solves many issues that the
Hammer++ is a powerful mapping tool that solves many issues that the ![]() Valve Hammer Editor introduces, and adds some much needed features that useful to every mapper, however there is no version of Hammer++ that directly supports the
Valve Hammer Editor introduces, and adds some much needed features that useful to every mapper, however there is no version of Hammer++ that directly supports the ![]() Portal 2 engine branch or
Portal 2 engine branch or ![]() Left 4 Dead engine branch out-of-the-box. Thankfully, there is a way to configure a Hammer++ configuration, using the
Left 4 Dead engine branch out-of-the-box. Thankfully, there is a way to configure a Hammer++ configuration, using the ![]() Counter-Strike: Global Offensive branch, to use
Counter-Strike: Global Offensive branch, to use ![]() Portal 2 or
Portal 2 or ![]() Left 4 Dead 2 assets and entities.
Left 4 Dead 2 assets and entities.
This method and accompanying pictures were taken from this steam guide by the user Erin-Rose-Webs.
Installing Hammer++ for Portal 2
Step 1 is downloading the files needed. Go to the Hammer++ website and navigate to the download section. Download the CS:GO version.
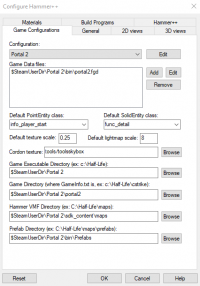
Next, make sure you have CS:GO downloaded on your computer. It is not needed to launch the CS:GO SDK, nor is it needed to ever launch the game, you just need the files on your computer. There is also an optional program that can make a process in the future easier, however it is not needed. If you wish to download it, here is the link: link shell extension. The next step is actually installing Hammer++ into the CS:GO files. Extract the bin folder in the archive into the Counter Strike: Global Offensive folder in your steamapps/common folder. Now, go into the bin folder and launch Hammer++. Now, we will create a new configuration pointed at the Portal 2 assets. Now, this is where things can get complicated. You will now launch the hammerplusplus.exe executable. You will get a popup that says that there are no configurations. Make sure to click no, otherwise you will get redirected to another article on this wiki. After clicking no, you will see a screen that is similar to the one seen below, but just completely blank:

Then, copy the information that is seen above into the respective boxes. If your game is in a separate folder than your normal steam directory, you will have to replace $SteamUserDir with the full file directory. Now click "Ok" to close and save this information. You will get two popups that say how this information will not update until Hammer++ restarts, but they are not important so just click "Ok" on both. With this completed, you are halfway done with configuring Hammer++.
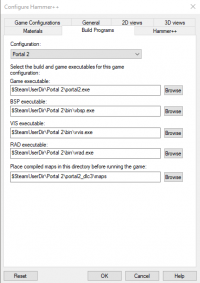
Now, for compiling the map, we need to define the build programs. Go to Tools>Options>Build programs and copy the information below:

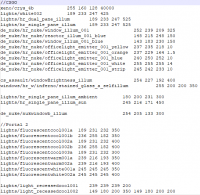
After you do this, press "Apply" then press "Ok" to save your changes. Then, close Hammer++. Now, we will have to bring over Portal 2's lighting data into CS:GO. Because Portal 2 had different texlights compared to CS:GO, we need to define portal 2's lights in the CS:GO directory l. Open Portal 2's lights.rad located in Portal 2/portal2 with any text editor and copy all of its contents. Then, go to CS:GO's lights file and paste Portal 2's contents at the bottom of the file. It should look similar to this (comments not needed):

You have now completed the setup of Hammer++! However if you load a new map you will find that many of your custom models and textures are missing. This is because the program is searching through the CS:GO directory for the necessary files and then it doesn't find them it presents you with a missing model/texture. To fix this, we will need to create symbolic links.
Adding custom content
This is where things can get complicating. You can copy-paste all your custom files, but that can bloat your hard drive more than it needs to. Instead, it can be more space effective to create symbolic links. This is where the Link Shell Extension can help, but it is possible to use command prompt. The command prompt method can be found here: Symbolic Links.
First, navigate to Portal 2\portal2\Gameinfo.txt and add all the Portal_dlcx folders as well as all your custom folders following the format seen below:
File:HammerppSetup3.png
We do this because CS:GO's engine, and in turn Hammer++'s engine, do not search automatically for the dlcs folders, so we have to manually list them.
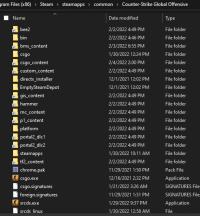
Next, go to your base Portal 2 directory and Ctrl+Left click all your custom folders and dlcs folders and right click. Select "Choose link source" to start creating links. Then, go to your CS:GO directory and right click an empty space. Hover over "Drop link as" and select "Symbolic Links". This will make your CS:GO folder look similar to this, just with all your custom folders instead:

After you do this, open Hammer++ again. Now, you should be set!
More info coming soon, please refer to the original steam guide while information is lacking.
