Ru/Indicator Lights (Portal 2)
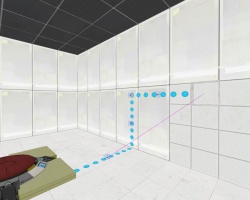
Индикаторные огни - световые дорожки в тестовых камерах, указывающие на взаимосвязанные энтити, например, кнопка и раздатчик. В неактивном состоянии огни имеют синий цвет, в активном - оранжевый.
Создание индикаторных огней
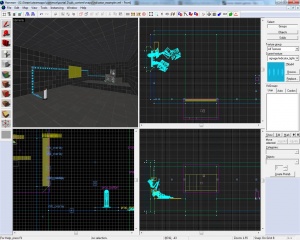
Данное руководство предполагает наличие базовых знаний Hammer.
1) В своей карте создайте две энтити, которые будут взаимодействовать. Это могут быть как сверхпрочная сверхударная сверхкнопка :), открывающая выходную дверь, так и кнопка-пьедестал, которая запустит пневматическую трубу, из которой потечёт гель, давая игроку на один шаг приблизиться к решению. То, что произойдёт, решаете вы, но всегда следом за активируемой штукой помещайте энтити env_texturetoggle — это поможет нам сменить цвет индикаторных огней в дальнейшем, а также напомнит, где вы разместили энтити - карта станет более понятной.
2) Выберите текстуру огней в браузере текстур, для данного руководства: "signage/indicator_lights/indicator_lights_floor" (легко находится, если ввести "indicator" в поле фильтра).
A1. signage/indicator_lights/indicator_lights_floor
A2. signage/indicator_lights/indicator_lights_wall
B1. signage/indicator_lights/indicator_lights_corner_wall
B2. signage/indicator_lights/indicator_lights_corner_floor
Template:Note:ru
3) Выберите инструмент Overlay в Hammer, и разместите оверлеи огней там, где вам нужно. Функционально нет разницы, как они размещены, хотя между взаимодействующими энтитями желательно провести логичную линию, обычно это кратчайший путь между двумя энтитями; не забудьте, что в некоторых местах кратчайший путь идёт по стене. Кроме того, в целях согласованности с индикаторами в картах Valve, на сгибах световых дорожек (но не в переходах от пола к стене, например) в углу помещайте signage/indicator_lights/indicator_lights_corner_wall, также, как и в начале у активатора (но не активируемого объекта).
Длина одной световой ленты - 4 кружка, но иногда вам может потребоваться другое их количество. К счастью, вы можете изменить свойства оверлея, чтобы удлинить его, а не использовать несколько оверлеев. Это можно сделать, отредактировав ключевое значение U Start или U End в окне свойств оверлея. Другой способ - растянуть оверлей 'физически' в одном из двухмерных видов — но сначала убедитесь, что флаг 'Texture Lock' снят. Помните, что индикаторные огни никогда не проходят между плиток! Template:Tip:ru
4. Выберите размещённые вами оверлеи (ТОЛЬКО те пометки, которые вам нужны) и назовите их одинаково. В данном руководстве мы используем "indlights_1". Затем откройте свойства помещённой вами env_texturetoggle, и введите то же имя в поле Target Brush(es). Теперь назовите env_texturetoggle "texturetoggle_lights_01"
5. Выберите энтити activator и откройте вкладку её выходов. В данном руководстве используется энтити простой кнопки, поэтому все выходные параметры в таблице будут соответствовать ей. Вам нужно только добавить следующие два входа к вашему активатору:
My Output > Target Entity Target Input Parameter Delay Only Once 
OnPressed texturetoggle_lights_01 SetTextureIndex 1 0.00 No 
OnButtonReset texturetoggle_lights_01 SetTextureIndex 0 0.00 No
В общем, теперь по нажатии кнопки texturetoggle_lights_01 изменит оверлеи, подключенные к ней, на их альтернативный "вариант", а именно на соответствующую оранжевую текстуру. После этого кнопка сбросит "вариант" на обычный синий цвет.
Готово! Индикаторные огни должны работать!
Рамка с галочкой
A checkmark box is a binary indicator, meaning it only has off and on states. It is used to indicate the operated entity 'active state' - a blue 'X' mark when inactive and an orange checkmark when active.
1. Create a prop_static with the following properties:
Property Name Value World Model models/props/sign_frame01/sign_frame01.mdl
Align it so it will be at the end of your light path.
2. At the exact same spot, with the exact same "Pitch Yaw roll" place a prop_indicator_panel. The best way to do this is to shift-drag the prop_static to the same place by moving it a unit to one direction and returning it.
models/props/sign_frame01/sign_frame01.mdl is needed as well.3. Fill the prop_indicator_panel's fields as desired. Give the entity a name, and make sure it is linked to the overlay not the env_texturetoggle.
Property Name Value Name checkmark_indlights_1 Indicator Lights indlights_1
4. Add to the activator entity another two outputs:
My Output > Target Entity Target Input Parameter Delay Only Once 
OnPressed checkmark_indlights_1 Check 0.00 No 
OnButtonReset checkmark_indlights_1 Uncheck 0.00 No
So now you have an operating checkmark box as well, don't forget to link the activator to the activated entity too.
Таймер в рамке
A checkmark timer acts almost as the checkmark box: showing the active state of the operated entity. However, it shows that the operation will last a limited amount of time. It is usually advised that the activator would be a simple button because when activating a floor button the player expects the operation to be permanent until they step off the button.
Before placing a timer think if you really need it, and if so, how much time is the timer's active state going to be? You don't want the task to be impossible, you just want to add an element of stress to the puzzle.
1. Again, place a prop_static with the following properties:
Property Name Value World Model models/props/sign_frame01/sign_frame01.mdl
Align it so it will be at the end of your light path.
2. Place a prop_indicator_panel at the exact same spot as the sign_frame01.mdl. Now you have to ask yourself: "how much time do I want the operated entity to be active?". For this tutorial I picked 8 seconds, so all I have to do is to add the following properties:
Property Name Value Name checktime_indlights_1 Timer Duration 8 Start visible? Yes Is a timer Yes Is checked No Indicator Lights indlights_1
3. Add a button with the following properties:
Property Name Value Name button_01 Delay Before Reset 8 Play timer sound? Yes Prevent fast reset? No
Setting the time in the 'Delay Before Reset' field will tell the button how much time the timer sound should be played. Setting the 'Prevent fast reset?' to 'No' allows to re-press the button at any given time during the timer duration. This will allow the player to restart the timer when he understands he acted to slowly without having to wait for the timer to reset on its own.
4. The last thing that needs to be done to make this timer operating is to add this single output in the Output tab:
My Output > Target Entity Target Input Parameter Delay Only Once 
OnPressed checktime_indlights_1 Start 0.00 No
The timer will reset automatically when the time runs out. However, you can still add a 'Stop' command to stop the timer on it's current value or to send a 'Reset' output to reset it manually.
Индикаторные огни старой лаборатории
Select a texture for the lights in the texture browser (Easily found by typing "neon" in the filter bar).
In this tutorial we'll be using "signage/indicator_lights/indicator_neon_straight"
As you might have noticed the default texture size of each light is a lot bigger than what it should be. To simply fix it check the 'Texture Lock' key, and in one of the 2D views shrink the overlay until it's a 16x16 one light texture. Now go back to Step 2 to finish the indicator line and triggers.
Рамка с галочкой старой лаборатории
Create a 32Wx2Lx32H block brush textured with tools/toolsnodraw. Place a signage/indicator_lights/indicator_neon_check overlay on the front, and texture the sides with plastic/plastickwall004a_dirty. Make sure your 'Texture Lock' key is checked and shrink the overlay to fit the brush. Move this brush so it is aligned with your indicator lights.
Tie the brush to a func_brush entity and give it the same name as your info_overlay entities.
Everything should be working now.
Завершение
To add a neon light-up flicker sound, simply place a ambient_generic on your checkmark box with the following properties:
Property Name Value Name <indicator_light_name>_sound Sound Name VFX.OGSignFlicker
Make sure, in the flags tab, that it is NOT looped, and add another Output to your activator:


