TF2/Setting the cap point layout: Difference between revisions
< TF2
Jump to navigation
Jump to search
Brandished (talk | contribs) (will the toc show up this time?) |
Brandished (talk | contribs) m (toc only shows up with 4 headings) |
||
| Line 1: | Line 1: | ||
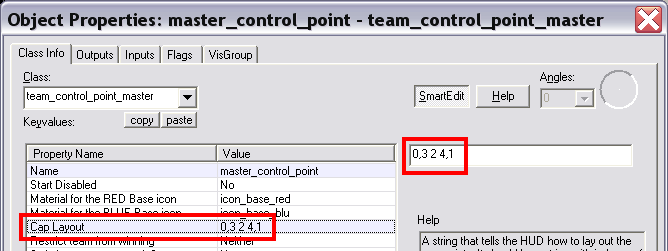
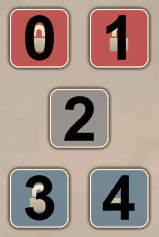
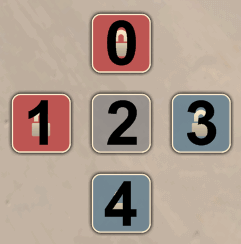
'''From the Hammer editor:''' Cap Layout, A string that tells the HUD how to lay out the cap points. It should be a string with indexes of cap points | [[Image:tf2_cpl_guide_00.png]] | ||
'''From the Hammer editor:''' Cap Layout, A string that tells the HUD how to lay out the cap points. It should be a string with indexes of cap points separated by commas to denote a new line. So <2,0 1> would create a pyramid, with cap point 2 on the top and cap points 0 & 1 on the bottom. | |||
{{Note|Do not include the "<" and ">" characters in the cap layout box, they are only listed above to mark off the beginning and end of the index string.}} | {{Note|Do not include the "<" and ">" characters in the cap layout box, they are only listed above to mark off the beginning and end of the index string.}} | ||
| Line 5: | Line 7: | ||
The cap layout value in the [[team_control_point_master]] entity does not change anything except the layout of the control points on the HUD. | The cap layout value in the [[team_control_point_master]] entity does not change anything except the layout of the control points on the HUD. | ||
==General guidelines== | |||
For the three cap layout examples below, assume the [[team_control_point]] entities in your map had these index settings: | For the three cap layout examples below, assume the [[team_control_point]] entities in your map had these index settings: | ||
:{| | :{| | ||
| Line 14: | Line 15: | ||
1 = Neutral Center Control Point | 1 = Neutral Center Control Point | ||
2 = Blue's Final Control Point | 2 = Blue's Final Control Point | ||
| | | | ||
|} | |} | ||
| Line 44: | Line 45: | ||
{{clr}} | {{clr}} | ||
== More examples == | ==More examples== | ||
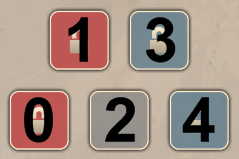
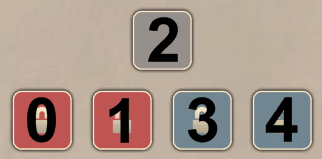
:{| Border="1" | :{| Border="1" | ||
! Cap layout setting | ! Cap layout setting | ||
! In-game | ! In-game appearance | ||
|- | |- | ||
|align=center valign=top | | |align=center valign=top | | ||
Revision as of 21:38, 28 October 2008
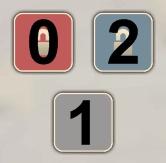
From the Hammer editor: Cap Layout, A string that tells the HUD how to lay out the cap points. It should be a string with indexes of cap points separated by commas to denote a new line. So <2,0 1> would create a pyramid, with cap point 2 on the top and cap points 0 & 1 on the bottom.
The cap layout value in the team_control_point_master entity does not change anything except the layout of the control points on the HUD.
General guidelines
For the three cap layout examples below, assume the team_control_point entities in your map had these index settings:
0 = Red's Final Control Point
1 = Neutral Center Control Point
2 = Blue's Final Control Point
- By leaving the cap layout box blank, the control points will be laid out on the HUD in a line from left to right by order of their assigned index values from least to greatest. With a blank cap layout the HUD would be look like this in-game
- You can rearrange the order in the HUD by simply by altering then index values in the cap layout box.
Using: 2 0 1
for your cap layout box would give you this instead of the above:
- The control points can also be arranged with a vertical layout in the HUD by separating the index values with commas; all values to the right of the comma would lie underneath the values to the left of the comma.
Something like 0,1,2
would give you this in-game:
