De/Applying Textures: Difference between revisions
Innocentive (talk | contribs) m (→Anbrindung der Textur: typo) |
Innocentive (talk | contribs) m (→Anbrindung der Textur: typo subtitle) |
||
| Line 31: | Line 31: | ||
[[File:Devbrowser.PNG|frame|none|Auswahl der Textur <code>dev_measurewall1101a</code>]] | [[File:Devbrowser.PNG|frame|none|Auswahl der Textur <code>dev_measurewall1101a</code>]] | ||
== | == Anbringung der Textur == | ||
Nach der Auswahl einer Textur, muss diese an einem Brush angebracht werden. | Nach der Auswahl einer Textur, muss diese an einem Brush angebracht werden. | ||
Revision as of 02:54, 8 February 2013
In diesem Abschnitt werden die Wände, der Fußboden und die Decke des soeben erstellten Raumes mit Texturen versehen.
Der Texturenbrowser
Der Texturenbrowser (Texture Browser) dient der Auswahl von Texturen (bzw. genauer: Materialien), die an den Brushes angebracht werden sollen. Die aktive Textur wird im Texturen-Werkzeugkasten rechts von den Sichtfenstern angezeigt.
Um den Texturenbrowser zu öffnen, klicke auf die Browse...-Schaltfläche im Texturen-Werkzeugkasten.

- Vorschaugröße
- Um das Durchsuchen der Texturen zu erleichtern, kann die Größe der Vorschaubilder im Texturenbrowser verändert werden: in der unteren linken Ecke befindet sich ein Auswahlmenü namens Size (Größe). Stelle die Größe auf "128×128" ein, sodass mehr Vorschaubilder auf den Bildschirm passen.
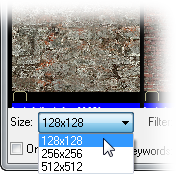 Ändern der Vorschaugröße.
- Das Filtern der Gallerie
- In den meisten Spielen beherbergt der Texturenbrowser Tausende Gegenstände. Es wäre äußerst problematisch, die gewünschte Textur zu finden, wenn es keine Filterfunktion gäbe. Diese Funktion ermöglicht es, nach Bestandteilen der Dateinamen zu suchen. Man kann Leerzeichen verwenden, um anhand mehrerer Begriffe zu filtern, beispielsweise "concrete wall", "plaster ceiling" oder "metal door" (selbstverständlich ohne die Anführungszeichen).
- Um wieder alle Texturen anzuzeigen, lösche einfach den Filtertext.
- Dev-Texturen
- Source kommt mit einer Gruppe von Texturen, die speziell dafür entwickelt wurden, die Erstellung von Brushes in Proportion zum Spieler zu erleichtern. Diese Texturen nennt man Dev-Texturen ('dev' für development = Entwicklung). Sie können einfach gefunden werden, wenn man anhand "dev" filtert.
- Finde die Textur
dev/dev_measurewall01aund wähle sie mittels Doppelklick aus.


dev_measurewall1101aAnbringung der Textur
Nach der Auswahl einer Textur, muss diese an einem Brush angebracht werden.
- Aktiviere des Auswahlwerkzeug
 .
. - Wähle die zu texturierende Wand aus, indem du im 3D-Sichtfenster auf sie klickst. Wenn beim Klicken auf eine Wand der gesamte Raum ausgewählt wird, sollte die Select-Einstellung (Auswahl) im Auswahlart-Werkzeugkasten in der oberen rechten Ecke von Hammer von Groups (Gruppen) zu Objects (Objekte) geändert werden. Alternativ können die gruppierten Wandbrushes entgruppiert werden.
- Klicke auf die Ausgewählte Textur anbringen-Schaltfläche
 der Werkzeugleiste, um die ausgewählte Textur auf allen Seiten des ausgewählten Brushes aufzutragen.

Adjusting textures
A newly-applied texture may not fit properly on a brush. Using the Toggle Texture Application tool ![]() , you can adjust it so that it does.
, you can adjust it so that it does.
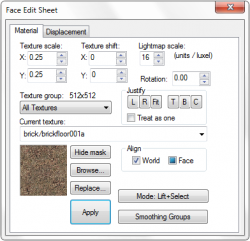
Because the dimensions of our wall are both powers of two (1024 and 512), every texture will fit evenly. However, we can still see some changes by altering the settings in the Face Edit Dialog. that has appeared:
- Texture Scale
- Adjusts the size of the texture. A value of “1” maps one texture pixel onto one unit. Negative numbers mirror the texture.
- Texture Shift
- Moves the texture along the X or Y axis. Positive numbers move the texture left (X axis) and down (Y axis). Negative numbers move the texture right (X axis) and up (Y axis).
- Current Texture
- Changes the applied texture on the surface.
 Tipp:With the face edit sheet open you can right-click on any surface to apply the current texture to it. More details here.
 - Lightmap Scale
- Affects how light effects apply to the surface. Smaller numbers are higher resolution and produce more expensive lighting effects. Larger numbers are lower resolution and produce cheaper lighting effects. See also Lightmap.
- Rotation
- Rotates the texture on the brush face.
- Justify
- Snaps the texture’s position to a specified position on the wall. Left, Right, Top, Bottom and Center. Finally, “Fit” squashes the entire texture onto the surface.
- Checking the “Treat as one” box will make Hammer consider all selected faces as one continuous item. This is useful when fitting a texture across multiple surfaces.
- Align
- Specifies how the texture is projected onto the face. World alignment applies textures along the global x, y, or z axis. Face alignment applies the texture directly onto the face no matter which way it faces.
- Mode
- Allows you to select what will happen when you click on a brush face with the left mouse button.
Apply the same texture to the remaining three walls, and using the same process apply a dev texture to the ceiling and the floor.