Screen (Portal 2): Difference between revisions
(→Step 5) |
No edit summary |
||
| Line 6: | Line 6: | ||
Monitors are made by making a [[func_monitor]] and a [[point_camera]]. | Monitors are made by making a [[func_monitor]] and a [[point_camera]]. | ||
==Step 1== | ==Step 1: Entities== | ||
Make an entity (See [[Creating_a_brush_entity]] for help). Change the entity into the [[func_monitor]] class. Name the entity monitor1. | Make an entity (See [[Creating_a_brush_entity]] for help). Change the entity into the [[func_monitor]] class. Name the entity monitor1. | ||
==Step 2== | ==Step 2: Point Camera== | ||
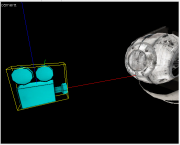
[[File:Pointcam.png|thumb|right|180px|point_camera used to show wheatley's monitor]] | [[File:Pointcam.png|thumb|right|180px|point_camera used to show wheatley's monitor]] | ||
Make a [[point_camera]] with the name monitor_camera. | Make a [[point_camera]] with the name monitor_camera. | ||
It should look like this when you put it in your map. Make sure it is in the right position so the monitor will show clearly the thing you want to be showed up in the func_monitor | It should look like this when you put it in your map. Make sure it is in the right position so the monitor will show clearly the thing you want to be showed up in the func_monitor | ||
==Step 3== | ==Step 3: Monitors' Properties== | ||
Go to the [[func_monitor]]’s properties and set camera name to: '''monitor_camera'''. | Go to the [[func_monitor]]’s properties and set camera name to: '''monitor_camera'''. | ||
==Step 4== | ==Step 4: Triggers== | ||
Connect the camera and the monitor to a trigger and set the trigger’s output to: | Connect the camera and the monitor to a [[trigger]] and set the trigger’s output to: | ||
::{| class=standard-table | ::{| class=standard-table | ||
| Line 29: | Line 29: | ||
|} | |} | ||
==Step 5== | ==Step 5: Texture== | ||
[[File:Monitor texture.png|thumb|right|140px|The texture that is needed to be used]] | [[File:Monitor texture.png|thumb|right|140px|The texture that is needed to be used]] | ||
Texture the face you want the screen to appear to "dev_tvmonitor1a". You should also click the button "Fit" for a better quality. | Texture the face you want the screen to appear to "dev_tvmonitor1a". You should also click the button "Fit" for a better quality. | ||
==Step 6: Making the "studio"== | |||
Make a 416x716x544 block and right click on the 2D view of it and press "hollow". Write in the box "32" and click OK. You should texture it with a black texture. | |||
==Step 7: Adding/Controlling Wheatley== | |||
Many people don't know how to work with scripts and with npcs. So the best way to make wheatley is a [[prop_dynamic]]. The model should be "glados_wheatley_boss_screen.mdl" and name it "wheatley". Put it in the black room. After that you can use triggers and connect it with the model so you can use his animations. For Example: | |||
::{| class=standard-table | |||
! || My Output || Target Entity || Target Input || Parameter || Delay || Only Once | |||
|- | |||
| [[Image:Io11.png]] || OnTrigger || wheatley || SetAnimation || 03_lowDefenseFire || 0.00 || No | |||
|} | |||
[[Category:Portal 2 Level Design]] | [[Category:Portal 2 Level Design]] | ||
Revision as of 07:30, 19 July 2012
Monitors are easy to make and they make the map more living.
Creating
Monitors are made by making a func_monitor and a point_camera.
Step 1: Entities
Make an entity (See Creating_a_brush_entity for help). Change the entity into the func_monitor class. Name the entity monitor1.
Step 2: Point Camera
Make a point_camera with the name monitor_camera. It should look like this when you put it in your map. Make sure it is in the right position so the monitor will show clearly the thing you want to be showed up in the func_monitor
Step 3: Monitors' Properties
Go to the func_monitor’s properties and set camera name to: monitor_camera.
Step 4: Triggers
Connect the camera and the monitor to a trigger and set the trigger’s output to:
Step 5: Texture
Texture the face you want the screen to appear to "dev_tvmonitor1a". You should also click the button "Fit" for a better quality.
Step 6: Making the "studio"
Make a 416x716x544 block and right click on the 2D view of it and press "hollow". Write in the box "32" and click OK. You should texture it with a black texture.
Step 7: Adding/Controlling Wheatley
Many people don't know how to work with scripts and with npcs. So the best way to make wheatley is a prop_dynamic. The model should be "glados_wheatley_boss_screen.mdl" and name it "wheatley". Put it in the black room. After that you can use triggers and connect it with the model so you can use his animations. For Example:

