Dark Messiah: Breakable Shelves: Difference between revisions
m (Added final picture) |
(cleanup) |
||
| Line 1: | Line 1: | ||
[[Image:DMMaMBreakableShelf.jpg|thumb|300px|right]] | [[Image:DMMaMBreakableShelf.jpg|thumb|300px|right]] | ||
An excellent gameplay tool, breakable shelves add a lot of immersion to any level. Though they are not necessarily difficult to produce, it does take many steps. | {{Dm}} An excellent gameplay tool in [[Dark Messiah]], breakable shelves add a lot of immersion to any level. Though they are not necessarily difficult to produce, it does take many steps. | ||
{{clr}} | {{clr}} | ||
== Creating your shelf == | == Creating your shelf == | ||
| Line 10: | Line 10: | ||
=== Making supports === | === Making supports === | ||
[[Image:DMMAMBreakShelfC.jpg|thumb|250px|right| The func_breakable's values.]] | [[Image:DMMAMBreakShelfC.jpg|thumb|250px|right| The func_breakable's values.]] | ||
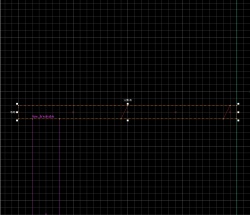
The support beams (the ones the player will kick to break) are a good place to start. Make one support, 16 by 16 in length and width, then 122 in height. Afterwards, select the beam and press | The support beams (the ones the player will kick to break) are a good place to start. Make one support, 16 by 16 in length and width, then 122 in height. Afterwards, select the beam and press {{key|Ctrl|T}}, then select "[[func_breakable]]" as the class. | ||
Change these values: | Change these values: | ||
| Line 21: | Line 21: | ||
{{clr}} | {{clr}} | ||
[[Image:DMMaMBreakShelfB.jpg|thumb|250px|right| Two 16x16x112 func_breakable beams.]] | [[Image:DMMaMBreakShelfB.jpg|thumb|250px|right| Two 16x16x112 func_breakable beams.]] | ||
Shift+click and drag the support to another spot to create a duplicate. For now, place the two pillars 144 units apart, and 104 units away from the wall, and make sure they both have the same name value. | {{key|Shift}}+click and drag the support to another spot to create a duplicate. For now, place the two pillars 144 units apart, and 104 units away from the wall, and make sure they both have the same name value. | ||
{{clr}} | {{clr}} | ||
=== Starting the shelf === | === Starting the shelf === | ||
[[Image:DMMaMBreakShelfD.jpg|thumb|250px|right| Two 16x128x8 beams.]] | [[Image:DMMaMBreakShelfD.jpg|thumb|250px|right| Two 16x128x8 beams.]] | ||
Create two new beams, 8 units tall, 16 units wide, and 128 units long, then | Create two new beams, 8 units tall, 16 units wide, and 128 units long, then {{key|Shift}}+click and create a second. | ||
{{note|Do not make these beams func_breakables!}} | {{note|Do not make these beams func_breakables!}} | ||
{{clr}} | {{clr}} | ||
| Line 32: | Line 32: | ||
{{clr}} | {{clr}} | ||
[[Image:DMMaMBreakShelfF.jpg|thumb|250px|right| Both upper planks clipped.]] | [[Image:DMMaMBreakShelfF.jpg|thumb|250px|right| Both upper planks clipped.]] | ||
Finally, select the two small pieces closest to the wall, and press | Finally, select the two small pieces closest to the wall, and press {{key|Ctrl|T}} to make them func_details. | ||
{{clr}} | {{clr}} | ||
=== Creating the platform === | === Creating the platform === | ||
| Line 42: | Line 42: | ||
{{clr}} | {{clr}} | ||
[[Image:DMMaMBreakShelfI.jpg|thumb|250px|right| The two func_physboxes.]] | [[Image:DMMaMBreakShelfI.jpg|thumb|250px|right| The two func_physboxes.]] | ||
Once the NPCClip is in place, select the two planks and NPCClip piece closest to the wall, as well as the middle two sections of the upper beam, then press | Once the NPCClip is in place, select the two planks and NPCClip piece closest to the wall, as well as the middle two sections of the upper beam, then press {{key|Ctrl|T}}. Change the entity's class to "[[func_physbox]]". | ||
{{clr}} | {{clr}} | ||
[[Image:DMMaMBreakShelfJ.jpg|thumb|250px|right| Func_physbox flags.]] | [[Image:DMMaMBreakShelfJ.jpg|thumb|250px|right| Func_physbox flags.]] | ||
| Line 53: | Line 53: | ||
=== Adding hinges === | === Adding hinges === | ||
[[Image:DMMaMBreakShelfK.jpg|thumb|250px|right| Phys_hinges.]] | [[Image:DMMaMBreakShelfK.jpg|thumb|250px|right| Phys_hinges.]] | ||
Create two | Create two [[phys_hinge]]s, and name them "platform_hinge_a" and "platform_hinge_b." Align them on opposite sides, bottom center on the func_details. | ||
:*Set the "Entity 1" value on both hinges to "platform_rear" | :*Set the "Entity 1" value on both hinges to "platform_rear" | ||
This will keep the back part of the shelf attached to the wall. The basic shelf is now complete, but we still need objects on top, NPC compatibility, and the logic to make it work. | This will keep the back part of the shelf attached to the wall. The basic shelf is now complete, but we still need objects on top, [[NPC]] compatibility, and the logic to make it work. | ||
{{clr}} | {{clr}} | ||
== Physics Objects == | == Physics Objects == | ||
| Line 65: | Line 65: | ||
[[Image:DMMaMBreakShelfM.jpg|thumb|250px|right| The env_physexplosions.]] | [[Image:DMMaMBreakShelfM.jpg|thumb|250px|right| The env_physexplosions.]] | ||
{{note|Even if you do not need props on your shelf, these env_physexplosions are necessary in order for the shelves to fall properly!}} | {{note|Even if you do not need props on your shelf, these env_physexplosions are necessary in order for the shelves to fall properly!}} | ||
Create an "env_physexplosion" entity and name it "platform_explosion" | Create an "[[env_physexplosion]]" entity and name it "platform_explosion" | ||
:* Change the magnitude value to 40. | :* Change the magnitude value to 40. | ||
Now | Now {{key|Shift}}+click and create as many duplicates as needed, then place them in locations relevant to your props (or just above the shelf). | ||
{{clr}} | {{clr}} | ||
== NPC compatibility == | == NPC compatibility == | ||
=== Link controllers === | === Link controllers === | ||
[[Image:DMMaMBreakShelfN.jpg|thumb|250px|right| The link_controllers.]] | [[Image:DMMaMBreakShelfN.jpg|thumb|250px|right| The link_controllers.]] | ||
In order to keep NPC's away from the sides of the shelf before it collapses, two link controllers are needed. Start by placing an "info_node_mm_link_controller" entity. Name it "platform_link_controller" | In order to keep NPC's away from the sides of the shelf before it collapses, two link controllers are needed. Start by placing an "[[info_node_mm_link_controller]]" [[entity]]. Name it "platform_link_controller" | ||
:*Change the "Mins" value to -16 -64 -64 | :*Change the "Mins" value to -16 -64 -64 | ||
:*Change the "Maxs" value to 16 64 64 | :*Change the "Maxs" value to 16 64 64 | ||
| Line 79: | Line 79: | ||
=== Ragdoll trigger === | === Ragdoll trigger === | ||
[[Image:DMMaMBreakShelfO.jpg|thumb|250px|right| Ragdoll trigger.]] | [[Image:DMMaMBreakShelfO.jpg|thumb|250px|right| Ragdoll trigger.]] | ||
To make sure | To make sure NPCs underneath the falling shelf become ragdoll, a trigger is needed. Create a brush with the "tools/toolstrigger" roughly covers the area beneath the "platform_front" physbox. Select this brush and press {{key|Ctrl|T}}, then change its class to "[[trigger_multiple]]" | ||
:*Name the trigger "platform_ragdoll" | :*Name the trigger "platform_ragdoll" | ||
:*Set "Start Disabled" to yes | :*Set "Start Disabled" to yes | ||
| Line 86: | Line 86: | ||
{{clr}} | {{clr}} | ||
=== Filter === | === Filter === | ||
Pick any spot nearby and create a "filter_activator_name" | Pick any spot nearby and create a "[[filter_activator_name]]" | ||
:*Name it "platform_filtername" | :*Name it "platform_filtername" | ||
:*Set the "Filter Name" value as "platform_rear" | :*Set the "Filter Name" value as "platform_rear" | ||
| Line 92: | Line 92: | ||
== Bringing it all together == | == Bringing it all together == | ||
=== Setup the logic_relay === | === Setup the logic_relay === | ||
Once again, pick any nearby spot and create a "logic_relay" entity. | Once again, pick any nearby spot and create a "[[logic_relay]]" entity. | ||
:*Name the entity "platform_relay" | :*Name the entity "platform_relay" | ||
:*Check the flag "Only trigger once" | :*Check the flag "Only trigger once" | ||
| Line 99: | Line 99: | ||
[[Image:DMMaMBreakShelfQ.jpg|thumb|250px|right| Output for both "platform_support" beams]] | [[Image:DMMaMBreakShelfQ.jpg|thumb|250px|right| Output for both "platform_support" beams]] | ||
For both of the two "func_brekable" beams: | For both of the two "func_brekable" beams: | ||
*:In the outputs tab, add a new output named "OnBreak", that targets entities name "platform_relay", via the input "Trigger" | *:In the outputs tab, add a new [[output]] named "OnBreak", that targets entities name "platform_relay", via the input "Trigger" | ||
{{clr}} | {{clr}} | ||
=== Big step: Outputs for the relay === | === Big step: Outputs for the relay === | ||
| Line 115: | Line 115: | ||
{{clr}} | {{clr}} | ||
=== Optional: Add sound === | === Optional: Add sound === | ||
Create an "ambient_generic" entity near the front of the shelf and name it "platform_sound" | Create an "[[ambient_generic]]" entity near the front of the shelf and name it "platform_sound" | ||
:*Set the "Sound Name" value to "Wood.Crash" | :*Set the "Sound Name" value to "Wood.Crash" | ||
:*Check the flags "Start Silent" and "Is NOT Looped" | :*Check the flags "Start Silent" and "Is NOT Looped" | ||
| Line 123: | Line 123: | ||
== In conclusion! == | == In conclusion! == | ||
[[Image:DMMaMBreakShelfS.jpg|thumb|350px|right| Finished result!]] | [[Image:DMMaMBreakShelfS.jpg|thumb|350px|right| Finished result!]] | ||
Now just add an info_player_start and test it out! | Now just add an [[info_player_start]] and test it out! | ||
{{note|Remember to change all the entity names if you duplicate the shelf!}} | {{note|Remember to change all the entity names if you duplicate the shelf!}} | ||
{{note|Feel free to make changes to all measurements and brushwork, as well as adding more supports or anything you please}} | {{note|Feel free to make changes to all measurements and brushwork, as well as adding more supports or anything you please}} | ||
Revision as of 19:20, 7 March 2011
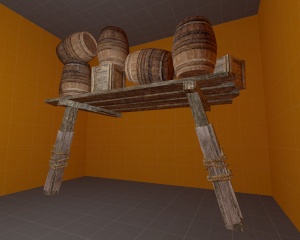
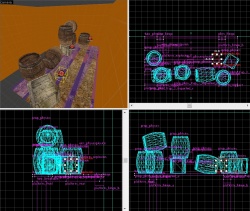
![]() An excellent gameplay tool in Dark Messiah, breakable shelves add a lot of immersion to any level. Though they are not necessarily difficult to produce, it does take many steps.
An excellent gameplay tool in Dark Messiah, breakable shelves add a lot of immersion to any level. Though they are not necessarily difficult to produce, it does take many steps.
Creating your shelf
Setting up
Start off with a good size room, preferably with a floor size of 320 by 320, and a ceiling with a height of 256. Textures and aesthetics are not the pivotal to this tutorial, feel free to use whatever textures or design variations you would like.
Making supports
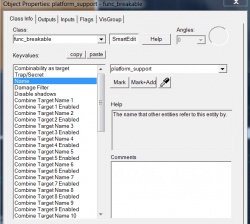
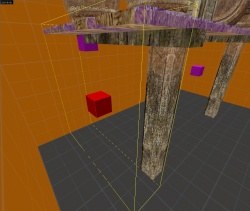
The support beams (the ones the player will kick to break) are a good place to start. Make one support, 16 by 16 in length and width, then 122 in height. Afterwards, select the beam and press Ctrl+T, then select "func_breakable" as the class.
Change these values:
- "Name" should be set as "platform_support"
- "Disable Shadows" should be set to "Yes"
- "Strength" should be set to 1
- "Material Type" should be set to "Wood"
Also, make sure nothing is check under the "Flags" tab. These changes will allow the player to break the support using only one hit in game.
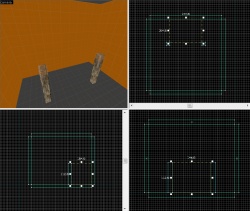
⇧ Shift+click and drag the support to another spot to create a duplicate. For now, place the two pillars 144 units apart, and 104 units away from the wall, and make sure they both have the same name value.
Starting the shelf
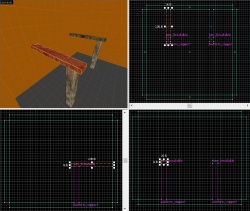
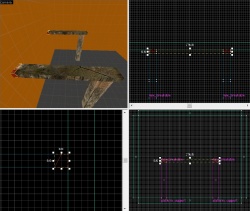
Create two new beams, 8 units tall, 16 units wide, and 128 units long, then ⇧ Shift+click and create a second.
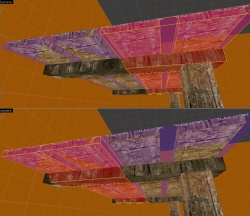
Next up, use the Clipping tool to clip the two upper boards exactly as shown.
Finally, select the two small pieces closest to the wall, and press Ctrl+T to make them func_details.
Creating the platform
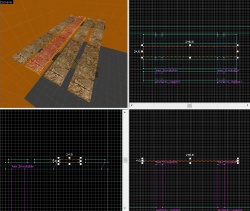
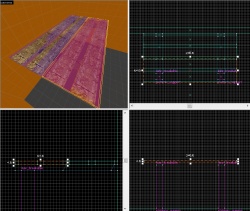
Now, create/duplicate four new planks, each 4 units tall, 24 units wide, and 244 units long. Spread these planks out along the top of the shelf, as shown.
Make 2 brushes the same height and length as the previous planks, with the texture "tools/toolsnpcclip," and adjust their positions and widths so that they each cover half the total surface area of the platform.
Once the NPCClip is in place, select the two planks and NPCClip piece closest to the wall, as well as the middle two sections of the upper beam, then press Ctrl+T. Change the entity's class to "func_physbox".
Change the following flags and values:
- Change the name of the physbox closest to the wall "platform_rear"
- Change the name of the physbox closest to the supports "platform_front"
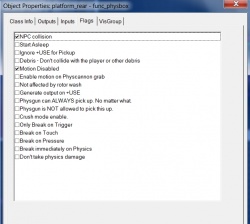
- Change "Material Type" to "Wood", and "Disable Shadows" to "Yes" in both entities
- Check "NPC Collision" and "Motion Disabled" in both entities flag tabs
Adding hinges
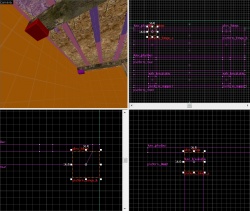
Create two phys_hinges, and name them "platform_hinge_a" and "platform_hinge_b." Align them on opposite sides, bottom center on the func_details.
- Set the "Entity 1" value on both hinges to "platform_rear"
This will keep the back part of the shelf attached to the wall. The basic shelf is now complete, but we still need objects on top, NPC compatibility, and the logic to make it work.
Physics Objects
Add some objects!
This tutorial does not cover the creation of physics props. Once you have created some, place them around the edges of the shelf. Make sure the objects are in a position where they will not fall once affected by gravity.
Adding env_physexplosions
Create an "env_physexplosion" entity and name it "platform_explosion"
- Change the magnitude value to 40.
Now ⇧ Shift+click and create as many duplicates as needed, then place them in locations relevant to your props (or just above the shelf).
NPC compatibility
Link controllers
In order to keep NPC's away from the sides of the shelf before it collapses, two link controllers are needed. Start by placing an "info_node_mm_link_controller" entity. Name it "platform_link_controller"
- Change the "Mins" value to -16 -64 -64
- Change the "Maxs" value to 16 64 64
Now place them at the sides of the shelf such that they block off any pathway through.
Ragdoll trigger
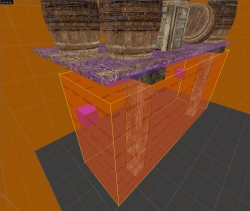
To make sure NPCs underneath the falling shelf become ragdoll, a trigger is needed. Create a brush with the "tools/toolstrigger" roughly covers the area beneath the "platform_front" physbox. Select this brush and press Ctrl+T, then change its class to "trigger_multiple"
- Name the trigger "platform_ragdoll"
- Set "Start Disabled" to yes
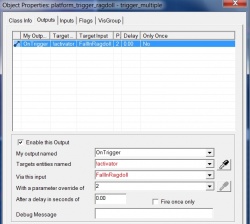
- In the outputs tab, add a new output named "OnTrigger", that targets entities name "!activator", via the input "FallInRagdoll", with a parameter override of 2
Filter
Pick any spot nearby and create a "filter_activator_name"
- Name it "platform_filtername"
- Set the "Filter Name" value as "platform_rear"
Bringing it all together
Setup the logic_relay
Once again, pick any nearby spot and create a "logic_relay" entity.
- Name the entity "platform_relay"
- Check the flag "Only trigger once"
Add outputs to the support beams
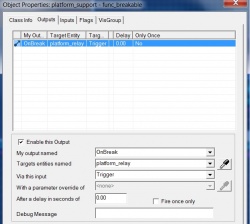
For both of the two "func_brekable" beams:
- In the outputs tab, add a new output named "OnBreak", that targets entities name "platform_relay", via the input "Trigger"
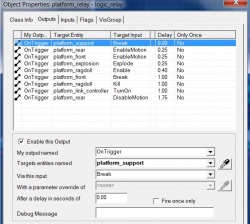
Big step: Outputs for the relay
Go back to "platform_relay" and add all of these outputs:
- Output named "OnTrigger", that targets entities named "platform_support", via the input "Break"
- Output named "OnTrigger", that targets entities named "platform_front", via the input "EnableMotion" with a delay of 0.25
- Output named "OnTrigger", that targets entities named "platform_rear", via the input "EnableMotion" with a delay of 0.25
- Output named "OnTrigger", that targets entities named "platform_explosion", via the input "Explode" with a delay of 0.25
- Output named "OnTrigger", that targets entities named "platform_ragdoll", via the input "Enable" with a delay of 0.40
- Output named "OnTrigger", that targets entities named "platform_front", via the input "Break" with a delay of 1.00
- Output named "OnTrigger", that targets entities named "platform_ragdoll", via the input "Kill" with a delay of 1.00
- Output named "OnTrigger", that targets entities named "platform_link_controller", via the input "TurnOn" with a delay of 1.00
- Output named "OnTrigger", that targets entities named "platform_rear", via the input "DisableMotion" with a delay of 1.75
Optional: Add sound
Create an "ambient_generic" entity near the front of the shelf and name it "platform_sound"
- Set the "Sound Name" value to "Wood.Crash"
- Check the flags "Start Silent" and "Is NOT Looped"
Quickly add this output to the logic_relay:
- Output named "OnTrigger, that targets entities named "platform_sound", via the input "PlaySound with a delay of 0.50
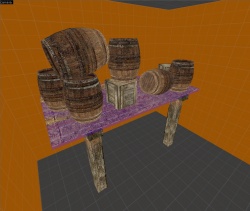
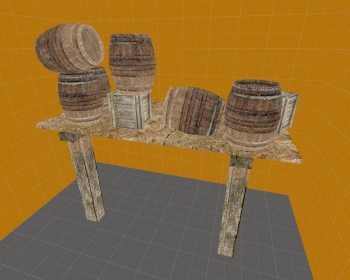
In conclusion!
Now just add an info_player_start and test it out!
