Saving and Compiling: Difference between revisions
mNo edit summary |
(Reformated the article and stuff.) |
||
| Line 2: | Line 2: | ||
{{first room menu}} | {{first room menu}} | ||
The final stage of making a level is saving and compiling it. A map must be compiled to run it in the Source Engine. | The final stage of making a level is saving and compiling it. A map must be compiled to run it in the Source Engine. | ||
<br clear="both" | <br clear="both"> | ||
==Saving | ==Saving the Map== | ||
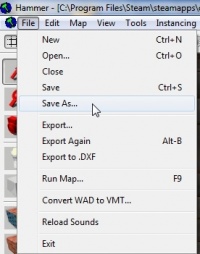
[[Image:hammer_saveas.jpg |thumb|left|200px| Choose ''Save As...'' to save the map.]] | |||
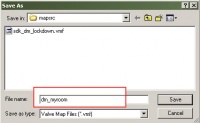
[[Image:hammer_setname.jpg |thumb|right|200px| Type in a name for the map, then Click the Save button.]] | |||
First, let's save this map: | |||
# Click the '''File''' menu. | |||
# As this is your first time saving this map, we will need to give it a name, so choose '''Save As...'''. | |||
# A ''Save As...'' dialog will open. Type the name of your map into the ''File Name'' field, but do not use spaces. ([[Half-Life 2: Deathmatch]] maps should have the <code>dm_</code> prefix before their map names so that they can easily be recognized.) | |||
# Finally click the ''Save'' button to save the map to disk. | |||
The map is saved in the .VMF file format. | |||
<br clear="both"> | |||
==Compiling the Map== | |||
You have saved your map, but before you are able to play it, you will also need to compile it into a run-able format. | |||
When a map is compiled, it is converted from the raw .VMF file that you just saved, into the .BSP format used by the game engine. Its geometry is processed and the proper lighting and shadows are pre-calculated with a couple of compile programs. | |||
<br clear="both"> | |||
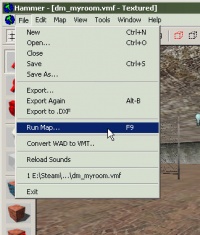
[[Image:hammer_pickrunmap.jpg |thumb|left|200px| Click the '''Run Map''' icon to compile your map.]] | |||
Open the '''File''' menu, and choose '''Run Map...'''. | |||
The '''Run Map''' dialog | The '''Run Map''' dialog will open. | ||
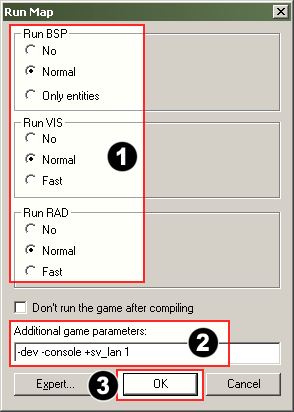
1. Make sure that '''Normal''' is set | [[Image:hammer_setmapparam.gif |thumb|500px| Change the ''Run Map'' parameters to match these settings, then click ''OK''.]] | ||
2. Under | |||
This dialog is used to set some basic compile parameters. | |||
1. Make sure that '''Normal''' is set under the '''Run BSP''', '''Run VIS''', and '''Run RAD''' settings. | |||
2. Under ''Additional game parameters:'', type: | |||
<code>-dev -console +sv_lan 1</code> | <code>-dev -console +sv_lan 1</code> | ||
| Line 41: | Line 49: | ||
3. Now click the '''OK''' button to start the map compile process. | 3. Now click the '''OK''' button to start the map compile process. | ||
<br clear="both"> | |||
The '''Compile Process Window''' will show the progress of the compile. | The '''Compile Process Window''' will show the progress of the compile. | ||
When the compilation is done, | When the compilation is done, the game you are mapping for will automatically launch, and load your map in the engine. | ||
Here's a shot of the compiled map in-game. It isn't much to look at yet, but it has the basic pieces you need to get started making your own maps. | Here's a shot of the compiled map in-game. It isn't much to look at yet, but it has the basic pieces you need to get started making your own maps. | ||
[[Image:hammer_engine.jpg | The final room, compiled and running in the game. Beautiful!]] | [[Image:hammer_engine.jpg | The final room, compiled and running in the game. Beautiful!]] | ||
<br clear="both"> | |||
Revision as of 02:44, 17 February 2006
The final stage of making a level is saving and compiling it. A map must be compiled to run it in the Source Engine.
Saving the Map
First, let's save this map:
- Click the File menu.
- As this is your first time saving this map, we will need to give it a name, so choose Save As....
- A Save As... dialog will open. Type the name of your map into the File Name field, but do not use spaces. (Half-Life 2: Deathmatch maps should have the
dm_prefix before their map names so that they can easily be recognized.) - Finally click the Save button to save the map to disk.
The map is saved in the .VMF file format.
Compiling the Map
You have saved your map, but before you are able to play it, you will also need to compile it into a run-able format.
When a map is compiled, it is converted from the raw .VMF file that you just saved, into the .BSP format used by the game engine. Its geometry is processed and the proper lighting and shadows are pre-calculated with a couple of compile programs.
Open the File menu, and choose Run Map....
The Run Map dialog will open.
This dialog is used to set some basic compile parameters.
1. Make sure that Normal is set under the Run BSP, Run VIS, and Run RAD settings.
2. Under Additional game parameters:, type:
-dev -console +sv_lan 1
See the Source SDK FAQ if you wish to learn more about these settings.
3. Now click the OK button to start the map compile process.
The Compile Process Window will show the progress of the compile.
When the compilation is done, the game you are mapping for will automatically launch, and load your map in the engine.
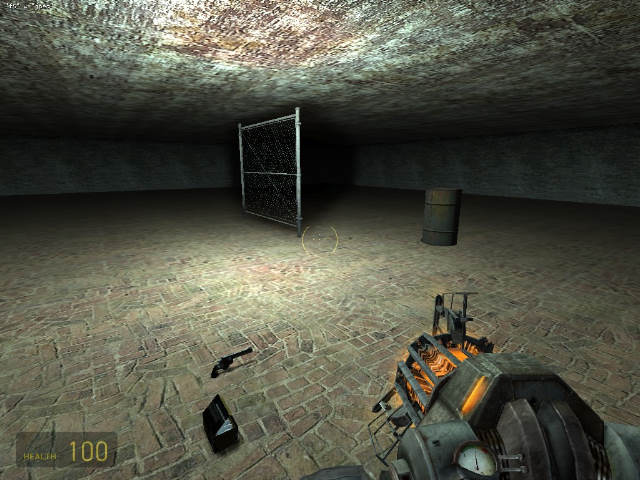
Here's a shot of the compiled map in-game. It isn't much to look at yet, but it has the basic pieces you need to get started making your own maps.
