Env screenoverlay: Difference between revisions
Jump to navigation
Jump to search
 Note:An overlay will be applied to all players in multiplayer games, even when the!activatoris one player. To apply an overlay to a single client, the command
m (→Materials) |
m (tf2 warning) |
||
| Line 3: | Line 3: | ||
{{base point|env_screenoverlay}} It can display and control a set of screen [[overlays]], to be displayed over the player's view. Useful for view effects like drunkenness, or teleporter afterimages, etc. | {{base point|env_screenoverlay}} It can display and control a set of screen [[overlays]], to be displayed over the player's view. Useful for view effects like drunkenness, or teleporter afterimages, etc. | ||
{{note|An overlay will be applied to all players in multiplayer games, even when the {{ent|!activator}} is one player. To apply an overlay to a single client, the command <code>r_screenoverlay <material_path></code> needs to be used with a {{ent|point_clientcommand}}. | {{note|An overlay will be applied to all players in multiplayer games, even when the{{ent|!activator}}is one player. To apply an overlay to a single client, the command <code>r_screenoverlay <material_path></code> needs to be used with a {{ent|point_clientcommand}}. | ||
}} | }} | ||
{{note|In {{portal2}}, screen overlays are disabled by default. You must set <code>r_drawscreenoverlay 1</code> to enable.}} | {{note|In {{portal2}}, screen overlays are disabled by default. You must set <code>r_drawscreenoverlay 1</code> to enable.}} | ||
{{warning|In {{tf2}}, the overlay can gets overriden by certain actions, like being ubered or burned.}} | |||
{{code class|CEnvScreenOverlay|env_screenoverlay.cpp}} | {{code class|CEnvScreenOverlay|env_screenoverlay.cpp}} | ||
Revision as of 13:22, 21 July 2021
Template:Base point It can display and control a set of screen overlays, to be displayed over the player's view. Useful for view effects like drunkenness, or teleporter afterimages, etc.
r_screenoverlay <material_path> needs to be used with a point_clientcommand.
Materials
You can use any material as an overlay, but UnlitGeneric materials are the least likely to have any visual bugs.
Valve provides these materials in the /effects folder:
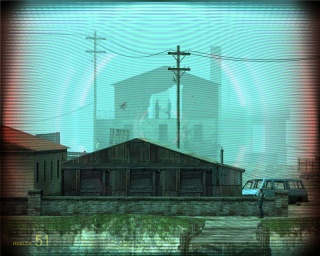
- combine_binocoverlay
- Combine binoculars
- tp_eyefx/tpeye
- Green teleport shimmer
- tp_eyefx/tpeye2
- Red teleport shimmer
- tp_eyefx/tpeye3
- Blue teleport shimmer
- tp_eyefx/tp_eyefx
- Warped distortion, somewhat similar the one seen on strider charge shots.
- tp_eyefx/tp_black
- Black. A thin border around the overlay is still visible.
- tp_eyefx/tp_eyefx_eli
- Flashing animation of three figures. Hardly usable as an overlay.
These materials are not designed as screen overlays, but will work as one:
- debug/yuv
- Monochrome (Black and white)
- effects/com_shield002a.vmt
- The combine shield shader effect - refraction with drifting squares.
- models/effects/portalfunnel_sheet
- Red-yellow-green scrolling ground overlay
- models/props_combine/portalball001_sheet
- Green downward haze
- effects/tp_refract
- Red/Orange Refractive overlay
- glass/glasswindow_refract01
- As if looking through a glass Observation window from Portal
Flags
- 1: Allow Suit Zoom
Keyvalues
- Overlay Name 1 (OverlayName1) ([todo internal name (i)]) to Overlay Name 10 (OverlayName10) <string>
- Name of the first overlay material to display.
- Overlay Duration 1 (OverlayTime1) ([todo internal name (i)]) to Overlay Duration 10 (OverlayTime10) <float>
- Amount of time that the overlay should be displayed for, after which it will begin showing the next overlay. Setting this to -1 will make the entity display the overlay indefinitely, until it's forced to change by an input.
Inputs
- StartOverlays
- Start displaying the first overlay.
- StopOverlays
- Stop displaying any overlays.
- SwitchOverlay <integer>
- Switch to displaying a specific overlay. Pass in the desired overlay number in the parameter. Entering -1 as the value will cause the overlay to display indefinitely.
Outputs
See Also
- Video with some overlays.
