Water (shader): Difference between revisions
No edit summary |
m (→Textures) |
||
| Line 17: | Line 17: | ||
=== Textures === | === Textures === | ||
{{tip|There is no <code>[[$basetexture]]</code> | {{tip|There is no <code>[[$basetexture]]</code> before Portal 2, The surface is a combination of fog colour, animated bump map, and reflection.}} | ||
; <code>$abovewater <[[bool]]></code> | ; <code>$abovewater <[[bool]]></code> | ||
| Line 24: | Line 23: | ||
; <code>$bottommaterial <material></code> | ; <code>$bottommaterial <material></code> | ||
: Required field. This is the material ('''not''' texture) to use when underneath the water’s surface. The bottom material must have <code>$reflecttexture</code> and <code>$abovewater</code> disabled, but can otherwise do whatever it wants. | : Required field. This is the material ('''not''' texture) to use when underneath the water’s surface. The bottom material must have <code>$reflecttexture</code> and <code>$abovewater</code> disabled, but can otherwise do whatever it wants. | ||
; {{p2 add|<code>$bastexture <texture></code>}} | |||
: Used to create the floating debris and goop inside test chambers. | |||
; {{EP2 add|<code>$underwateroverlay <material></code>}} | ; {{EP2 add|<code>$underwateroverlay <material></code>}} | ||
: Applies a screen overlay when the camera is underwater. Generally used with <code>effects\water_warp01</code>. Requires <code>$abovewater</code> to be 0. | : Applies a screen overlay when the camera is underwater. Generally used with <code>effects\water_warp01</code>. Requires <code>$abovewater</code> to be 0. | ||
Revision as of 12:27, 3 May 2014


Water is one of the Source engine's most complex shaders. It creates animated, real-time reflective and refractive, fogged, normal-mapped water.
Special behaviour
- Expensive and cheap
Watermaterials fall into two groups: expensive and cheap. Expensive water reflects and refracts the world in real-time, while cheap water uses an$envmapand does not refract. Users can disable expensive water rendering through their video options, so always place env_cubemaps.- Above and below
Wateractually requires two materials: one for above the surface and one for below. These materials are independent of each other, but of course for proper effect need to correlate in most areas.- Template:L4d2 add
- Water can flow in arbitrary directions. It's very tricky to create a flow map by hand however, and the tool Valve use internally is unreleased.
Shader parameters
Textures
$basetexture before Portal 2, The surface is a combination of fog colour, animated bump map, and reflection.$abovewater <bool>- Whether this material is used for above or below the water’s surface.
$bottommaterial <material>- Required field. This is the material (not texture) to use when underneath the water’s surface. The bottom material must have
$reflecttextureand$abovewaterdisabled, but can otherwise do whatever it wants. - Template:P2 add
- Used to create the floating debris and goop inside test chambers.
- Template:EP2 add
- Applies a screen overlay when the camera is underwater. Generally used with
effects\water_warp01. Requires$abovewaterto be 0. $bumpmap <texture>$normalmap <texture>- A Du/dv map for DirectX 8 rendering (
$bumpmap), and a bump map for DirectX 9 and above ($normalmap). These should be animated unless the water is to be perfectly still.  Note:The
 $normalmapcommand is unique to theWatershader, and uses a normal map. A du/dv map is used for$bumpmapwhen using theWatershader. The$dudvmapcommand is obsolete. Tip:Use
 $bumptransformwith the TextureScroll proxy to move the normal map.- Template:EP2 add
- Template:EP2 add
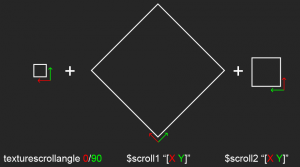
- If
$scroll1is defined and X is not zero, two more instances of the normal map will be drawn in such a way that they are merged together. The first layer is 7x larger and rotated 45°; the second is 2x larger and rotated 90°. The parameters specify the speed and direction that the extra layers will move. (Valve's materials usually contain a third number, but it doesn't have any apparent effect and is most likely obsolete.) $dudvframe <int>$bumpframe <int>- Frame to start the animated du/dv map and bump map on, respectively. Somewhat confusingly,
$bumpframeaffects$normalmap, which should be pointing to a bump map.

Fog
$fogcolor <RGB matrix>- This is the color of the water’s volumetric fog. Generally this value should match the color used in the bottom material.
- Template:L4d2 add
- Allows the fog to receive lightmaps, so that static objects can cast shadows onto the water. Must be enabled when the map is compiled.
$fogenable <bool>- Enable volumetric fog for the water.
$fogend <float>- This is the distance in inches from the eye at which water fog ends.
$fogstart <float>- This is the distance in inches from the eye at which water fog starts.
 Warning:Must be
 0for edge fading to work properly.
Reflection/Refraction
$envmap <env_cubemap / texture>- Provides reflections for cheap water. See
$envmap $forcecheap <bool>- Make this water cheap regardless of the water_lod_control entity's or user's settings. This will disable real-time reflection and instead use
$envmap. Refraction is assumed to be opaquely the water fog color. $forceexpensive <bool>- This forces the water to render itself as expensive, regardless of the map's water_lod_control or the user's settings.
- Template:P2 add
- Makes this water reflect the skybox material in addition to other reflections.
$reflectamount <float>- This is the amount of warp for the reflection. Higher values produce more visible reflections.
$reflectentities <bool>- Make the water reflect entities. By default, no entities are reflected.
$reflecttexture <texture>- Texture to use for reflection. For real-time reflections, use
_rt_WaterReflection. - Tip:Specify
$refracttexturewithout$reflecttextureto get real-time refraction on$envmapreflections. $reflecttint <RGB matrix>- This is the color tint for the real-time reflection and environment map.
$refractamount <float>- This is the amount of warp for the refraction. Higher values produce more warping.
$refracttexture <texture>- Texture to use for refraction. For real-time refractions, use
_rt_WaterRefraction. - Tip:Specify
$refracttexturewithout$reflecttextureto get real-time refraction on$envmapreflections. $refracttint <RGB matrix>- This is the color of the refraction.
- Warning:It is recommended that you set this to white or something close to white so that edge transitions work properly on DX9.
Flow
Template:MatVar Template:MatVar Template:MatVar Template:MatVar Template:MatVar Template:MatVar Template:MatVar Template:MatVar Template:MatVar Template:MatVar
Authoring a flow map

Overall, trying to create a flow map manually is a nightmare. Just working out what colours to paint is hard, and then either it's very difficult to align with the world correctly or you have to worry about seams between brushes. It's just about possible to get flow in a line (fit the water texture to each brush and rotate it to handle curves), but anything complex is out of the question.
But if you do want to give it a try, flow direction is read from the red and green channels of the flow map. 50% tone means no movement.
The texture scale of any faces using a water texture with a flow map appear to have a direct correlation on the flow map. The fewer water faces or planes you use the easier the process of authoring a custom flow map will be (selecting all of your water faces and using 'treat as one' when using the fit scaling may also be an option)
- Red channel
- X axis
- Green channel
- Y axis
- Alpha channel
- In Portal 2, Controls blending between different water materials (water/sludge etc)
You can also use flow field editor from algoholic.eu website : http://algoholic.eu/another-flow-field-editor-update/
There is a guide on how to author Flow Maps (based on the UDK, though) in a similar fashion that they appear to be for Source : https://www.dropbox.com/s/ii2x077vj64lyhl/Water%20Flow%20For%20UDK.pdf
Other
%compilewater <bool>- This is needed to make a map using the material compile properly.
$surfaceprop water- Tells the physics system that the surface is water. See $surfaceprop.
%tooltexture <texture>- Defines the texture Hammer will display in the material browser.
WaterLOD proxy- This connects the water_lod_control entity in a level to the water’s internal parameters. This must be declared in the material for the LOD mechanisms to work properly.
See also
- Adding Water (in Hammer)
- Creating a Waterfall Material
- Making a wall of water
- True reflections under CSS (French)